If you’ve ever struggled with sewing on snaps or struggled to find the right tool, you’re not alone. A snap fastener tool can make your life so much easier, whether you’re fixing clothes, crafting, or working on DIY projects.
But how do you use it correctly to get strong, neat snaps every time? This guide will walk you through simple, step-by-step instructions that anyone can follow. By the end, you’ll feel confident and ready to tackle your next project with ease.
Keep reading to discover the secrets to using a snap fastener tool like a pro!

Credit: www.youtube.com
Choosing The Right Snap Fastener Tool
Choosing the right snap fastener tool is important for a smooth project. The tool must fit your fabric and the type of snaps you use. A good tool makes fastening easier and lasts longer. It helps attach snaps firmly without damaging the material. Understanding different tools and their uses saves time and effort.
Types Of Snap Fastener Tools
Snap fastener tools come in various designs. Handheld pliers are common and easy to use. They work well for small projects and light fabrics. Hammer-on tools require a hammer to set snaps. These are good for heavy-duty fabrics like denim or leather. Press machines provide strong pressure and precise placement. They are best for frequent use or professional work. Each tool suits different needs and skill levels.
Selecting Based On Fabric And Project
Fabric type affects tool choice greatly. Thin fabrics need gentle tools like plastic pliers. Thick fabrics need strong tools that can handle pressure. Consider the snap size and material too. Small snaps need delicate tools to avoid damage. Larger snaps require heavier tools for a secure fit. Think about your project’s scale. Quick fixes need simple tools. Larger projects benefit from durable, high-quality tools.

Credit: www.amazon.com
Preparing Materials And Workspace
Preparing your materials and workspace is the first step in using a snap fastener tool effectively. This stage ensures that you have all necessary items ready and a clean, organized area for work. A well-prepared setup helps you work faster and prevents mistakes during installation.
Gathering the right tools and snaps, and arranging a tidy workspace, sets the foundation for a smooth process. Clear space allows better focus and avoids damage to your fabric or tools.
Gathering Snaps And Tools
Start by collecting all snap fasteners you plan to use. Check the type and size to match your project needs. Have extra snaps on hand for practice or mistakes.
Next, gather your snap fastener tool, pliers or press, and any required accessories. Include a hammer if your tool needs it. Keep scissors and fabric markers nearby for adjustments.
Setting Up A Clean Work Area
Choose a flat, stable surface with good lighting. A table or desk works well. Remove clutter and unnecessary items from the area.
Lay down a soft cloth or cutting mat to protect your fabric and tools. Ensure the space is free of dust or dirt to avoid stains on your material.
Organize your snaps and tools within easy reach. This reduces interruptions and keeps your workflow steady. A clean workspace supports precise and safe snap installation.
Marking Placement On Fabric
Marking the placement on fabric is a vital step for installing snap fasteners. Accurate marks ensure snaps align perfectly and function smoothly. This step helps avoid mistakes that can ruin your project. Clear marking makes the installation process easier and faster.
Measuring Snap Positions
Start by deciding where the snaps will go. Use a ruler or measuring tape to find the exact spot. Measure carefully from edges or seams for consistency. Mark both sides where the snap parts will meet. Double-check your measurements before moving on. Proper measuring keeps snaps straight and even.
Using Fabric Markers Or Chalk
Choose a fabric marker or tailor’s chalk that shows well on your fabric. Test the marker on a scrap piece first to see if it washes out. Make small, clear marks on the fabric where snaps will be placed. Avoid large or dark marks that may be hard to remove. These temporary marks guide you during snap installation.

Credit: thehabygoddess.blogspot.com
Attaching Snap Components
Attaching snap components is a key step in using a snap fastener tool. It ensures the snaps hold fabric or material firmly. Proper placement of each part makes the snap strong and functional.
Careful alignment is necessary to avoid damage and to make sure the snap works smoothly. Follow these steps to attach the snaps correctly.
Positioning The Cap And Socket
Start by placing the cap on the front side of your fabric. The cap is the visible part of the snap.
Next, position the socket on the back side of the fabric, directly behind the cap. The socket has small prongs that go through the fabric.
Use the snap fastener tool to press the cap and socket together firmly. This action secures the cap in place and bends the prongs to hold tightly.
Aligning The Stud And Post
Turn the fabric over to the other side where you want the snap to close. Place the post on the front side of the fabric here.
Then, position the stud on the back side, lining it up directly behind the post. The stud fits into the socket to close the snap.
Press the snap fastener tool over the stud and post. Squeeze firmly to lock these two parts together.
Check the snap by opening and closing it. It should feel secure without being hard to pull apart.
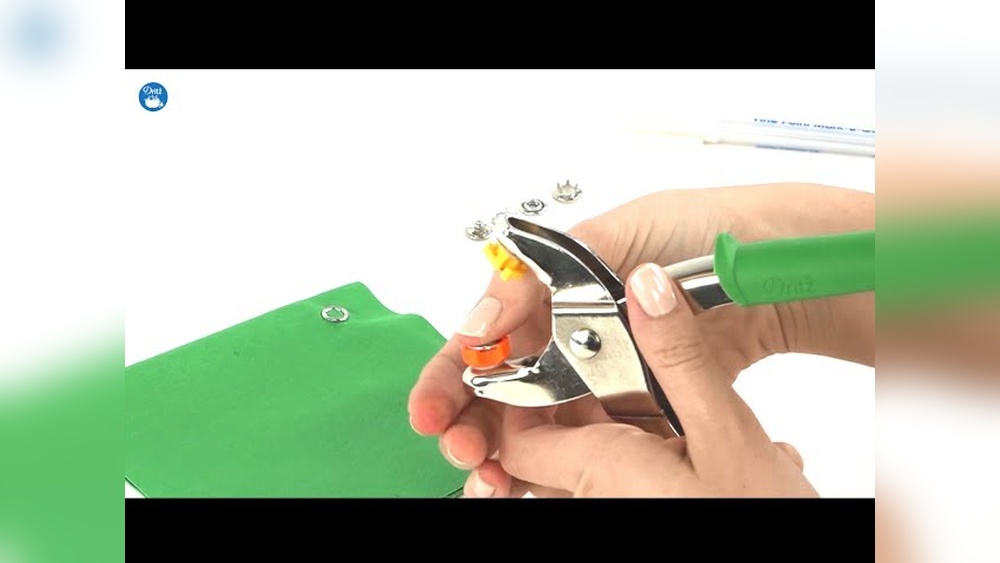
Using The Snap Fastener Tool
Using the snap fastener tool is simple and fast. It helps attach snaps to fabric or other materials securely. This tool works well for clothes, bags, and crafts. Learning to use it properly will make your projects look neat and last longer.
Securing Snaps With Pliers
Hold the fabric firmly between the snap parts. Place the snap fastener tool over the snap. Align the tool so it matches the snap’s shape. Squeeze the pliers slowly to press the snap together. Check if the snap is tight and does not move. Repeat for each snap you want to attach.
Applying Pressure Correctly
Apply firm but gentle pressure on the pliers. Press too hard, and the snap may break or bend. Press too softly, and the snap will not hold. Keep the pressure steady and even while squeezing. This ensures the snap closes well and stays fixed. Practice on scrap fabric to feel the right force.
Tips For Different Fabrics
Using a snap fastener tool on various fabrics needs care and attention. Fabrics differ in thickness and texture. This affects how snaps hold and how the tool works. Follow these tips to avoid damage and ensure strong snaps on all fabric types.
Handling Delicate Materials
Delicate fabrics like silk or chiffon require gentle handling. Use a thin fabric stabilizer or interfacing to support the snap area. Place a soft cloth under the fabric when pressing snaps to protect it. Avoid strong pressure with the tool. Press slowly and check progress often to prevent tearing or distortion.
Working With Thick Or Heavy Fabrics
Thick fabrics such as denim or canvas need more force to attach snaps securely. Use a heavy-duty snap fastener tool or hammer-on snaps designed for thick materials. Mark snap positions clearly to avoid mistakes. Punch holes carefully to fit the snap prongs through. Press firmly but evenly to secure the snap without bending it.
Troubleshooting Common Issues
Troubleshooting common issues with a snap fastener tool helps avoid frustration. Problems can occur during installation, but most have simple fixes. Understanding these fixes saves time and materials. This section covers how to fix misaligned snaps and deal with loose or stuck fasteners.
Fixing Misaligned Snaps
Misaligned snaps happen when the two parts do not line up correctly. This causes difficulty snapping them together or weak closure. To fix this, remove the snap carefully with pliers. Reposition the snap parts on the fabric, ensuring they face each other straight.
Use the tool slowly and check alignment before applying pressure. Press firmly but evenly to avoid shifting. Confirm both snap halves are centered on the fabric layers. Correct alignment allows snaps to close smoothly and hold well.
Dealing With Loose Or Stuck Fasteners
Loose fasteners do not stay closed and may fall off easily. Stuck fasteners fail to open or close properly. For loose snaps, check if the prongs pierce the fabric fully. If not, reposition and press again to secure them tightly.
Stuck fasteners often occur from bent prongs or excess pressure. Gently pry open the stuck snap with a small tool, like a flathead screwdriver. Straighten any bent parts carefully before reinstalling. Avoid pressing too hard to prevent damage.
Maintaining Your Snap Fastener Tool
Maintaining your snap fastener tool ensures it works smoothly and lasts longer. Regular care keeps the tool ready for every project. Simple steps like cleaning and replacing parts prevent damage. This section guides you through easy maintenance tips for your snap fastener tool.
Cleaning And Storage
After each use, wipe the tool with a dry cloth. Remove any dirt, fabric bits, or residue. Avoid using water as it may cause rust. Store the tool in a dry place, away from moisture. Use a protective case or pouch if available. Keep the tool separate from heavy objects to avoid damage. Regular cleaning prevents build-up that can block tool parts.
Replacing Worn Parts
Check the tool regularly for worn or damaged parts. Look at the jaws and pins for signs of wear. Replace any broken or bent pieces immediately. Use parts recommended by the tool’s manufacturer. Using wrong parts can cause poor snap installation. Proper replacement keeps the tool working efficiently. This step avoids frustration and saves time on projects.
Frequently Asked Questions
How To Put On Snap Fasteners With A Hammer?
Place the snap fastener on fabric with the prong through the hole. Align the socket on top. Hold firmly and tap the snap with a hammer until secure. Repeat for the other side. Ensure snaps align for proper closure.
How To Use Eyelet And Snap Fastener Pliers?
Place the fabric between the pliers’ jaws. Align the eyelet or snap correctly. Squeeze the handles firmly to secure the fastener. Repeat for the other side. Check for a tight fit and adjust if needed.
How To Use A Dritz Snap Fastener Tool?
Place the snap cap’s prong through fabric. Align the socket over the cap. Position the tool’s dish side on top. Squeeze firmly to secure the snap. Repeat for the other snap parts to complete installation.
Which Side Of The Snap Goes On Top?
The cap side of the snap with the smooth dome goes on top. The socket side fits underneath the fabric.
Conclusion
Using a snap fastener tool is simple with practice. Always align the snap parts carefully before pressing. Apply even pressure to secure the fastener tightly. This tool saves time and improves your sewing projects. With patience, your snaps will hold strong and look neat.
Keep your tool clean for best results every time. Try different fabrics to see how the tool works. Snap fasteners add convenience and style to your crafts. Enjoy making your projects easier and more durable today.