Are you ready to give your clothing or craft projects a professional touch? Learning how to attach snap fasteners is easier than you think, and once you master this simple skill, you’ll add convenience and style to your creations.
Whether you’re fixing a jacket, making baby clothes, or creating handmade accessories, snap fasteners provide a secure and neat closure that’s perfect for everyday use. In this guide, you’ll discover clear, step-by-step instructions that anyone can follow—no special tools or experience needed.
Keep reading, and by the end, you’ll feel confident attaching snap fasteners like a pro, making your projects both functional and polished. Let’s get started!

Credit: so-sew-easy.com
Types Of Snap Fasteners
Snap fasteners come in several types, each suited for different materials and uses. Choosing the right type ensures your project stays secure and looks great. Understanding these types helps you pick the best snap for your needs.
Plastic Snaps
Plastic snaps are lightweight and come in many colors. They are perfect for baby clothes and light fabrics. These snaps are easy to attach using simple tools. Plastic snaps do not rust and are safe for children’s wear.
Metal Snaps
Metal snaps are strong and durable. They work well on denim, leather, and heavy fabrics. Metal snaps add a classic look to garments. Attaching them requires special tools for a secure fit.
Sew-on Snaps
Sew-on snaps attach by stitching onto fabric. They are versatile and easy to replace. These snaps suit delicate fabrics that cannot handle pressure tools. Sew-on snaps come in metal or plastic options.
Heavy-duty Snaps
Heavy-duty snaps are made for tough jobs. Use them on outerwear, bags, and upholstery. They hold up under strong tension and frequent use. Heavy-duty snaps need strong tools or machines for attachment.

Credit: www.youtube.com
Tools Needed
Preparing the fabric is the first step to attaching snap fasteners properly. It ensures the snaps hold well and last longer. Good preparation helps prevent fabric damage and makes installation easier.
Follow clear steps to get your fabric ready before adding snaps. This part of the process sets the foundation for a neat, durable finish.
Choosing The Right Fabric
Pick a fabric that matches your project’s needs. Light fabrics like cotton or linen work well for small snaps. Heavy fabrics such as denim or canvas need stronger snaps. Avoid stretchy fabrics as they may pull and distort around snaps.
Thicker fabrics provide better grip for snaps. Thin fabrics may require extra support to hold snaps firmly.
Adding Interfacing For Support
Interfacing adds strength to thin or delicate fabrics. It prevents the fabric from tearing when snaps are attached. Choose a fusible interfacing for easy application. Iron it on the wrong side of the fabric before placing snaps.
Use a lightweight interfacing for light fabrics. Use a heavier one for medium to thick fabrics. This step ensures the snaps stay securely in place over time.
Marking Snap Placement
Mark where you want the snaps clearly. Use tailor’s chalk or a fabric marker that washes out. Mark both sides of the fabric to align the snaps perfectly. Ensure the marks are spaced evenly and match the snap size.
Check alignment by folding the fabric and matching the marks. Correct placement helps the snaps close smoothly and look professional.
Preparing Fabric
Attaching snap fasteners is a simple process that adds a professional touch to your sewing projects. Snap fasteners hold fabric pieces together securely and are easy to open and close. Proper placement and alignment ensure that your snaps function well and last long. Below is a step-by-step guide to attaching snap fasteners using different tools.
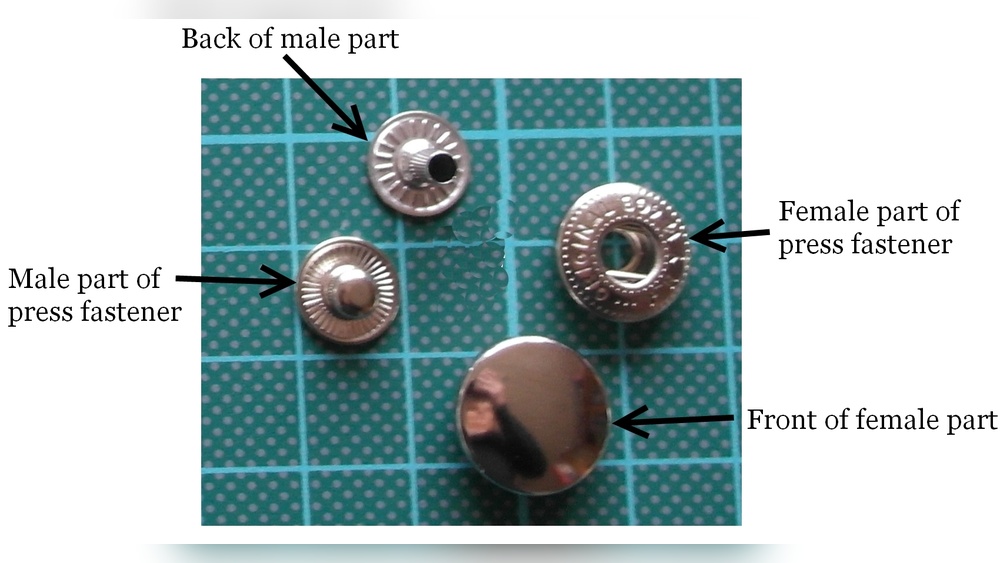
Placing The Female Side
The female side, also called the socket, has a hole in the center. Place this part on the top or right side of your fabric. It will be visible when the snap is closed. Push the post through the fabric carefully without stretching it. Make sure the fabric lies flat beneath the snap.
Placing The Male Side
The male side, known as the stud, has a small protruding post. This piece goes on the bottom or left side of the fabric. Insert the post through the fabric from the wrong side. Keep the fabric smooth and taut to prevent puckering. The stud must align perfectly with the female side.
Aligning Snap Parts
Proper alignment ensures the snap closes securely. Match the female side’s socket with the male side’s stud. Check that both pieces face the right direction. Hold the fabric layers firmly to avoid shifting. Test the snap by pressing the two parts together gently.
Using Snap Pliers
Snap pliers make attaching fasteners quick and easy. Place the female part in the pliers’ bottom jaw. Position the male part in the top jaw. Squeeze the handles firmly but not too hard. The pliers will press the snap parts together. Remove the fabric and check the snap’s hold.
Using Hammer And Anvil
Using a hammer and anvil is a classic method for securing snaps. Place the female side on the anvil’s flat surface. Position the male side on top of the fabric aligned with the female part. Tap the male side gently with a hammer. Apply even, controlled strikes to avoid damage. Inspect the snap to ensure it fits tightly.
Attaching Snap Fasteners
Attaching sew-on snap fasteners can be simple with the right approach. These snaps are perfect for fabrics that can be sewn easily. Proper technique ensures your snaps stay strong and work well. Here are key tips to attach sew-on snaps securely and neatly.
Sewing The Top Piece
Start by placing the top piece of the snap on the fabric’s right side. This piece usually has a hole in the middle. Use a needle and thread that matches your fabric color. Sew carefully around the edges of the snap. Make small, tight stitches to hold it firmly. Avoid sewing through the hole to keep the snap functional. Stitch all the way around at least twice for strength.
Sewing The Bottom Piece
The bottom piece goes on the fabric’s opposite side. It has a small post or stud that fits into the top piece. Place it so it aligns perfectly with the top snap. Use the same thread and needle to sew this part. Stitch around the base of the stud. Keep stitches close and tight to prevent wobbling. Make sure the snap parts line up well for easy closing.
Ensuring Secure Attachment
Check your snaps after sewing for secure attachment. Pull gently to test strength without damaging fabric. If loose, add more stitches around the edges. Avoid large gaps between stitches to keep the snap stable. Trim any excess thread to prevent snagging. Properly sewn snaps will last through many uses and washes.
Tips For Sew-on Snaps
Proper care and maintenance help snap fasteners last longer and work smoothly. Regular attention prevents rust, dirt buildup, and damage. It also keeps snaps looking clean and new. Small steps can make a big difference in performance and appearance.
Cleaning Snap Fasteners
Use a soft cloth to wipe away dirt and dust. For metal snaps, a bit of mild soap and water works well. Avoid soaking snaps in water to prevent rust. Dry snaps completely after cleaning to stop moisture damage. A small brush can clean hard-to-reach spots gently.
Replacing Worn Snaps
Check snaps regularly for signs of wear or damage. Loose or broken snaps should be replaced quickly. Use the right tools to remove old snaps without harming fabric. Attach new snaps firmly to ensure they snap properly. Correct replacement keeps your item functional and neat.
Storage Tips
Store items with snap fasteners in a dry place. Avoid humid areas that can cause rust on metal parts. Keep snaps closed during storage to protect their shape. Use fabric bags or boxes to reduce dust buildup. Proper storage preserves snap fasteners and extends their life.

Credit: blog.closetcorepatterns.com
Frequently Asked Questions
How Do You Install Snap Fasteners?
Place the female snap (socket) on the fabric’s right side. Insert the male snap (stud) on the opposite side. Align both pieces carefully. Use snap pliers or a press to firmly secure them together. Test the snap for a tight, secure fit.
Which Side Of The Snap Goes On Top?
Place the female snap (socket with hole) on the top or right side of the fabric. The male snap (stud) goes on the bottom or left side. This ensures the stud fits securely into the socket for a proper snap closure.
How To Attach Press Studs By Hand?
Mark snap positions on fabric. Align male and female parts on opposite sides. Push post through fabric hole. Use a snap tool or hammer to press firmly. Check snap closes securely. Repeat for all snaps.
How To Put On Snap Fasteners With A Hammer?
Place snap parts aligned on fabric layers. Hold one piece on the fabric. Strike gently with a hammer on the snap setter. Repeat for the other side. Ensure tight, secure fastening without damaging fabric.
Conclusion
Attaching snap fasteners is simple with the right steps. Start by placing each part on the correct fabric side. Make sure to align the male and female pieces carefully. Use tools like snap pliers for a tight fit. Practice on scrap fabric to build confidence.
With patience, your snaps will hold strong and look neat. Keep your project tidy and enjoy the ease of snap closures. Try these tips for smooth, secure fastener attachment every time.