Are you ready to transform your outdoor space with a sleek, clean deck? Installing Trex with hidden fasteners is the secret to achieving a smooth, professional look without visible screws or nails.
But if you’re unsure where to start or worried about making mistakes, this guide is made just for you. You’ll discover simple, step-by-step instructions that make the process easier than you think. Keep reading, and by the end, you’ll have the confidence to install your Trex decking perfectly—giving your yard the upgrade it deserves.
Preparing Your Deck Surface
Preparing your deck surface is a key step before installing Trex with hidden fasteners. It sets the stage for a strong, lasting deck. Proper preparation helps the fasteners work well and keeps the deck safe and stable.
Selecting The Right Materials
Choose quality materials that fit the Trex system. Use pressure-treated wood for the joists and framing. Avoid soft woods that may warp or rot. Pick fasteners made for composite decking. This ensures they hold tight and resist rust. Good materials make the whole project easier and better.
Measuring And Marking The Area
Measure the deck space carefully. Mark the outline and joist locations with chalk or pencil. Check the spacing matches Trex’s instructions. Mark spots for hidden fasteners clearly. Accurate markings guide the installation and prevent mistakes. Take your time and double-check all measurements.
Cleaning And Leveling The Surface
Remove dirt, leaves, and old nails from the deck. Sweep the surface clean to avoid bumps. Check the joists for any loose or damaged boards. Level low spots by sanding or adding shims. A smooth, clean surface helps the fasteners fit tight. This step ensures the deck looks good and stays strong.

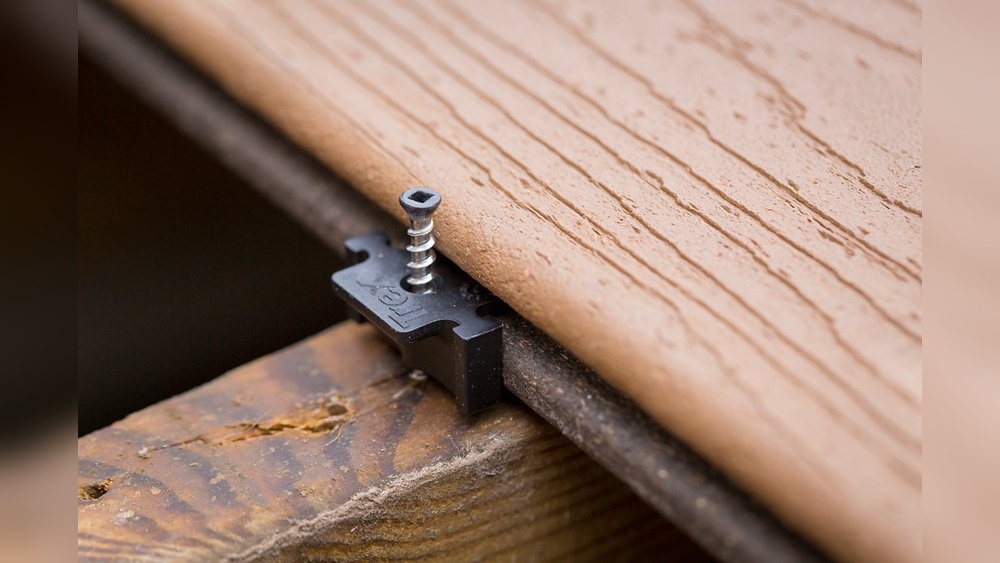
Credit: www.trex.com
Gathering Required Tools
Gathering the right tools is the first step for installing Trex decking with hidden fasteners. Having everything ready saves time and avoids frustration. Use tools designed for decking projects to get the best results. Prepare all materials before starting your installation. This ensures a smooth and efficient process.
Fasteners And Accessories
Hidden fasteners hold the Trex boards securely without visible screws. Choose fasteners made for Trex decking for proper fit and durability. You will need starter clips, deck screws, and spacer wedges. Starter clips attach the first board to the frame. Spacer wedges keep consistent gaps between boards. Use fasteners rated for outdoor use to avoid rust.
Power Tools And Hand Tools
A drill with a driver bit is essential for installing hidden fasteners. A cordless drill offers mobility and ease. A circular saw or miter saw helps cut Trex boards accurately. Use a tape measure and carpenter’s square to check board length and angles. A rubber mallet can help tap boards into place without damage. Keep a pencil handy for marking cuts and holes.
Safety Gear Essentials
Wear safety glasses to protect your eyes from dust and flying debris. Use work gloves to prevent splinters and improve grip. Hearing protection is important when using power tools. A dust mask helps avoid breathing in sawdust. Proper footwear with good traction reduces the risk of slips. Safety gear keeps you safe and comfortable during the job.
Setting Up The Hidden Fasteners
Setting up the hidden fasteners is a key step in installing Trex decking. It ensures the boards stay secure and look clean. Proper setup makes your deck last longer and keeps it safe to walk on.
This part of the installation requires care and precision. Each fastener must be placed in the right spot. Follow these simple steps to get the job done right.
Positioning The Starter Clips
Begin by placing the starter clips along the edge of the deck frame. Space them evenly, about 12 inches apart. These clips hold the first board in place. Make sure they sit flat and line up with the frame.
Aligning The Fasteners Correctly
Next, position the hidden fasteners between the boards. Each fastener fits into the groove of the Trex board. Keep them straight and level. Proper alignment avoids gaps and ensures a tight fit.
Securing Clips To The Deck Frame
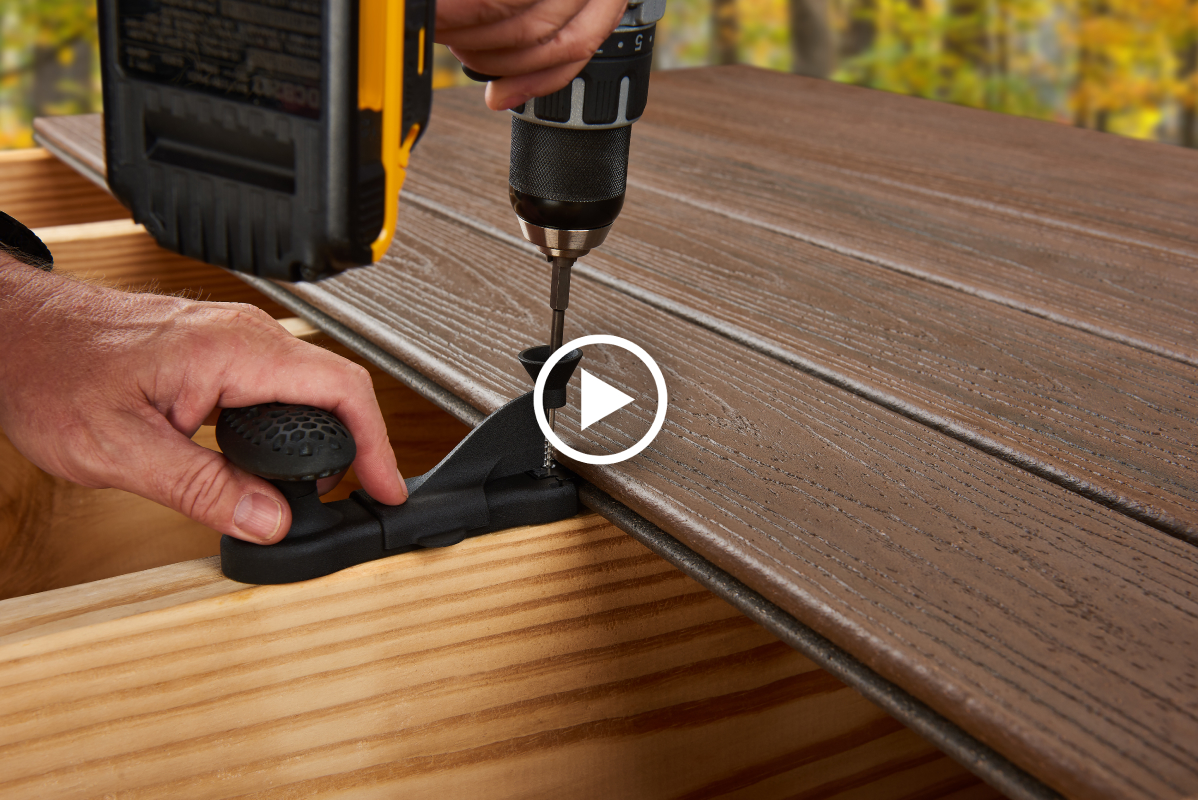
Finally, use screws to attach the clips to the deck frame. Drive the screws firmly, but do not over-tighten. The clips should be snug and stable. This step locks the boards securely in place.

Credit: www.youtube.com
Installing Trex Boards
Installing Trex boards with hidden fasteners creates a clean and smooth deck surface. It hides screws and nails, giving your deck a neat look. This method also helps protect the boards from damage and weather effects. Follow these steps for a simple and strong installation.
Placing The First Board
Start by placing the first Trex board along the edge of your deck frame. Make sure it is straight and aligned well. Secure this board with visible screws or nails to keep it stable. This board acts as a guide for the rest of the installation.
Attaching Boards Using Hidden Fasteners
Use Trex hidden fasteners to attach the next board. Slide the fastener into the groove of the first board. Then, screw it into the frame to hold the board tightly. Repeat this process for each board. Hidden fasteners keep the deck surface smooth and free of visible hardware.
Maintaining Proper Spacing
Leave small gaps between boards for water drainage and wood expansion. Trex recommends spacing of about 1/8 inch. Use spacers or the design of fasteners to keep consistent gaps. Proper spacing prevents warping and helps maintain the deck’s durability.
Finishing Touches
Finishing touches bring your Trex deck installation to life. These final steps ensure your deck looks clean and lasts longer. Small details matter for a smooth, professional finish. Follow these simple tips to complete your project with confidence.
Trimming And Cutting Boards
Cut boards carefully to fit the deck edges. Use a fine-toothed saw for clean cuts. Measure twice, cut once. Smooth any rough edges with sandpaper. Proper trimming keeps the deck looking neat and safe.
Installing Edge Trim And Fascia
Edge trim hides the fasteners and gives a polished look. Attach fascia boards to the deck frame edges. Use screws that match your deck’s color. Make sure the trim fits tightly. This step protects the deck from moisture and insects.
Inspecting And Cleaning The Deck
Check the deck for loose boards or gaps. Tighten any loose screws or fasteners. Sweep the deck to remove dirt and debris. Clean the surface with a mild soap and water. A clean deck stays beautiful and safe for years.
Credit: www.trex.com
Tips For Long-lasting Decks
Building a deck with Trex and hidden fasteners creates a clean look. Keeping this deck strong and beautiful needs some care. Follow simple tips to make your deck last for years.
These tips help protect your investment. They keep your deck safe from weather and wear. Learn easy ways to care for your Trex deck.
Regular Maintenance Practices
Clean your deck often to remove dirt and debris. Use a soft brush and mild soap with water. Avoid harsh chemicals that can damage the surface. Check for loose or damaged boards and fix them quickly. Keep gutters and drains clear to stop water pooling.
Preventing Common Installation Mistakes
Use the right spacing between boards to allow for expansion. Make sure hidden fasteners are properly secured. Avoid over-tightening fasteners to prevent damage. Check the deck frame is level and sturdy. Follow Trex’s installation guidelines closely for best results.
Seasonal Care Recommendations
Clear snow and ice gently to avoid scratching. Remove leaves and debris in autumn to prevent mold. Inspect your deck for damage after storms. Apply a protective finish if recommended by Trex. Store furniture and grills properly to avoid stains and dents.
Frequently Asked Questions
What Tools Are Needed To Install Trex With Hidden Fasteners?
You need a drill, Trex hidden fasteners, screws, a tape measure, and spacers. These tools ensure a smooth, secure installation process.
How Do Hidden Fasteners Improve Trex Deck Appearance?
Hidden fasteners create a clean, fastener-free surface. They prevent visible screws, enhancing the deck’s overall aesthetic and providing a seamless look.
Can I Install Trex Hidden Fasteners On Any Deck Frame?
Hidden fasteners work best on wood or composite joists spaced 16 inches apart. Ensure your frame meets these criteria for proper installation.
How Much Spacing Is Required Between Trex Boards Using Hidden Fasteners?
Maintain a 1/8 inch gap between boards with hidden fasteners. This spacing allows for wood expansion and proper water drainage.
Conclusion
Installing Trex with hidden fasteners makes your deck look clean. Follow the steps carefully for a strong, lasting hold. Use the right tools and materials to avoid problems. Take your time and check each board as you go. This method hides screws for a smooth, neat finish.
Enjoy a beautiful deck that stays secure for years. Keep safety in mind and work with care. Your new deck will be a great place to relax. Simple steps lead to great results.