Have you ever needed to keep your papers together quickly but didn’t have a paper fastener handy? Making your own paper fastener is easier than you think—and it can save you time and hassle.
You’ll learn simple, step-by-step methods to create a strong, reliable paper fastener using things you probably already have. Keep reading, and you’ll discover a clever trick that will make organizing your documents a breeze!

Credit: www.amberdohrenwend.com
Materials Needed
Gathering the right materials is the first step to making a paper fastener. Having what you need on hand makes the process smooth and quick. This section lists the basic supplies and optional tools to help you create a strong and neat fastener.
Basic Supplies
- Paper sheets or cardstock
- Brass fasteners (also called split pins)
- Scissors
- Hole puncher or a sharp tool to make holes
- Ruler
- Pencil or pen
Optional Tools
- Cutting mat for safe cutting
- Bone folder for crisp folds
- Tweezers to handle small parts
- Colored markers to decorate
- Glue stick for extra hold
- Clamp or clips to hold papers together

Credit: www.youtube.com
Choosing The Right Paper
Choosing the right paper is key for making a paper fastener. The paper must hold well and not tear easily. Picking the correct type and thickness helps your fastener work better. It also makes your project look neat and last longer.
Paper Types
Different paper types have different uses. Plain white paper is easy to fold but can tear quickly. Cardstock is thicker and stronger. It holds fasteners firmly. Construction paper offers color and some strength. Choose paper that suits your project needs.
Thickness And Durability
Thickness matters for a paper fastener. Thin paper may rip under pressure. Thick paper or light cardboard gives more durability. The paper should be thick enough to hold the fastener tight. This stops the paper from tearing or bending out of shape.
Cutting The Paper Strips
Cutting the paper strips is an important step in making a paper fastener. The strips need to be the right size and shape. This ensures the fastener works well and looks neat. Careful cutting helps avoid waste and keeps the project tidy.
Measuring Dimensions
Measure the paper carefully before cutting. Use a ruler to get exact lengths and widths. Mark the paper lightly with a pencil. This helps you cut straight lines. Common sizes for fastener strips are about 1 inch wide and 4 inches long. Adjust sizes to fit your project needs.
Straight Cutting Tips
Use sharp scissors or a craft knife for clean cuts. Cut slowly and follow the pencil lines. Keep the paper flat on a surface while cutting. Avoid jagged edges by cutting in one smooth motion. Check each strip after cutting to make sure it is even and straight.
Folding Techniques
Folding techniques are key to making a strong paper fastener. The way you fold affects its hold and shape. Simple folds create prongs that grip papers well. Careful folding forms a neat head that keeps papers secure. Follow these steps to fold your fastener correctly.
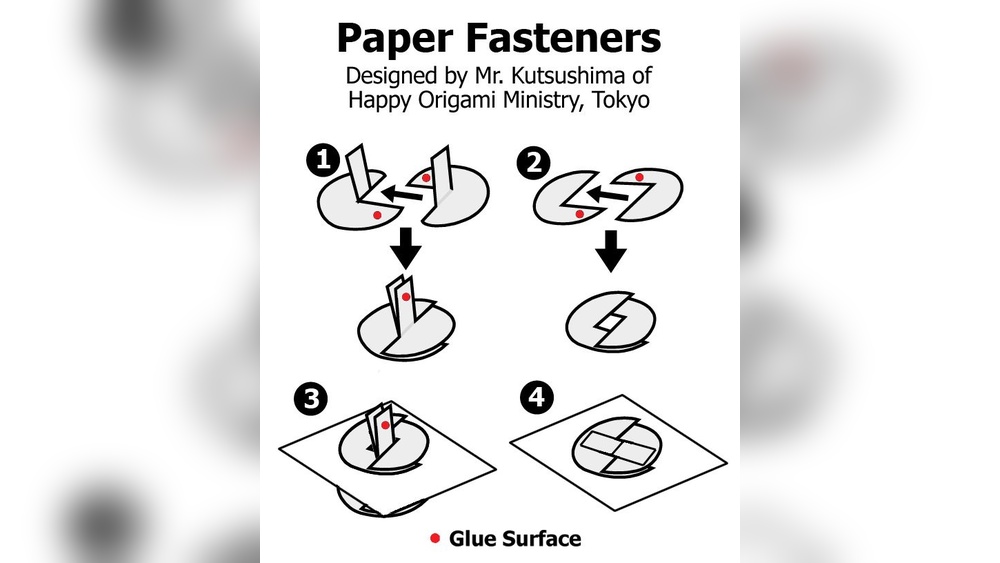
Creating The Prongs
Start by folding the paper strip in half lengthwise. Make a sharp crease to keep the fold firm. Next, unfold the strip and fold each edge toward the center crease. These folds form the prongs that hold papers tightly. Cut small slits at the folded edges to help the prongs bend easily. Fold the prongs outward to prepare for insertion through papers.
Making The Head
Take a small square of paper for the fastener’s head. Fold it in half diagonally to form a triangle. Press the fold firmly to keep it sharp. Place the triangle over the prongs’ ends. Fold the triangle’s corners around the prongs to lock them in place. Press the head flat to finish the fastener securely.
Assembling The Fastener
Assembling the paper fastener is a key step. It brings all parts together to create a strong hold. Careful assembly ensures the fastener works well and lasts long.
Aligning The Parts
Place the fastener parts on a flat surface. Match the holes of each part carefully. Check that the prongs fit through the holes perfectly. Good alignment stops the fastener from bending or breaking. Take your time to position everything right.
Securing With Glue Or Tape
Use glue or tape to hold the parts in place. Apply a small amount of glue on the base. Press the parts firmly and let the glue dry. Tape works well for quick fixes or temporary holds. Wrap tape tightly around the fastener for extra strength. This step keeps the fastener steady during use.
Testing The Fastener
Testing the paper fastener is a key step. It shows if the fastener works well. You want the papers to stay tight. The fastener should not slip or break easily. Testing helps find any problems early. It also helps you improve the fastener’s hold.
Checking Strength
Start by pulling the fastened papers gently. See if the fastener holds the papers firmly. Try to move the papers apart. If they separate easily, the fastener is weak. Test with different paper thicknesses too. Strong fasteners work on thin and thick papers. Keep checking until the fastener feels secure.
Adjusting For Better Hold
If the fastener feels loose, adjust it. Tighten the prongs or reposition the fastener. Flatten the prongs more if needed. Make sure they bend smoothly without tearing the paper. You can add a small piece of tape for extra hold. Keep testing after each change. Adjust until the fastener grips papers tightly.
Creative Variations
Creative variations make paper fasteners fun and unique. They add style and personality to simple designs. Small changes can turn a plain fastener into a decorative piece. These ideas inspire you to experiment and enjoy the craft.
Decorative Elements
Use beads, buttons, or small charms to decorate your fastener. Glue them on the top or thread them through the paper. Simple ribbons tied around the fastener add charm. Use stamps or stickers for extra decoration. These small touches make your fastener stand out.
Using Colored Paper
Colored paper adds brightness and variety to fasteners. Choose vibrant or pastel shades to match your project. Layer different colors for a cool effect. Cut shapes like stars or hearts from colored paper and attach them. This technique gives a fresh look to simple fasteners.

Credit: www.amberdohrenwend.com
Frequently Asked Questions
What Materials Are Needed To Make A Paper Fastener?
You need a brass fastener, paper sheets, a hole punch, and scissors. These materials are easy to find and affordable. Ensure the hole punch fits the fastener size for secure binding.
How Do You Assemble A Paper Fastener?
First, punch holes through the papers where you want to fasten. Insert the brass fastener through the holes. Spread the prongs open behind the papers to lock them in place.
Can I Reuse A Paper Fastener Multiple Times?
Yes, paper fasteners are reusable. Simply fold the prongs back and remove the fastener. You can then use it again on other documents without damaging the fastener.
Are Paper Fasteners Better Than Staples?
Paper fasteners offer flexibility and reusability, unlike staples. They also allow easy addition or removal of pages. However, staples might be more secure for permanent binding.
Conclusion
Making a paper fastener is simple and quick. You only need a few basic tools. This skill helps keep your papers organized. You can make fasteners at home or school. Practice a couple of times to get better. Try different materials for a fun twist.
Small steps lead to neat and tidy work. Now, your papers stay together without hassle. Give it a try and see how easy it is.