Are your cabinet handles looking dull or outdated? Giving your cabinet hardware a fresh coat of paint can completely transform the look of your kitchen or bathroom without spending a fortune.
But before you start painting, there’s one important step you can’t skip: priming. Knowing how to properly prime and paint your cabinet hardware will ensure a smooth finish that lasts for years. In this guide, you’ll discover simple, step-by-step tips that make the process easy—even if you’ve never painted hardware before.
Ready to bring new life to your cabinets? Let’s get started!
Credit: www.lifesahmazing.com
Gather Supplies
Before you start priming and painting cabinet hardware, gather all needed supplies. Having everything ready saves time and helps the project go smoothly. This step ensures you do not stop in the middle to find missing items.
Choose The Right Paint And Primer
Select a primer made for metal surfaces. It helps paint stick better and lasts longer. Use paint designed for metal or cabinets. Satin or semi-gloss finishes work well for hardware. These paints resist wear and look nice.
Select Proper Tools
Get small paintbrushes or foam brushes for detailed work. Use fine-grit sandpaper to smooth hardware before priming. Have painter’s tape ready to protect areas you don’t want painted. Also, use gloves to keep hands clean and safe.
Prepare A Safe Workspace
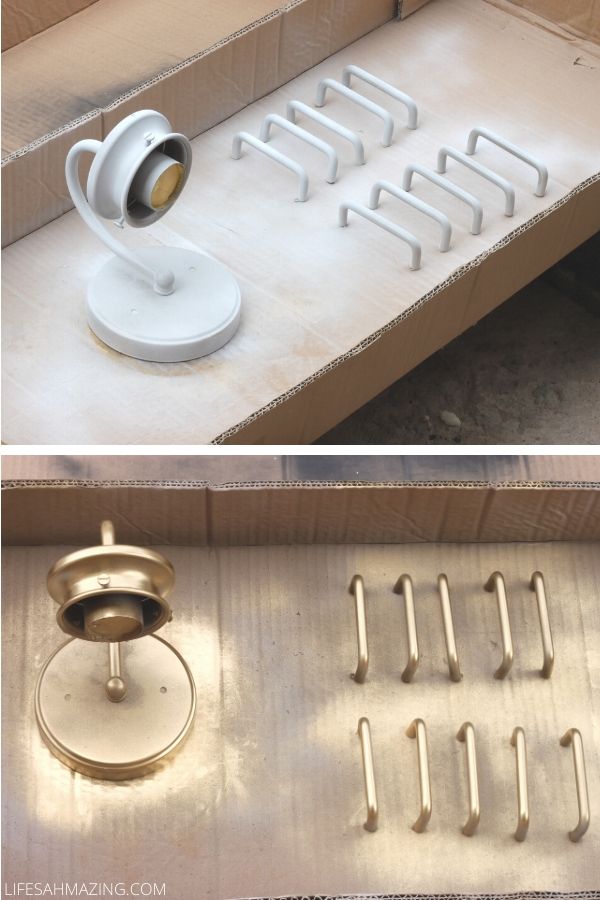
Pick a well-ventilated area for painting. Open windows or use a fan to keep air flowing. Cover your workspace with newspaper or a drop cloth. This protects surfaces from paint spills and drips. Wear old clothes to avoid stains.

Credit: www.thriftydecorchick.com
Remove Hardware
Removing cabinet hardware is the first step before priming and painting. It makes the process cleaner and easier. Hardware includes knobs, handles, and hinges.
Careful removal helps protect your cabinets and the hardware itself. Take your time and work methodically.
Label And Organize Pieces
Label each piece to avoid confusion later. Use small bags or containers for screws and parts.
Write notes or numbers on the bags. Match these with the hardware location on the cabinet.
This keeps everything organized and speeds up reassembly.
Use Proper Tools For Removal
Use the right tools to remove hardware safely. A screwdriver is the most common tool needed.
Select the correct screwdriver size to avoid stripping screws. A power drill with a screwdriver bit can work too, but use it gently.
A putty knife or flat tool helps pry off stuck hardware. Avoid forcing pieces off to prevent damage.
Clean Hardware
Cleaning cabinet hardware is a key step before painting. Dirt and grease stop paint from sticking well. Clean hardware helps paint look smooth and last longer.
Take your time cleaning. Use the right methods to remove all grime. This prepares the surface for priming and painting.
Remove Dirt And Grease
Start by wiping hardware with a dry cloth. This removes loose dust and dirt. Next, use a damp cloth to clean sticky spots.
For heavy grease, use a soft brush. Gently scrub to avoid scratching the surface. Make sure to clean all sides of the hardware.
Rinse with clean water and dry completely. Leaving moisture can cause paint to peel later.
Use Appropriate Cleaning Solutions
Choose mild soap or dish detergent for most hardware types. Mix with warm water for effective cleaning. Avoid harsh chemicals that can damage metal or finish.
For stubborn stains, try a mixture of baking soda and water. Apply gently with a cloth or brush. Rinse and dry thoroughly after cleaning.
Test any cleaner on a small area first. This prevents damage and ensures safe cleaning.
Sand Surfaces
Sanding cabinet hardware is a vital step before painting. It helps paint stick better and last longer. Rough or shiny surfaces can stop primer and paint from holding well. Sanding creates a slightly rough texture that allows paint to grip firmly.
Take time to sand carefully. It makes a big difference in the final look of your cabinets. Proper sanding can smooth out imperfections and prepare the hardware for a clean, even coat of primer and paint.
Choose The Right Grit Sandpaper
Select sandpaper grit based on the surface condition. For most cabinet hardware, 220-grit sandpaper works best. It is fine enough to smooth surfaces without causing deep scratches.
Coarser grits like 120 or 150 grit remove paint or rough patches faster. Use them only if the hardware has thick old paint or heavy rust. Finish with a finer grit for a smooth surface.
Smooth Rough Areas
Check the hardware for rough spots, bumps, or rust patches. Sand these areas gently but thoroughly. Smooth surfaces help primer spread evenly and prevent paint peeling.
Work in small sections and use light pressure. Keep sanding until the surface feels even and smooth to the touch. Wipe off dust before moving to priming.
Apply Primer
Applying primer to cabinet hardware is a key step before painting. Primer helps paint stick better and lasts longer. It also blocks rust and uneven colors. Taking time to apply primer correctly improves the final look.
Use Even Strokes
Use a small brush or spray for primer. Move your brush in smooth, even strokes. Cover all surfaces without leaving thick spots. Thin layers dry faster and prevent drips. Take your time to coat every part well.
Allow Proper Drying Time
Let the primer dry fully before painting. Check the primer can for drying times. Usually, it takes about 30 minutes to an hour. Rushing can cause paint to peel or bubble. Dry primer creates a strong base for paint.
Paint Hardware
Painting cabinet hardware gives old pieces a fresh look. It can change the style of your entire kitchen or bathroom. Proper painting makes hardware durable and beautiful.
Follow these steps carefully for the best results. Take your time and paint with care. The right technique helps paint stick better and last longer.
Select Painting Technique
Choose a painting method that suits your hardware type. Spray painting works well for small, detailed pieces. Brush painting is good for larger or simpler shapes. Use smooth, even strokes to avoid drips. Pick a well-ventilated area for painting to stay safe.
Apply Multiple Thin Coats
Thin coats of paint dry faster and look smoother. Apply several light layers instead of one thick coat. Let each layer dry before adding the next. This prevents runs and uneven surfaces. Thin coats build strong, lasting color over time.
Let Paint Fully Dry
Allow hardware to dry completely before handling or reinstalling. Drying times vary by paint type and room conditions. Waiting ensures the paint cures hard and resists scratches. Avoid rushing to keep your work neat and durable.
Seal And Protect
Sealing and protecting painted cabinet hardware is key to lasting results. A good seal stops paint from chipping and fading. It also shields the surface from moisture and dirt. This step keeps your hardware looking fresh and new for a long time.
Choosing the right topcoat and applying it correctly ensures strong protection. Follow simple steps to seal your cabinet hardware well.
Choose Suitable Topcoat
Select a topcoat that fits the paint type and hardware material. Clear polyurethane and acrylic sprays are popular choices. They dry fast and add a hard protective layer. Glossy, satin, or matte finishes are available. Pick one that matches your style and paint finish.
Ensure the topcoat is compatible with your primer and paint. Test on a small piece before full application. This avoids unwanted reactions or cloudiness.
Apply And Dry Properly
Apply the topcoat in thin, even layers. Use light strokes to avoid drips and runs. Hold the spray can or brush about 6 to 8 inches away from the surface. Let each coat dry fully before adding another.
Drying time varies by product but usually takes 1 to 2 hours. Place the hardware in a dust-free area while drying. After the final coat, wait at least 24 hours before handling or installing. This ensures a tough, durable finish.
Reinstall Hardware
Reinstalling cabinet hardware is the last step in your painting project. It brings your cabinets back to life and shows off your hard work. Proper reinstallation ensures the hardware looks good and works well for a long time.
Careful attention during this step avoids damage to the hardware and cabinets. Take your time to do it right.
Check For Dryness And Durability
Make sure the paint on the hardware is fully dry before reinstalling. Wet paint can smudge or peel off easily. Wait at least 24 hours for the paint to cure well.
Inspect the hardware for any weak spots or cracks. Replace any damaged pieces. Durable hardware will last longer and keep your cabinets looking fresh.
Use Correct Tools For Installation
Use the right screwdriver or drill bit for your hardware screws. This prevents stripping the screws or damaging the hardware. A snug fit keeps the hardware secure.
Work slowly and carefully. Tighten screws just enough to hold the hardware firmly. Avoid overtightening, which can crack the hardware or cabinet surface.

Credit: www.youtube.com
Frequently Asked Questions
How Do You Properly Prime Cabinet Hardware?
Clean the hardware thoroughly to remove dirt and oils. Apply a metal primer in thin, even coats. Let each coat dry fully before applying paint. This ensures better adhesion and a smooth finish.
What Type Of Paint Works Best For Cabinet Hardware?
Use spray paint designed for metal surfaces. Acrylic or enamel spray paints provide a durable, smooth finish. Avoid thick paints that can cause drips or uneven texture.
Can I Paint Cabinet Hardware Without Priming?
Priming is recommended for better paint adhesion and durability. Skipping primer can lead to peeling or chipping paint. Primer also helps cover old finishes and prevents rust.
How Long Should Primer Dry Before Painting Hardware?
Allow primer to dry for at least 30 minutes. Drying times may vary based on temperature and humidity. Ensure the primer is fully dry to avoid paint defects.
Conclusion
Priming and painting cabinet hardware can refresh any space. Start with clean, dry hardware for the best results. Apply a smooth, even primer coat to help paint stick. Use light coats of paint, letting each dry before the next. This process protects the hardware and adds a fresh look.
Take your time and work in a well-ventilated area. Small steps make a big difference in the final finish. Enjoy your updated cabinets with hardware that looks new again. Simple care and patience create lasting beauty.