Are you ready to give your home a fresh, stylish look with new shutters? Installing shutter fasteners might sound tricky, but with the right steps, you can do it yourself quickly and confidently.
Whether your siding is soft vinyl or tough brick, choosing the right fasteners and knowing how to install them makes all the difference. In this guide, you’ll learn simple, clear instructions on how to install shutter fasteners that hold your shutters securely and look great.
Keep reading to discover expert tips that will save you time and make your shutters stand out beautifully on your home.
Credit: exteriorsolutions.com
Types Of Shutter Fasteners
Choosing the right shutter fasteners is key for a secure and neat installation. Different fasteners suit different siding materials and shutter types. Understanding these options helps ensure your shutters stay in place and look great.
Shutter Spikes For Soft Siding
Shutter spikes work well with soft sidings like vinyl and hardboard. They are usually made of plastic and have ridges or scales. These ridges grip inside pre-drilled holes, holding the shutter firmly. Spikes often match the shutter color for a clean, flush look. They are easy to install and do not damage soft siding. This makes them a popular choice for vinyl shutters.
Screws For Hard Surfaces
Screws are ideal for harder surfaces such as wood, brick, or masonry. They are made of metal and provide a strong, secure hold. Screws can be painted to match the shutter, blending in visually. Installing screws requires pre-drilling holes and careful handling. They keep shutters firmly attached, even in strong wind or weather. Screws offer durability and reliability for heavy or wooden shutters.
Comparing Spikes And Screws
Spikes suit soft siding and create a smooth finish. Screws fit hard surfaces and offer stronger support. Spikes are easier to install but less durable on tough materials. Screws take more time but ensure shutters stay secure long-term. Choose spikes for vinyl or soft surfaces. Select screws for wood or masonry siding. Matching fasteners to siding type prevents damage and improves shutter stability.

Credit: www.homedepot.com
Tools And Materials Needed
Installing shutter fasteners requires the right tools and materials. Having everything ready makes the process smooth and efficient. This section covers the essentials you need before you start.
Fasteners And Anchors
Choose fasteners that fit your shutter type and wall surface. Plastic shutter spikes work well on vinyl siding. They grip firmly and blend with the shutter color. Metal screws suit wood or masonry surfaces. Use anchors for added support in drywall or brick. Proper fasteners keep shutters secure and stable.
Drills And Drivers
A cordless drill is vital for making holes quickly. Use a drill bit that matches the fastener size. A screwdriver or drill driver helps insert screws with ease. Make sure the tools have good battery life. This reduces interruptions during installation.
Measuring And Marking Tools
Accurate placement needs measuring tools. A tape measure helps find the right shutter position. Use a pencil or chalk to mark drill points. A level ensures shutters sit straight. These tools prevent mistakes and save time.
Preparing For Installation
Preparing for installation is the first step to ensure your shutter fasteners hold strong. Proper preparation saves time and prevents mistakes. Follow these easy steps to get ready.
Selecting The Right Fastener
Choose fasteners based on your siding type and shutter material. Plastic spikes work well for soft surfaces like vinyl or hardboard. Metal screws fit better on wood or masonry. Pick fasteners that match your shutter color for a neat look.
Checking Manufacturer Guidelines
Always read the manufacturer’s instructions before starting. Guidelines explain which fasteners to use and how deep to drill. They may include weight limits and spacing rules. Following these rules ensures a safe, lasting installation.
Measuring And Marking Mounting Points
Measure carefully to find the correct spots for fasteners. Use a tape measure and pencil to mark holes on the shutter and wall. Check that marks align evenly to keep shutters straight. Accurate marking helps avoid drilling errors and keeps shutters secure.
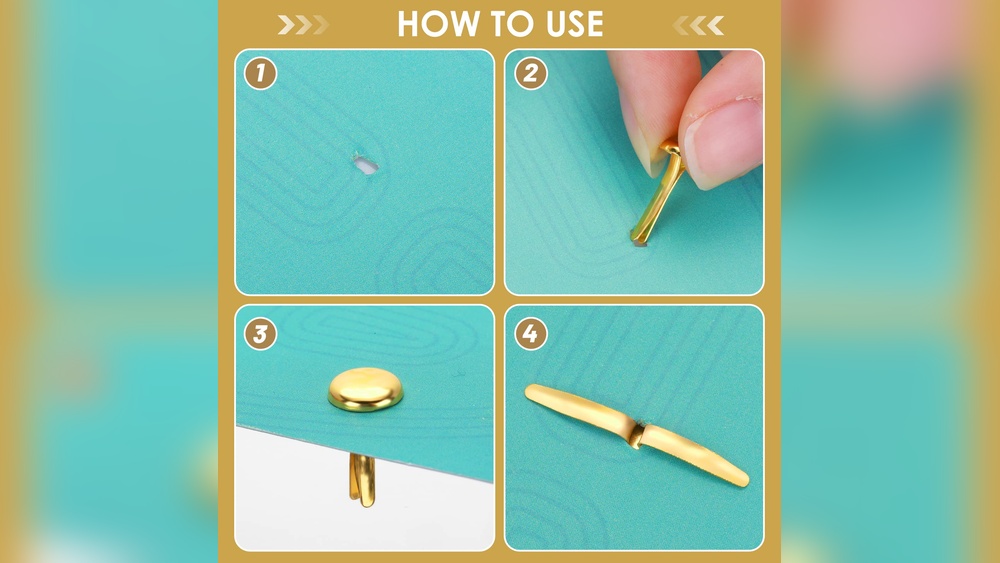
Installing Shutter Spikes
Installing shutter spikes is a straightforward way to secure shutters, especially on vinyl or soft siding. These spikes hold the shutters firmly without damaging the siding. Proper installation ensures the shutters stay in place and look neat. Follow these steps for best results.
Drilling Pilot Holes
Start by marking where each spike will go. Use a drill bit slightly smaller than the spike width. Carefully drill pilot holes through the shutter and into the siding. These holes guide the spikes and prevent splitting.
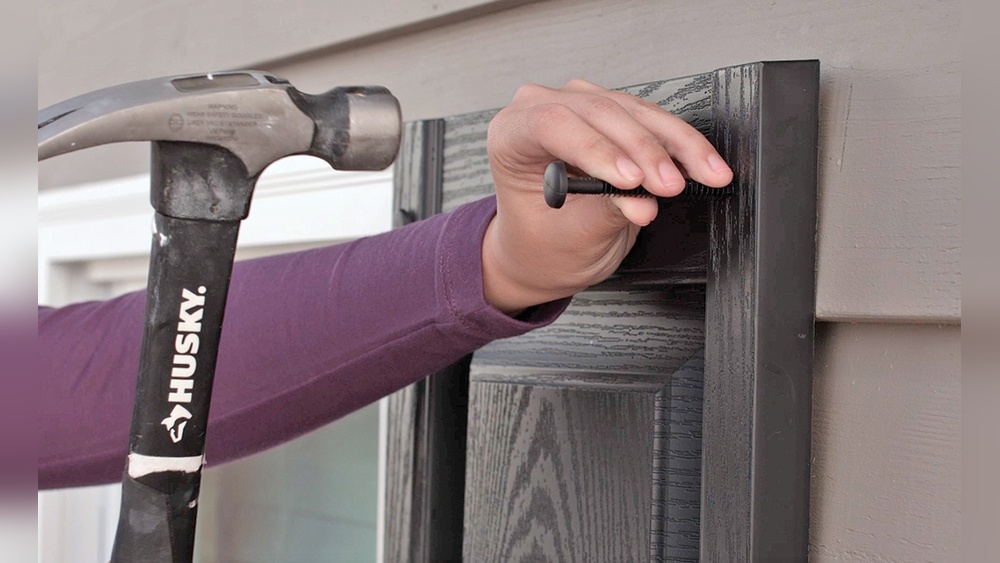
Inserting And Securing Spikes
Push the shutter spike into each pilot hole. The spikes have ridges that grip the siding firmly. Tap them gently with a hammer until fully inserted. Avoid over-hammering to prevent damage to the siding.
Ensuring A Flush Finish
Check that each spike sits flush with the shutter surface. This creates a clean, smooth look. Use a soft mallet if slight adjustments are needed. Properly seated spikes improve both appearance and hold.
Installing Screws
Installing screws is a key step in securing shutter fasteners firmly. Proper screw installation ensures shutters stay in place through weather and time. This process involves careful preparation and attention to detail. Follow these simple steps for strong, lasting results.
Pre-drilling Holes And Using Anchors
Start by marking where the screws will go. Use a drill bit slightly smaller than the screw diameter. This prevents wood or masonry from splitting. Pre-drilling makes it easier to drive screws straight and deep.
For masonry or drywall, use anchors to increase grip. Insert the anchor into the hole before screwing. Anchors hold screws tightly and keep shutters from loosening.
Driving Screws Securely
Use a screwdriver or drill with a proper bit for the screws. Drive screws slowly to avoid stripping heads. Tighten until the shutter sits flush but avoid over-tightening. Over-tightening can crack the shutter or damage the surface.
Check each screw for firmness. Loose screws reduce shutter stability and can cause noise in wind.
Using Caps And Washers For Appearance
Cover screw heads with caps or washers for a neat look. Caps come in colors that match shutters. Washers distribute pressure evenly and protect the shutter surface.
These small details improve the shutter’s overall appearance. They also prevent screws from rusting or loosening over time.

Credit: exteriorsolutions.com
Special Considerations
Installing shutter fasteners requires attention to specific conditions of your home’s exterior. Different surfaces and shutter materials need unique approaches. Special care ensures a strong, lasting hold and a neat appearance. Understanding these special considerations helps avoid damage and ensures proper installation.
Installing On Vinyl Siding
Vinyl siding is soft and can crack if fasteners are too tight. Use shutter spikes made for vinyl to prevent damage. Pre-drill holes slightly smaller than the spike diameter. Insert spikes gently to hold shutters firmly without bending or cracking. Choose spikes that match shutter color for a clean look. Avoid screws, which can cause splitting or warping on vinyl.
Mounting On Brick Or Masonry
Brick and masonry are hard surfaces requiring strong fasteners. Use screws with masonry anchors for a secure hold. Drill holes with a masonry bit before inserting anchors. Insert anchors flush with the wall to ensure screws fit properly. Tighten screws carefully to avoid cracking bricks. This method keeps shutters stable even in strong winds.
Handling Different Shutter Materials
Shutter materials affect fastener choice and installation. Vinyl shutters work best with plastic spikes for a flush finish. Wood shutters need metal screws for strong support. Composite shutters require screws or spikes depending on thickness and weight. Always match fastener size to shutter thickness for best results. Proper fasteners prevent damage and keep shutters aligned.
Troubleshooting Common Issues
Troubleshooting common issues during shutter fastener installation helps ensure a secure and lasting hold. Problems can arise from improper fastener use or siding damage. Identifying and fixing these issues early prevents costly repairs and keeps shutters looking their best.
Fasteners Not Holding Firmly
Fasteners may not grip well if the hole is too large. Use the correct size drill bit for pre-drilling. Soft siding can cause fasteners to loosen over time. Try using longer or wider fasteners for better hold. Check if the fastener type matches your siding material. Plastic spikes work well for vinyl, while screws suit wood or masonry better.
Damage To Siding Or Shutter
Cracks or dents often occur during installation from excessive force. Avoid hammering fasteners too hard. Use a rubber mallet or gentle taps instead. Pre-drill holes carefully to prevent splitting siding. Keep shutters aligned to avoid pressure points that cause damage. Inspect siding and shutters before installation for existing issues.
Removing And Replacing Fasteners
Remove loose or damaged fasteners with pliers or a screwdriver. Pull slowly to avoid enlarging holes. Clean the hole of debris before inserting new fasteners. Use a sealant around the fastener to protect siding from moisture. Replace fasteners with the right type and length. Tighten securely but avoid over-tightening, which can cause damage.
Maintenance Tips
Proper maintenance keeps shutter fasteners secure and your shutters looking great. Small checks now avoid big problems later. Follow these simple tips to care for your shutters and fasteners effectively.
Checking Fastener Tightness
Regularly check the tightness of your shutter fasteners. Use a screwdriver to gently test each fastener. Tighten any that feel loose. Loose fasteners can cause shutters to wobble or fall.
Be careful not to over-tighten, as this can damage the siding or shutter. Tight fasteners ensure your shutters stay firmly in place during wind and rain.
Cleaning And Inspecting Shutters
Clean your shutters often to remove dirt and debris. Use a soft cloth and mild soap with water. Avoid harsh chemicals that can damage the finish. Rinse with clean water and dry well.
While cleaning, inspect shutters for cracks, chips, or warping. Check fasteners for rust or wear. Early spotting of problems saves time and money on repairs.
Replacing Worn Fasteners
Replace fasteners that show signs of rust, bending, or damage. Use the same type and size of fastener originally installed. This keeps the shutter secure and looking neat.
Remove old fasteners carefully to avoid damaging the shutter or siding. Insert new fasteners firmly but gently. Proper replacement protects your investment and extends shutter life.
Frequently Asked Questions
How Do You Install Shutter Fasteners?
To install shutter fasteners, first choose spikes for soft siding or screws for hard surfaces. Pre-drill holes, insert anchors if needed, then secure shutters tightly for a flush, stable fit.
Should I Use Shutter Spikes Or Screws?
Use shutter spikes for soft siding like vinyl; they offer a flush look. Choose screws for hard surfaces like wood or brick for stronger hold. Screws are more durable, while spikes are easier to install but less secure. Match fastener type to siding and shutter material.
What Size Drill Bit For Shutter Fasteners?
Use a drill bit slightly smaller than the shutter fastener diameter. Typically, a 3/32″ or 1/8″ bit works well. Always check fastener instructions for precise sizing. Pre-drill pilot holes to ensure secure and damage-free installation of shutter fasteners.
How Are Shutters Attached To Brick?
Attach shutters to brick by drilling pilot holes, inserting plastic anchors, then securing with metal screws for a strong hold.
Conclusion
Installing shutter fasteners is a simple task with the right steps. Choose spikes for vinyl or soft siding and screws for hard surfaces. Measure and mark carefully before drilling holes. Secure the fasteners tightly to keep shutters in place. Taking your time ensures a clean and lasting finish.
Now, your shutters will look great and stay secure through all weather. Enjoy the improved appearance and protection they bring to your home.