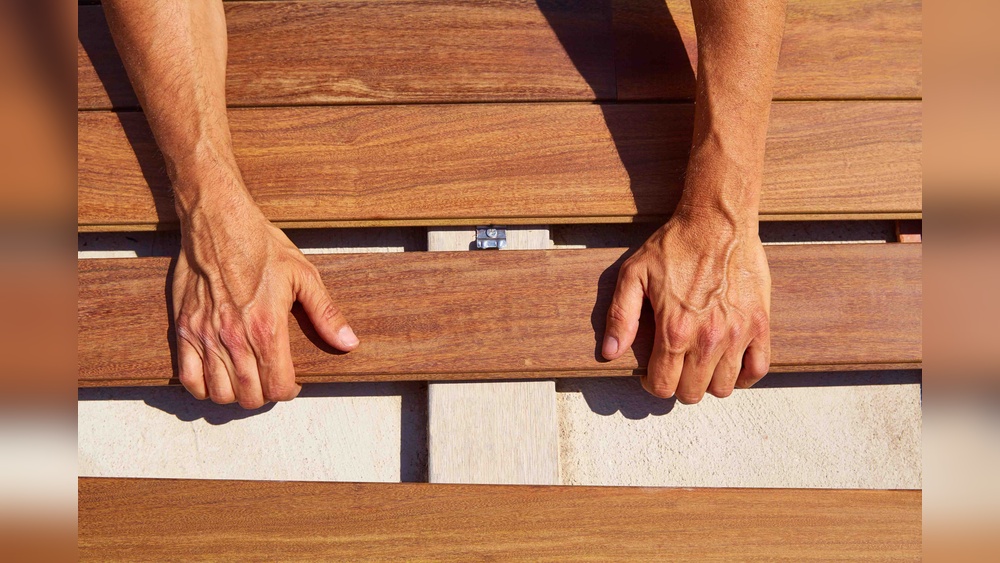
If you want your deck to look sleek and seamless, installing decking with hidden fasteners is the way to go. Imagine a surface free of visible screws or nails, giving your outdoor space a clean, modern finish that stands out in your Austin home.
But how do you achieve that flawless look without spending hours guessing the right technique? This guide will walk you through each step, helping you install your decking like a pro. Whether you’re upgrading your backyard or building a new deck from scratch, you’ll discover simple tips and tricks to save time and avoid common mistakes.
Ready to transform your deck into a stunning, fastener-free surface? Keep reading to learn how hidden fasteners can make all the difference.
Choosing Hidden Fasteners
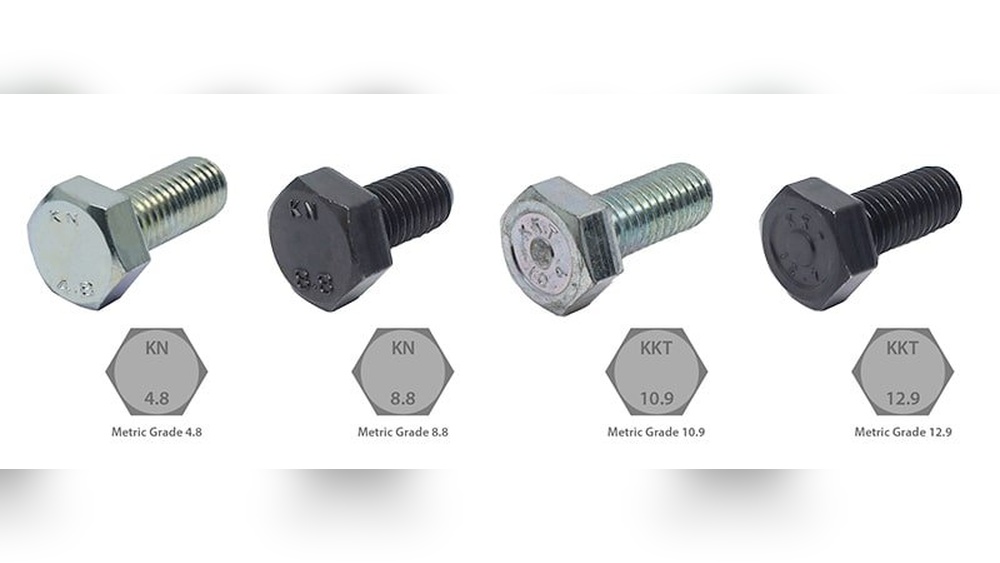
Choosing the right hidden fasteners is key to a clean and durable deck. These fasteners keep screws out of sight and protect the wood from damage. Selecting suitable fasteners depends on the decking material and the type of installation you plan. Understanding the options helps you pick the best fit for your project.
Types Of Hidden Fasteners
There are several types of hidden fasteners available. Some use clips that attach to the joists and grip the board edges. Others use screws that fit into grooves on the sides of the decking boards. Some systems combine clips and screws for extra strength. Choose a type that matches your deck style and ease of installation.
Material Compatibility
Hidden fasteners must suit the decking material. Composite boards often require specific clips designed for their grooves. Hardwood decking may need stainless steel clips or screws to prevent rust. Pressure-treated wood works well with most fasteners but check the product details. Using compatible fasteners ensures a secure fit and longer deck life.
Benefits Over Traditional Screws
Hidden fasteners offer a smooth, screw-free surface, improving deck appearance. They reduce tripping hazards by eliminating exposed screw heads. These fasteners allow the wood to expand and contract without cracking. They also protect the wood from moisture damage around screw holes. Overall, hidden fasteners create a safer, cleaner, and more durable deck.
Credit: www.fastenmaster.com
Preparing Your Deck
Preparing your deck properly is the first step to a strong and beautiful finish. This stage sets the foundation for installing decking with hidden fasteners. Careful preparation ensures your deck looks clean and lasts longer.
Start with accurate measurements and a clear plan. Choose the right materials that fit your budget and style. Check the spacing of the joists to support the decking boards well. Each step helps avoid problems later and makes installation easier.
Measuring And Planning Layout
Measure the area of your deck space carefully. Use a tape measure to get exact dimensions. Sketch a layout plan on paper or use a digital tool. Mark where each board will go to avoid mistakes. Planning helps reduce waste and speeds up work.
Selecting Quality Deck Boards
Pick deck boards that match your climate and use. Look for durable, weather-resistant materials like composite or treated wood. Check for straight boards without cracks or warping. Good quality boards fit well with hidden fasteners and last longer.
Ensuring Proper Joist Spacing
Joists must be spaced correctly to hold the deck boards firmly. Most hidden fastener systems work best with joists spaced 16 inches apart. Use a level to ensure joists are even and flat. Proper spacing prevents deck boards from bending or squeaking.
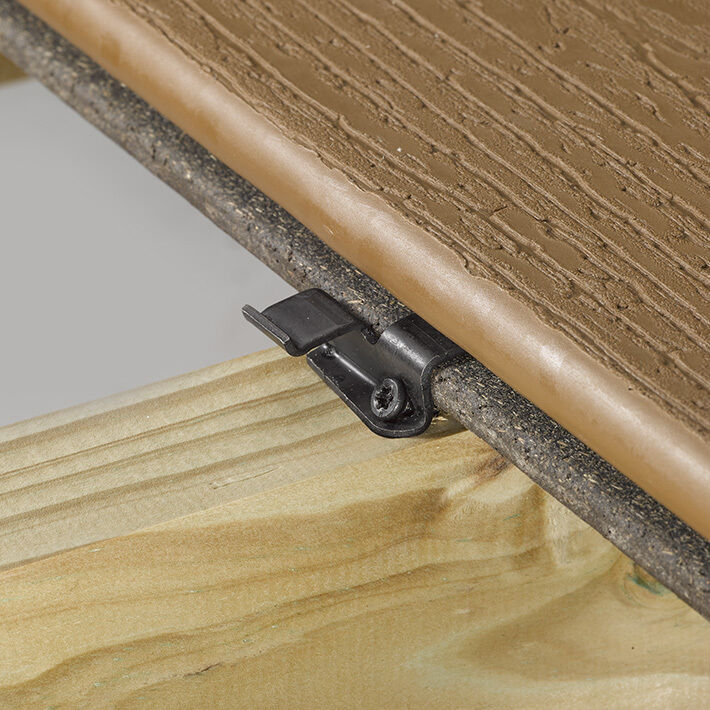
Installing Starter Clips
Installing starter clips is the first step in a hidden fastener decking project. These clips hold the first deck board firmly in place. Proper installation ensures your deck boards remain aligned and secure. Follow clear steps to position and attach starter clips correctly.
Positioning Starter Clips
Place the starter clips along the joist where the first board will sit. Space them evenly, about every 12 to 16 inches. Align clips to hold the board straight and flush against the ledger or rim joist. Check that clips are inside the board groove for a hidden look.
Securing Clips To Joists
Use the screws provided with your fastener system. Drive each screw through the clip and into the joist firmly. Avoid over-tightening to prevent damaging the clip or joist. Secure clips tightly enough to prevent movement but allow slight board expansion.
Avoiding Common Mistakes
Do not place clips too far from the edge of the board groove. Avoid uneven spacing that can cause board warping. Never skip screws or use wrong fasteners, which reduce deck stability. Ensure clips sit flat on joists to keep boards level and aligned.

Credit: www.youtube.com
Attaching Deck Boards
Attaching deck boards with hidden fasteners ensures a clean, smooth surface free of visible screws. This method keeps the deck looking neat and increases durability. Proper technique during attachment is essential for a strong, lasting deck.
Sliding Boards Into Clips
Begin by placing the hidden fastener clips on the joists. Each clip fits into the groove along the board’s edge. Carefully slide the deck board into these clips. Make sure the board slides in evenly along its entire length. This keeps boards secure and straight.
Aligning Boards Correctly
Check that each board aligns perfectly with the previous one. Proper alignment prevents gaps and uneven surfaces. Use spacers if needed to maintain consistent spacing. Align boards so the grooves fit snugly onto the clips. This ensures a uniform deck surface.
Applying Pressure Without Damage
Press the board firmly into the clips to lock it in place. Avoid using excessive force which might crack or damage the wood. Use a rubber mallet or a block of wood to apply gentle pressure. This method protects the boards while securing them tightly.
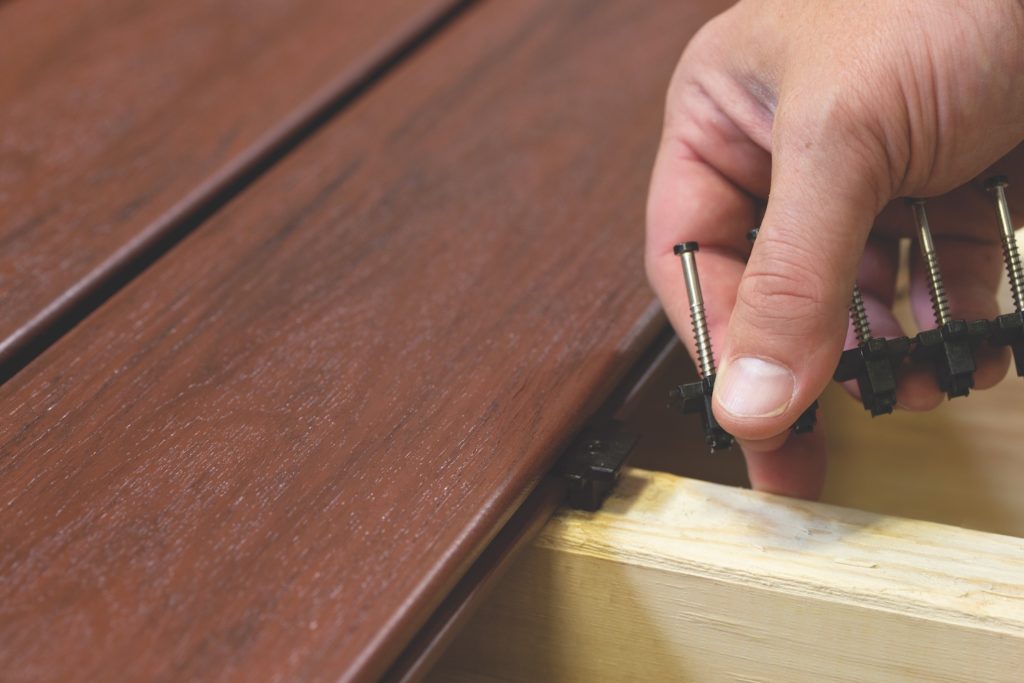
Securing Boards To Joists
Securing boards to joists is a key step when installing decking with hidden fasteners. Proper attachment ensures your deck stays strong and safe. It also keeps the fasteners invisible, giving your deck a clean look.
Paying attention to how you secure boards helps avoid problems like warping or loose boards later. Use the right techniques to make the installation smooth and durable.
Pre-drilling Screws
Pre-drilling holes makes it easier to insert screws without splitting the wood. Use a drill bit slightly smaller than the screw diameter. Drill straight into the joist through the fastener’s holes. This step helps keep boards tight and aligned.
Centering Fasteners On Joists
Place each fastener so it sits in the center of the joist below. Centering ensures maximum grip and prevents the board from moving. Use a tape measure or guide to align fasteners evenly along the joist length.
Using Pre-loaded Screw Clips
Many hidden fastener systems come with pre-loaded screw clips. These clips hold screws ready for quick driving into the joist. They save time and keep screws steady during installation. Insert the clip into the board’s groove, then secure it to the joist with a screw.
Handling Edges And Borders
Handling edges and borders is a key step in installing decking with hidden fasteners. Proper attention here ensures a clean, professional finish. Edges and borders protect the deck’s structure and add to its visual appeal. This section covers techniques for working with perimeter boards, securing the last board, and creating decorative borders.
Installing Perimeter Boards
Start by selecting sturdy, straight boards for the deck’s perimeter. These boards frame the deck and cover the hidden fasteners inside. Install perimeter boards by screwing them directly into the joists. Use screws that resist rust and corrosion for long-lasting strength. Make sure boards are flush with the deck surface to avoid trip hazards. Check alignment often to keep edges straight and neat.
Using L Brackets For Last Board
The last board often needs extra support to stay secure. L brackets provide strong reinforcement without visible screws on top. Attach L brackets under the last board, fixing one side to the board and the other to the joist. This method holds the board firmly in place and prevents movement. Use stainless steel brackets and screws to avoid rust stains on the deck surface.
Creating Picture Frame Borders
Picture frame borders add a stylish edge to the deck, enhancing its overall look. To create this effect, install boards around the deck’s perimeter at a 90-degree angle to the main decking boards. Cut corners precisely to form clean miter joints. Secure these border boards with hidden fasteners or screws from underneath. This border style hides deck ends and gives a polished, finished appearance.
Dealing With Challenges
Installing decking with hidden fasteners can be rewarding but may also present some challenges. Proper handling of these issues ensures a smooth, clean finish for your deck. This section covers common problems and how to solve them effectively.
Fixing Bowed Or Bent Boards
Bowed or bent boards can cause gaps or uneven surfaces. Start by selecting boards with minimal warping. If you spot slight bends, gently tap the board into place before fastening. Use clamps to hold the board flat against the joists. Avoid forcing severely warped boards, as they can damage the hidden fasteners or weaken the deck structure.
Avoiding Common Installation Errors
Align fasteners correctly inside the board grooves to avoid splitting. Check joist spacing to match the fastener requirements. Do not over-tighten screws, as this can damage clips or grooves. Keep boards spaced evenly for proper drainage and expansion. Double-check measurements before fastening each board to reduce mistakes. Always follow the manufacturer’s instructions for best results.
When Not To Use Hidden Fasteners
Hidden fasteners are not ideal for all decking types. Avoid using them on very soft or brittle wood, which can crack easily. Do not use hidden fasteners on uneven or warped joists, as this affects board alignment. For decks exposed to heavy loads or extreme weather, traditional fastening may provide better strength. Always consider the material and environment before choosing hidden fasteners.
Credit: armadillodeck.com
Finishing Touches
Finishing touches bring a polished look to your deck. They ensure durability and enhance visual appeal. Taking time on these final steps makes your deck safe and beautiful for years.
Trimming And Cutting Boards
Trim boards carefully to fit the deck edges precisely. Use a sharp saw to make clean cuts. Measure twice to avoid mistakes. Smooth any rough edges with sandpaper. Proper trimming creates a neat, professional finish.
Installing Material-matched Plugs
Material-matched plugs hide screw holes and fastener spots. Choose plugs that match your decking color and texture. Fit them snugly into pre-drilled holes for a seamless look. This step keeps the deck surface smooth and safe.
Cleaning And Maintenance Tips
Clean your deck regularly to prevent dirt buildup. Sweep off leaves and debris weekly. Wash the surface with a mild soap solution every few months. Avoid harsh chemicals that damage decking material. Routine maintenance extends your deck’s life and beauty.
Frequently Asked Questions
How Do You Install Hidden Fastener Decking?
Slide the hidden fastener into the deck board groove. Align it with joists and secure screws. Work from the outer edge inward. Repeat for each board.
When Not To Use Hidden Deck Fasteners?
Avoid hidden deck fasteners on softwoods prone to splitting, irregular board thickness, or boards without grooves. Use visible fasteners for edge or end boards.
Do Trex Hidden Fasteners Go On Every Joist?
Trex hidden fasteners must be installed on every joist to securely hold each deck board in place. This ensures stability and proper alignment throughout the deck.
How To Hide Fasteners On Deck?
Use hidden fastener clips or screws that fit into deck board grooves. Attach fasteners to joists from the side or below. This keeps the deck surface clean and screw-free. Match fasteners with board material for seamless appearance.
Conclusion
Installing decking with hidden fasteners creates a clean, smooth surface. It also prevents nails or screws from showing. This method improves your deck’s appearance and durability. Remember to align fasteners correctly on each joist. Take your time to ensure tight, secure fitting.
With careful work, your deck will look great and last longer. Hidden fasteners offer a neat finish that many homeowners prefer. Try this technique for a professional-looking deck without visible screws.