Are you ready to give your cabinets a fresh new look? Installing hardware on cabinet doors and drawers is a simple way to transform your space instantly.
But if you’ve never done it before, the idea might feel a bit tricky. Don’t worry—you’re about to learn easy, step-by-step methods that anyone can follow. By the end of this guide, you’ll have the confidence to add beautiful handles and knobs that perfectly match your style.
Keep reading, and let’s make your cabinets stand out!
Choosing The Right Hardware
Choosing the right hardware for cabinet doors and drawers changes the whole look of your space. Hardware is more than just functional. It adds style and personality to your cabinets. Picking the best pieces helps your cabinets look neat and complete.
Think about the design and feel you want. The right hardware matches your room’s theme and makes opening doors easy. Small details like size and shape also matter for comfort and use.
Types Of Cabinet Hardware
There are several types of hardware to pick from. Knobs are small and simple. Handles or pulls give a modern or classic look. Cup pulls work well for drawers. Bar pulls create a sleek feel. Each type fits different needs and styles.
Materials And Finishes
Hardware comes in many materials. Popular choices include metal, wood, and plastic. Metal is strong and lasts long. Finishes like brushed nickel, chrome, and bronze add shine or matte looks. Choose a finish that matches your room’s colors and lighting.
Matching Hardware To Style
Match hardware to your cabinet style for a balanced look. Traditional cabinets look good with ornate or antique hardware. Modern designs work best with simple and clean hardware. Rustic cabinets pair well with wooden or black metal pieces. The right match makes your cabinets stand out.
Gathering Necessary Tools
Before installing hardware on cabinet doors and drawers, gather all needed tools. This step saves time and avoids frustration during the project. Having the right tools makes the job easier and ensures a clean, professional look.
Basic Tools Needed
Start with a screwdriver set, including both flathead and Phillips heads. A tape measure helps place handles and knobs evenly. A pencil marks drilling spots. A power drill speeds up screw installation. Drill bits sized for hardware screws are necessary. A level keeps hardware straight on doors and drawers.
Optional Tools For Precision
A center punch creates small dents to guide drill bits. A clamp holds doors steady for safer drilling. A ruler or straight edge improves measurement accuracy. A stud finder locates solid spots behind cabinet faces. These tools help achieve perfect alignment and prevent mistakes.
Preparing Cabinet Doors And Drawers
Preparing cabinet doors and drawers is the first step to install hardware properly. This step helps avoid mistakes and keeps the hardware secure. Taking time to measure and clean ensures a neat and lasting finish.
Careful preparation saves effort later. It helps the hardware fit perfectly and look good on your cabinets. Clean surfaces prevent damage and keep screws tight. Accurate marks guide your drilling and avoid errors.
Measuring And Marking
Measure twice to place hardware correctly. Use a ruler or tape measure for accuracy. Mark spots lightly with a pencil. Check the distance from edges and between holes.
Keep marks straight and even on all doors and drawers. Use a level if needed. Consistency helps the hardware line up and look balanced.
Ensuring Surface Cleanliness
Wipe surfaces with a clean cloth. Remove dust, grease, and dirt fully. A clean surface helps screws hold better. It also stops hardware from slipping.
Use mild soap and water if needed. Dry the area completely before drilling. Clean surfaces make installation easier and stronger.
Installing Handles And Knobs
Installing handles and knobs on cabinet doors and drawers is a simple way to improve their look and function. Proper installation ensures the hardware fits well and lasts long. This process needs careful measuring, drilling, and fixing to avoid damage and keep everything aligned.
Aligning Hardware Correctly
Start by marking the spot for the handle or knob. Use a ruler or template for even placement. Check that the marks are level on all doors and drawers. Consistency in alignment keeps the cabinets looking neat and professional.
Drilling Pilot Holes
Drill small pilot holes on the marked spots. Pilot holes make it easier to screw in hardware. They also prevent wood from splitting. Use a drill bit slightly smaller than the screws.
Securing Hardware Firmly
Place the handle or knob over the pilot holes. Insert screws through the back of the door or drawer. Tighten screws with a screwdriver until the hardware feels secure. Avoid over-tightening to prevent damage.
Attaching Drawer Pulls
Attaching drawer pulls is a simple way to improve the look and function of your cabinets. Proper installation makes drawers easier to open and adds style to your furniture. This section explains how to place and fix drawer pulls correctly for the best results.
Positioning For Comfort And Function
Place drawer pulls where your hand naturally fits. Usually, this means near the top edge of the drawer front. Check the height so pulling feels easy and comfortable. Avoid spots too close to the sides, which can be hard to grip. Consistent placement across all drawers gives a neat, uniform look. Measure the same distance from the drawer’s edge for each pull.
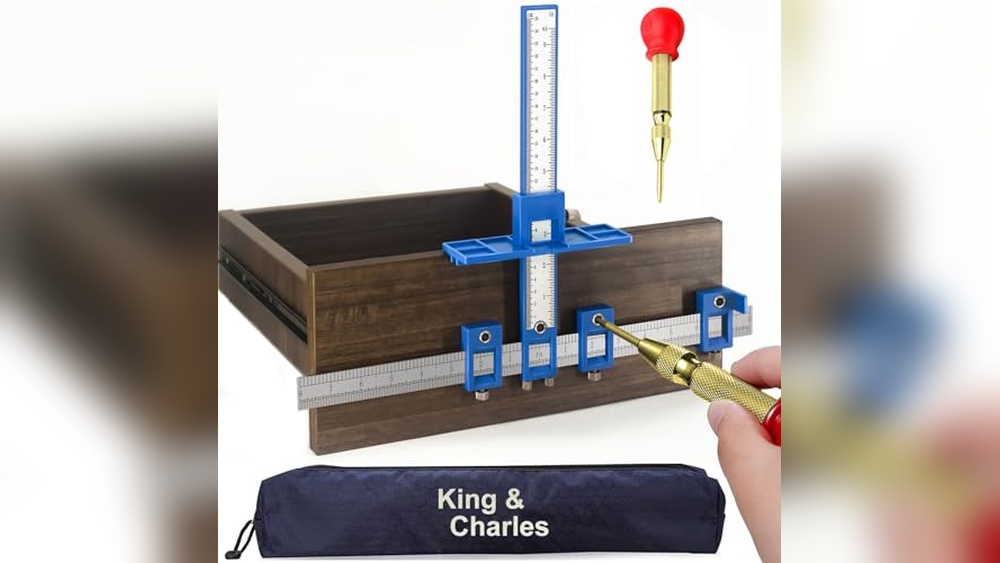
Using Templates For Accuracy
Templates help mark the exact spot for screws. Use a paper or plastic guide that matches your pull size. Align the template on the drawer front and mark the holes with a pencil. This method saves time and avoids mistakes. Drill holes carefully to prevent wood splitting. Keep the template steady to ensure all pulls line up perfectly.

Credit: www.youtube.com
Common Installation Mistakes
Installing hardware on cabinet doors and drawers can seem simple. Yet, many make common mistakes that affect the look and function. Avoid these errors to get a smooth and strong fit. Pay close attention to each step for the best result.
Misalignment Issues
Hardware must line up perfectly on doors and drawers. Misaligned handles or knobs look sloppy and cause problems. Measure twice before drilling. Use a template or guide to keep holes straight. Small errors here make big differences in the final look.
Over-tightening Screws
Screws hold hardware firmly but tightening too much can cause damage. Over-tightening strips screw holes or cracks wood. Tighten screws until they are snug, not forced. Use a screwdriver with good control to avoid this mistake.
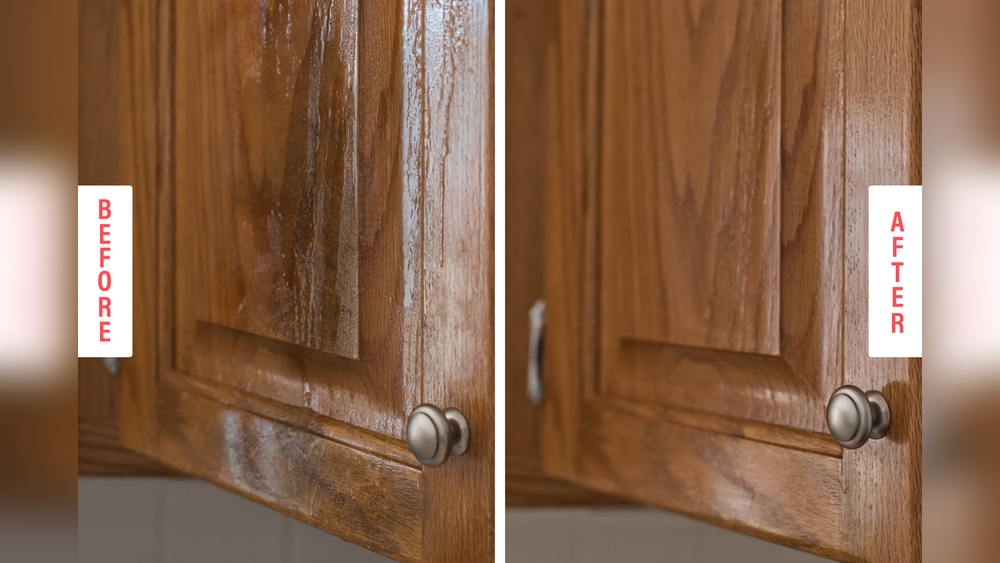
Ignoring Surface Damage
Check cabinet surfaces before installing hardware. Rough or damaged areas weaken the hold. Sand any bumps or chips smooth. Clean the surface well. Hardware sits better on a smooth, clean surface, lasting longer and working well.
Maintenance Tips For Cabinet Hardware
Keeping your cabinet hardware in good shape extends its life and keeps cabinets looking fresh. Regular care prevents damage and saves money on repairs. Simple maintenance routines help cabinet doors and drawers work smoothly for years.
Cleaning And Polishing
Use a soft cloth to wipe hardware regularly. Avoid harsh chemicals that can damage finishes. Mild soap and water work well for most materials. Dry hardware completely to stop rust or corrosion. Polishing metal hardware restores shine and removes fingerprints.
Tightening Loose Hardware
Check screws and bolts often for looseness. Use a screwdriver to tighten any loose parts. Loose hardware can cause doors to sag or drawers to stick. Tightening prevents damage to both hardware and cabinets. Do not overtighten to avoid stripping screws.
Replacing Worn Components
Replace damaged or worn hardware promptly. Look for signs like cracks, rust, or broken parts. Match new hardware to the old style and size. Proper replacements keep cabinets functional and attractive. Regular updates can improve cabinet usability and appearance.

Credit: www.thriftydecorchick.com

Credit: www.amazon.com
Frequently Asked Questions
What Tools Are Needed To Install Cabinet Hardware?
You need a drill, screwdriver, tape measure, pencil, and mounting screws. A template or jig helps ensure accurate hole placement. These tools make the installation easier and more precise.
How Do I Measure For Hardware Placement On Doors?
Measure the door’s width and height. Mark the center or desired position using a pencil. Use a template for consistent placement across multiple doors.
Can I Install Hardware On Drawers Without Professional Help?
Yes, installing hardware on drawers is simple with basic tools. Follow manufacturer instructions and measure carefully. DIY installation saves money and adds a personal touch.
What Type Of Screws Should I Use For Cabinet Hardware?
Use screws provided with your hardware or 8 or 10 wood screws. Choose length based on door thickness to ensure a secure fit without damage.
Conclusion
Installing hardware on cabinet doors and drawers is simple with the right steps. Measure carefully and mark your spots before drilling. Use proper tools to avoid mistakes. Take your time to align handles or knobs evenly. A steady hand helps to keep everything straight.
This small project can improve your space’s look quickly. Enjoy the satisfaction of doing it yourself. Keep these tips in mind for future updates too. Your cabinets will look neat and work well. Ready to add hardware? Just follow these easy steps!