Have you ever struggled with buttons that won’t stay closed or zippers that jam at the worst moments? Snap fasteners might be the simple fix you need.
Learning how to sew on snap fasteners can save you time and give your clothes a neat, professional look. In this guide, you’ll discover easy, step-by-step instructions that make adding snaps quick and stress-free. Whether you’re repairing a favorite jacket or creating something new, mastering this skill will boost your confidence and keep your projects looking sharp.
Ready to make your sewing projects easier and more durable? Let’s get started!
Choosing Snap Fasteners
Choosing the right snap fasteners is key to a neat and lasting finish. The right snaps hold fabric well and match your project style. Picking suitable types, materials, and sizes makes sewing easier and improves the look.
Types Of Snap Fasteners
Snap fasteners come in various types for different uses. Sew-on snaps have holes to stitch through. They work well on soft fabrics. Pry snaps need a tool to attach and suit thick materials. Plastic snaps are light and good for baby clothes. Metal snaps are strong and fit heavy fabrics like denim.
Materials And Sizes
Materials affect the snap’s strength and feel. Metal snaps last long and resist wear. Plastic snaps are gentle on fabric and lighter. Choose sizes based on fabric thickness and project use. Small snaps suit thin or delicate cloth. Larger snaps fit heavy or thick materials better. Pick the right size for easy opening and closing.
Credit: www.doinaalexei.com
Gathering Sewing Tools
Before sewing on snap fasteners, gather all the needed tools. This step makes the process smooth and easy. Having the right supplies helps keep your work neat and fast. Organize your tools in one place to avoid interruptions.
Essential Sewing Supplies
Start with a sharp sewing needle. Choose one strong enough for your fabric type. Pick thread that matches your fabric color. Polyester thread works well for most materials. Have a pair of small scissors to cut thread cleanly. Snap fasteners come in pairs, so keep them ready. A thimble can protect your finger while sewing. Lastly, keep a pin cushion to hold needles safely.
Optional Tools For Efficiency
A pair of pliers helps press snap fasteners tightly. A seam ripper can fix mistakes quickly. Use a fabric marker to mark snap placement. A small ruler or tape measure ensures accuracy. A needle threader speeds up threading. These tools save time and improve results.
Preparing Fabric And Fasteners
Preparing fabric and fasteners is the first step to sewing snap fasteners neatly. Proper preparation helps the snaps sit well and last longer. It also makes sewing easier and prevents fabric damage. Take time to prepare your materials carefully before starting.
Marking Placement
Choose the exact spots for the snap fasteners on your fabric. Use a fabric pen or chalk to mark these points clearly. Measure twice to ensure both sides match perfectly. Marking helps avoid mistakes and keeps snaps aligned. Precise placement improves the look and function of your project.
Reinforcing Fabric
Snap fasteners can pull on fabric and cause tears. Reinforce the marked spots with a small piece of interfacing or fabric patch. Sew or iron the reinforcement in place for extra strength. Reinforcement stops fabric from stretching or ripping. This step ensures your snaps stay secure and your project lasts longer.

Credit: www.youtube.com
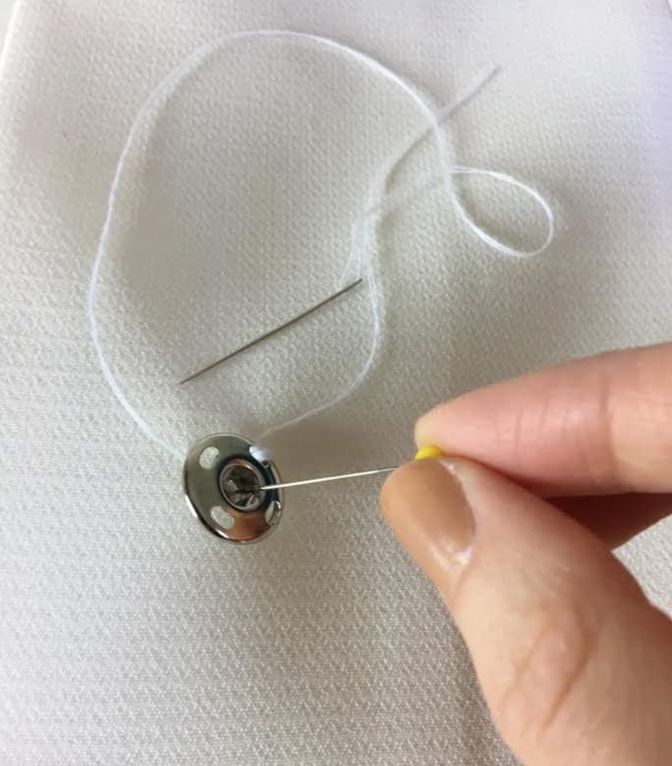
Attaching Snap Parts
Attaching snap parts is a simple step in sewing snap fasteners. It helps secure the two pieces of fabric together. Each snap has two parts: the socket and the stud. Sewing these parts carefully makes the snap work well and last long.
Sewing The Socket
Start by placing the socket on the fabric. Use a needle and thread that matches the fabric color. Sew small, tight stitches around the holes of the socket. Keep the stitches close to the edge to hold it firmly. Make sure the socket sits flat and does not move. Sew through the fabric several times for strength. Tie off the thread on the backside to finish.
Sewing The Stud
Place the stud on the matching fabric piece. Use the same thread color as before. Sew around the stud holes with small stitches. Check that the stud stays in place and does not wiggle. Sew multiple passes to secure the stud well. Knot the thread on the inside of the fabric. This keeps the stud stable and ready to snap.
Checking Alignment And Fit
Checking alignment and fit is a key step when sewing on snap fasteners. It ensures the snaps close correctly without gaps or pulling. Proper alignment makes the garment look neat and works well.
Take your time to position the snaps right before stitching. This step prevents mistakes and saves effort later. Testing the snap closure helps spot any issues early.
Testing Snap Closure
After placing the snaps, close them gently. Check if the snaps line up evenly and hold tight. The closure should feel secure but not too hard to snap open.
Look for any misalignment or gaps between the snaps. If the snap does not hold well, note the problem area. This test shows if the snaps need adjusting.
Adjusting If Needed
Move the snaps slightly if they do not align properly. Mark the new position with a pencil or fabric chalk. Remove the snap carefully and sew it in the new spot.
Test the snap closure again after adjusting. Repeat the process until the snaps close smoothly and fit well. Proper fit keeps the garment comfortable and durable.

Credit: www.youtube.com
Tips For Durable Snaps
Snap fasteners add convenience and style to many clothing items. To keep them working well, durability matters. Strong snaps save time and effort in the long run. These tips help make snaps last longer and stay secure.
Stitching Techniques
Choose strong thread like polyester or nylon for sewing snaps. Use small, tight stitches to hold the snap firmly. Sew around the snap base several times to add strength. Avoid loose or long stitches that can come undone. Keep the thread tension even to prevent puckering. Knot the thread securely at the start and end.
Care And Maintenance
Keep snaps clean from dirt and lint. Use a soft brush or cloth to wipe them gently. Avoid harsh detergents that can weaken the snap metal or fabric. Check snaps often for loose threads or damage. Repair or replace snaps quickly to prevent further issues. Store items with snaps in a dry place to stop rust or corrosion.
Frequently Asked Questions
How Do You Sew Snap Fasteners On Fabric?
To sew snap fasteners, mark placement and align snaps. Use a needle and strong thread. Stitch firmly around the snap’s holes for secure attachment. Avoid puckering by keeping stitches even and tight.
What Materials Are Needed To Sew Snap Fasteners?
You need snap fasteners, a needle, strong thread, scissors, and fabric. A snap fastener tool or pliers helps with installation. Optional tools include chalk for marking and a thimble for hand sewing.
Can You Sew Snap Fasteners On Thick Fabrics?
Yes, snap fasteners can be sewn on thick fabrics. Use a strong needle and heavy-duty thread. Make extra stitches for durability. Consider using snap fastener tools designed for thicker materials.
How To Avoid Damaging Fabric While Sewing Snaps?
Use sharp needles and avoid forcing them through fabric. Mark snap placement carefully before sewing. Sew slowly and evenly to prevent puckering. Reinforce fabric with interfacing if needed for extra strength.
Conclusion
Sewing on snap fasteners is simple with practice. Take your time to align each snap carefully. Use the right tools and stitch firmly. Small steps lead to strong, neat results. Your clothes and projects will look tidy and last longer.
Keep trying, and you will get better fast. Snap fasteners add convenience and style to any fabric. Enjoy creating with this handy sewing skill.