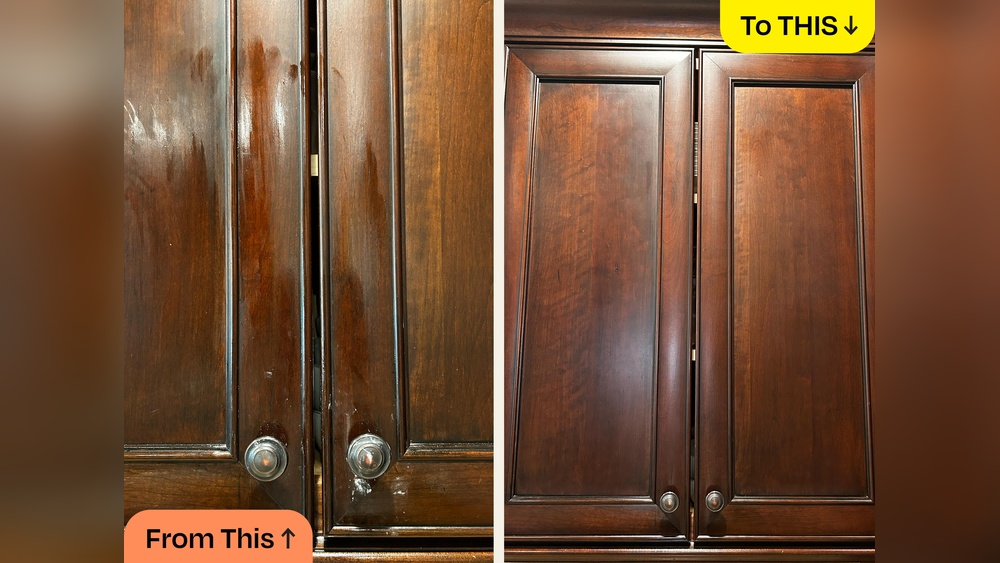
Are your old cabinet handles looking dull and outdated? You don’t have to replace them to give your cabinets a fresh, new look.
Refinishing your cabinet hardware is a simple and affordable way to transform your space. In this guide, you’ll learn easy steps to bring back the shine and charm of your old hardware. Imagine how satisfying it will feel to see your cabinets sparkle without spending a fortune.
Keep reading, and you’ll discover how to do it yourself, quickly and effectively.
Gathering Supplies
Before you start refinishing old cabinet hardware, gather all necessary supplies. Having the right tools and materials makes the job easier and gives better results. Prepare your workspace and collect everything you need. This step saves time and prevents interruptions.
Choosing The Right Tools
Select tools that fit the hardware size and shape. A small screwdriver set helps remove screws safely. Use a soft brush to clean dirt and dust from the pieces. Sandpaper with fine grit smooths out rough spots without damaging the metal. Gloves protect your hands during the process. A small container holds parts so nothing gets lost.
Selecting Paints And Finishes
Pick paints that stick well to metal surfaces. Spray paint gives a smooth, even coat quickly. Choose primer designed for metal to avoid peeling. Clear finishes protect paint and add shine. Matte or glossy finishes depend on your style preference. Water-based paints are easy to clean and safe to use indoors.
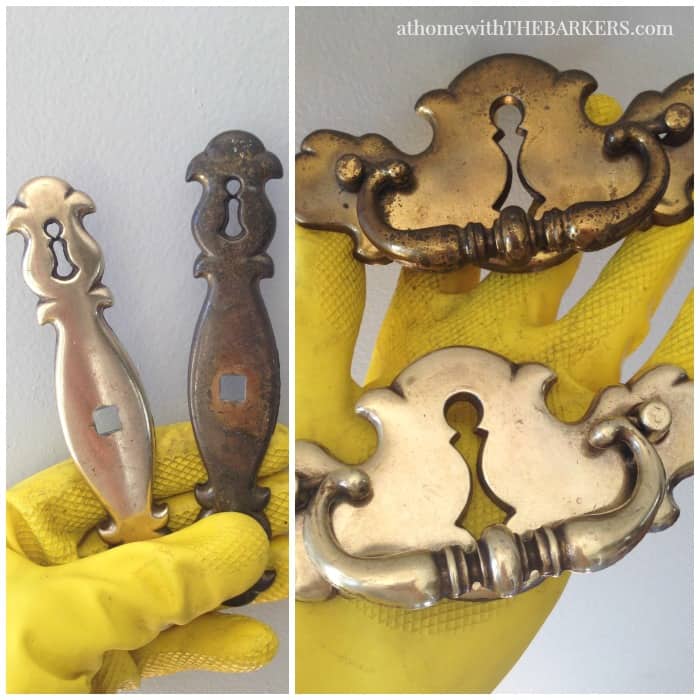
Credit: athomewiththebarkers.com
Removing Hardware
Removing old cabinet hardware is the first step in refinishing. This stage requires care to avoid damage. Proper removal protects both the hardware and cabinets. Taking time here makes the refinishing process smoother and more effective.
Safely Detaching Handles And Knobs
Start by finding the screws holding the handles or knobs. Use the right screwdriver to loosen them carefully. Turn screws slowly to avoid stripping or breaking. If screws are stuck, apply a little oil to loosen them. Hold the hardware firmly while unscrewing to prevent slips. Remove each piece gently to keep it intact.
Organizing Hardware Pieces
Place all screws and hardware parts in a small container. Label containers to remember which piece goes where. This keeps parts safe and easy to find later. Organizing saves time during reinstallation. Group similar items together for better order.
Cleaning And Preparing
Cleaning and preparing old cabinet hardware is the first step to a great finish. Dirt, grease, and rough surfaces stop paint or polish from sticking well. Proper cleaning and sanding make the hardware look smooth and fresh. This helps new finishes last longer and look better.
Start by removing all dirt and grease. Then, sand the surface gently to smooth out any rough spots or old paint. These simple steps set a solid base for refinishing your hardware.
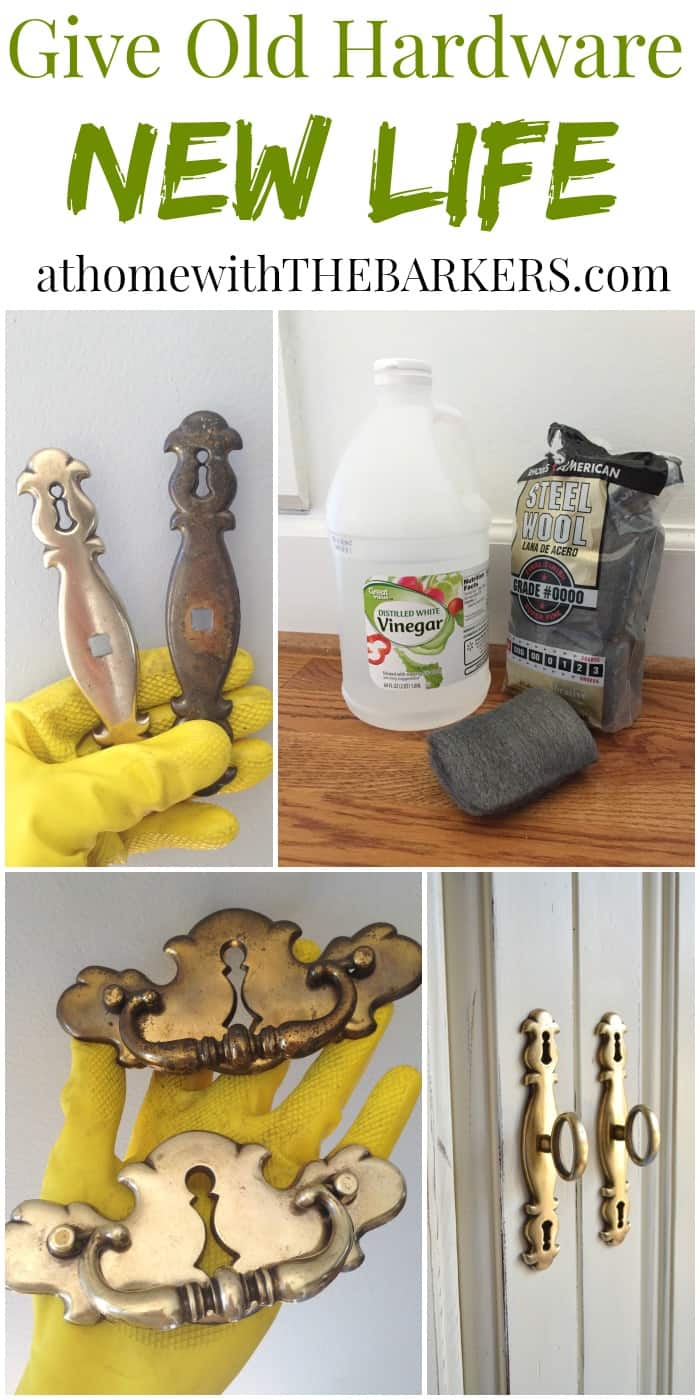
Removing Dirt And Grease
Use warm water mixed with mild dish soap to clean the hardware. Soak the pieces for a few minutes. Use a soft brush or cloth to scrub away dirt and grease. Pay close attention to crevices and corners. Rinse well with clean water and dry completely. A clean surface helps the new finish stick better.
Sanding For A Smooth Surface
Use fine-grit sandpaper, like 220 grit, to sand the hardware. Sand gently in small circles to avoid scratching. Focus on removing old paint or rust and smoothing rough patches. After sanding, wipe off dust with a damp cloth. Smooth surfaces hold paint or polish evenly and look more polished.
Applying Primer
Applying primer is a key step in refinishing old cabinet hardware. It helps paint stick better and lasts longer. Primer also prevents rust and covers any old paint or stains.
Taking time to apply primer well sets a strong base for your finish coat. It improves the final look and protects the hardware from damage.
Selecting Primer Types
Choose a primer made for metal surfaces. Oil-based primers work best for rust prevention. Water-based primers dry faster and clean up easily. Consider the type of paint you plan to use. Match the primer to your paint for best results.
Tips For Even Coverage
Clean hardware before priming. Remove dirt and grease with soap and water. Let it dry completely. Use light, thin coats of primer. Avoid thick layers that can drip or peel. Allow each coat to dry before adding another. Use a small brush or spray for smooth coverage. Cover all sides evenly for a neat finish.
Painting Or Spraying
Painting or spraying old cabinet hardware gives it a fresh, new look. This method is cost-effective and easy to do at home. It works well for metal, wood, or plastic hardware pieces. Proper painting can protect the hardware from rust and wear. Choose the right paint and technique for a smooth finish.
Using Spray Paint Vs. Brush
Spray paint covers surfaces evenly and quickly. It reaches small crevices better than a brush. Spray paint creates a smooth, thin coat that looks professional. It dries faster but needs good ventilation and protection from dust.
Using a brush allows more control on small areas. Brushes work well for detailed hardware with grooves. Brush strokes might show if not applied carefully. It takes longer to dry compared to spray paint.
Choose spray paint for speed and smoothness. Pick a brush for precision and detailed work.
Layering And Drying Times
Apply thin layers of paint for the best finish. Thick layers can drip and take longer to dry. Let each coat dry fully before adding the next one. This prevents smudging and uneven texture.
Drying times vary by paint type and room temperature. Usually, wait 15-30 minutes between coats. Complete drying may take up to 24 hours.
Patience ensures a durable and attractive finish on your hardware.
Adding Protective Finish
Adding a protective finish to old cabinet hardware keeps the new look fresh and lasting. It shields the surface from dirt, moisture, and wear. A good finish also enhances the hardware’s shine and color. Choosing the right sealant and applying a top coat carefully can make all the difference.
Choosing Sealants
Pick a sealant that fits the hardware material. Clear lacquers work well on metal and brass. Acrylic sealants are good for painted or delicate surfaces. Water-based sealants dry fast and have less smell. Test a small area first to check the effect. The right sealant stops rust and fading.
Applying Top Coats
Apply thin, even layers of the top coat. Use a soft brush or spray for smooth coverage. Let each layer dry completely before adding the next. Two or three coats usually provide enough protection. Avoid thick coats that can drip or cloud. The final finish should feel smooth and hard.
Reinstalling Hardware
Reinstalling hardware on your cabinets is the final step in the refinishing process. This part requires care to keep everything aligned and secure. Proper installation ensures your hardware looks great and works well for years.
Ensuring Proper Fit
Check the holes in your cabinet doors or drawers. They must match the new hardware size. Use the original holes if the hardware size is the same. If not, fill old holes with wood filler and drill new ones carefully.
Hold the hardware in place before screwing it in. Make sure it sits flat against the surface. Tighten screws evenly to avoid crooked handles or knobs. Avoid overtightening to prevent damage.
Final Touches For A Polished Look
Wipe the hardware with a soft cloth to remove fingerprints or dust. Check for any scratches or spots missed during refinishing. Use a small brush to clean around edges and screw heads.
Test each handle or knob by pulling gently. They should feel firm and stable. Adjust screws if anything feels loose. Clean the cabinet surface again to reveal your refreshed hardware.
Credit: athomewiththebarkers.com
Troubleshooting Common Issues
Refinishing old cabinet hardware can bring new life to your furniture. Sometimes, problems arise during the process. Troubleshooting these common issues helps you get the best results. Fix them quickly and continue with your project.
Dealing With Paint Chips
Paint chips can happen during sanding or painting. To fix small chips, lightly sand the area with fine-grit sandpaper. Clean the surface to remove dust. Apply a thin layer of paint using a small brush. Let it dry completely before handling. For larger chips, remove loose paint first. Then, prime the bare metal to help the paint stick. Paint over the primer with thin coats. Allow each coat to dry to avoid more chipping.
Fixing Uneven Finishes
Uneven finishes make hardware look rough. This happens if paint is too thick or dries too fast. Sand the hardware lightly with fine sandpaper. This smooths bumps and rough spots. Clean off dust before painting again. Use thin, even coats of paint. Let each coat dry fully before adding the next. Avoid heavy brush strokes to keep the finish smooth. Patience improves the final look greatly.
Creative Design Ideas
Creative design ideas make old cabinet hardware look fresh and unique. They add personality and style to any room. Simple changes can bring new life to tired cabinets. Experimenting with different looks can create a special space.
Try mixing and matching styles or adding decorative accents. These choices help your cabinets stand out. They also reflect your taste and creativity.
Mixing And Matching Styles
Combine different hardware styles for an eye-catching effect. Use modern handles with vintage knobs. This contrast adds depth and interest to cabinets. Mixing finishes, like brass and matte black, works well. It creates a balanced, stylish look without much effort. Keep the sizes similar to maintain harmony. This approach fits kitchens and bathrooms alike.
Using Decorative Accents
Add decorative accents to enhance old hardware. Small details like floral designs or geometric shapes stand out. Paint hardware in bold colors for a fresh look. Use stencils or stickers for unique patterns. Attach small charms or beads to knobs for charm. These accents make hardware pieces more personal. They turn simple hardware into art.

Credit: www.youtube.com
Frequently Asked Questions
How Do I Remove Old Cabinet Hardware Safely?
To remove old hardware, use a screwdriver to unscrew knobs and pulls gently. Avoid damaging the wood by working slowly. Keep screws and parts organized for reinstallation or replacement.
What Materials Are Best For Refinishing Cabinet Hardware?
Metal hardware like brass, bronze, or nickel refinish well. Clean thoroughly, then use paint, spray, or electroplating for a fresh look. Choose materials compatible with your tools and finishes.
Can I Refinish Cabinet Hardware Without Removing It?
It’s best to remove hardware before refinishing. This ensures even coverage and prevents damage to cabinets. Refinishing in place risks drips and uneven finishes.
How Do I Clean Cabinet Hardware Before Refinishing?
Soak hardware in warm, soapy water and scrub with a brush. Remove grease, dirt, and old finish. Dry completely before sanding or applying new finishes.
Conclusion
Refinishing old cabinet hardware can refresh any room quickly. It saves money and reduces waste. Small changes make a big difference in appearance. Use the right tools and take your time. Clean, sand, and paint carefully for best results. Enjoy the satisfaction of a simple, creative project.
Your cabinets will look new without replacing hardware. Try this easy update to brighten your space today.