Are you ready to upgrade your cabinets but unsure how to drill the perfect hole for your new hardware? You’re not alone.
Drilling holes might seem simple, but one wrong move can ruin your cabinets or leave your hardware misaligned. In this guide, you’ll discover easy, step-by-step tips to drill precise holes every time—no guesswork, no damage. By the end, you’ll have the confidence to tackle your project like a pro and transform your space with flawless cabinet hardware installation.
Keep reading, and let’s get started!
Tools Needed
Drilling holes for cabinet hardware needs the right tools. Using proper tools makes the job easier and more accurate. It helps prevent mistakes and saves time. Below are the essential tools needed for this task.
Types Of Drills
A cordless drill is best for drilling cabinet holes. It is easy to handle and portable. A corded drill can provide more power for harder materials. Choose a drill with adjustable speed for better control. A drill with a level or guide helps keep holes straight.
Drill Bits For Hardware
Use a brad-point drill bit for clean, precise holes. It prevents the wood from splintering. A twist drill bit works for general purposes. Match the drill bit size to the hardware screw or bolt. Keep extra bits ready for different hardware sizes.
Measuring Tools
A tape measure helps find the exact position for holes. A ruler or straight edge ensures straight and even alignment. Mark spots with a pencil before drilling. A combination square can check right angles for perfect placement.
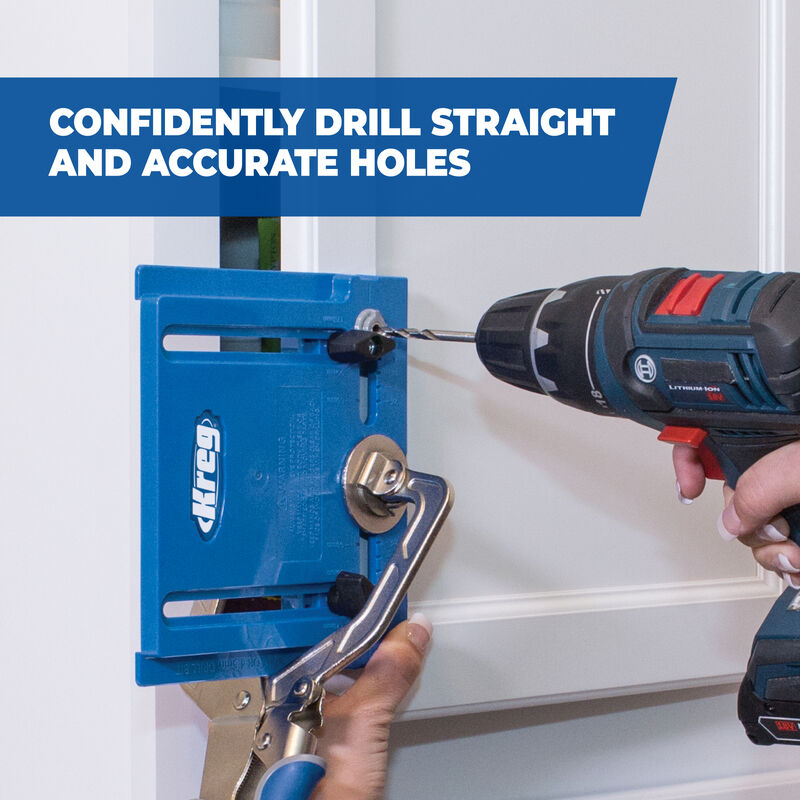
Credit: www.kregtool.com
Preparing The Cabinet
Preparing the cabinet is a key step before drilling holes for hardware. It ensures accurate placement and prevents damage. Taking time at this stage saves effort later and helps achieve a professional look.
Cleaning The Surface
Start by cleaning the cabinet surface thoroughly. Remove dust, grease, and dirt with a damp cloth. A clean surface helps marks stay visible. It also prevents the drill from slipping during work.
Marking Drill Points
Measure carefully to find the exact spot for each hole. Use a pencil to make small marks where the hardware will go. Double-check measurements on both sides to keep holes even. Precise marks lead to straight, well-aligned hardware.
Using Templates
Templates guide drilling by showing the exact hole locations. You can buy templates or make your own from cardboard. Place the template on the cabinet and secure it with tape. Drill through the template holes for consistent and accurate results.
Measuring And Marking
Measuring and marking are the first steps to drill holes for cabinet hardware. Accurate marks ensure the hardware fits perfectly and looks neat. Taking your time here saves effort later. Use a tape measure and pencil for clear, precise marks. Follow these tips to get it right.
Finding Center Points
Find the exact center of the cabinet door or drawer front. Measure the width and height, then divide by two. Mark the center lightly with a pencil. This point guides where to drill. Center points keep handles balanced and symmetrical.
Consistent Spacing
Keep holes evenly spaced for a uniform look. Measure the distance between each hole carefully. Use a ruler or a template to maintain equal gaps. Consistent spacing makes installation easier and improves appearance.
Double Checking Marks
Check your marks before drilling. Measure again to confirm accuracy. Use a level to ensure marks are straight and aligned. Double checking prevents mistakes and saves time. Correct marks help hardware fit perfectly.

Credit: us.plankhardware.com
Drilling Techniques
Drilling holes for cabinet hardware needs care and the right technique. Proper drilling makes the installation smooth and the hardware fit perfectly. It also prevents damage to the cabinet surface. Follow simple drilling steps to get clean, straight holes every time. These tips will help you avoid mistakes and get professional results.
Choosing The Right Speed
Select a drill speed that matches your material. Use a slow speed for hardwood or thick surfaces. Faster speeds work well for softwoods or thin materials. Slow drilling avoids overheating and keeps the drill bit sharp. Match the speed to the drill bit size too. Large bits need slower speeds to cut cleanly.
Drilling Straight Holes
Keep the drill perpendicular to the cabinet surface. Tilted holes cause hardware to sit unevenly. Use a drill guide or a square to check the angle. Start with a small pilot hole to guide the larger bit. Hold the drill steady and apply firm, even pressure. Let the drill do the work without forcing it.
Avoiding Splintering
Place masking tape over the drilling spot to reduce splintering. Drill slowly as you break through the wood surface. Use a backing board under the hole area for extra support. Sharp drill bits cut cleaner and reduce tear-out. Clean the drill bit often to keep it sharp and effective.
Installing Hardware
Installing hardware on cabinets is a key step to finish your project. It makes your cabinets look good and work well. Proper installation helps avoid loose knobs or handles that fall off. Follow clear steps to place and secure hardware correctly. Take time to align each piece before tightening screws. This ensures smooth use and a neat appearance.
Aligning Handles And Knobs
Start by placing the handle or knob on the drilled hole. Check if it is straight and centered. Use a ruler or level to confirm alignment. Mark the screw holes lightly with a pencil if needed. This prevents mistakes and keeps hardware uniform on all cabinets. Adjust the position until it feels balanced and looks right.
Securing Screws
Insert screws through the back of the cabinet door or drawer. Use a screwdriver to tighten them slowly. Avoid over-tightening, which can damage the wood or strip the screws. Tighten just enough to hold the hardware firmly. Stop if you feel resistance or the hardware starts to bend. Secure screws evenly for steady support.
Testing Fit And Function
After installing, open and close the door or drawer several times. Check if the handle or knob feels solid and comfortable. Make sure it does not wobble or catch on anything. Adjust screws if the hardware moves or feels loose. Confirm smooth function before finishing your project. Proper fit keeps cabinets easy to use and durable.
Tips For Accuracy
Drilling holes for cabinet hardware needs care and focus. Accuracy is key for a clean look and proper fit. Small mistakes can lead to misaligned handles or knobs. Follow these simple tips to drill precise holes every time.
Using Stop Collars
Stop collars limit how deep the drill bit goes. They help prevent drilling too far through the wood. Attach a stop collar at the needed depth on your drill bit. This tool keeps your holes uniform and neat. It also protects the cabinet surface from damage.
Practicing On Scrap Wood
Try drilling on a piece of scrap wood first. This practice helps you get a feel for the drill and bit. Check your hole size and depth before moving to the cabinet. Practice reduces the chance of mistakes on the final piece. It builds confidence and improves your control.
Working With Different Materials
Cabinets may be made of wood, MDF, or metal. Each material needs a different drilling approach. Use slower speed for hard materials like metal to avoid damage. Softer woods need less pressure to avoid splitting. Know your material and adjust your technique for best results.
Common Mistakes To Avoid
Drilling holes for cabinet hardware seems simple, but small errors can cause big problems. These mistakes lead to misaligned handles, loose screws, or damage to the cabinet. Avoiding common errors saves time and keeps your project neat and strong.
Understanding these mistakes helps you drill holes correctly the first time. Focus on precision and the right tools. This section highlights the most frequent errors to watch for.
Misaligned Holes
Misaligned holes make cabinet hardware look crooked. Measure carefully before drilling. Use a template or ruler to mark exact spots. Double-check measurements on both sides of the door or drawer. Small shifts cause handles to sit unevenly and spoil the look.
Wrong Drill Bit Size
Choosing the wrong drill bit size causes loose or tight holes. Use a drill bit that matches the screw size exactly. Too big, and the screw won’t hold. Too small, and the screw may split the wood or break. Check screw packaging for the recommended drill bit size.
Overdrilling
Overdrilling makes holes too deep or wide. This weakens the cabinet material and hardware fit. Drill just deep enough for the screw length. Use a drill stop or tape on the bit to control depth. Avoid pushing too hard or drilling too long.

Credit: plankhardware.com
Frequently Asked Questions
How Do I Measure For Cabinet Hardware Holes?
Measure from the cabinet edge to the hole center accurately. Use a ruler or template for consistency. Mark the spot lightly with a pencil before drilling to ensure precise placement.
What Drill Bit Size Is Best For Cabinet Hardware?
Use a drill bit matching your hardware screws. Typically, a 3/16-inch or 1/4-inch bit fits most cabinet handles. Always check the hardware package instructions for exact sizes.
How Can I Avoid Splitting Wood When Drilling?
Drill a small pilot hole first to prevent wood splitting. Use a sharp drill bit and drill slowly. Clamping the wood securely also helps avoid damage during drilling.
Should I Use A Drill Guide For Cabinet Holes?
Yes, a drill guide ensures straight and accurate holes. It helps maintain consistent hole depth and position. This tool is especially useful for beginners or multiple cabinet installations.
Conclusion
Drilling holes for cabinet hardware is simple with the right tools. Measure carefully and mark your spots clearly. Use a drill bit that fits the hardware screws. Take your time and drill straight holes for best results. Practice on scrap wood if you feel unsure.
Clean the holes before attaching hardware to avoid damage. Following these steps helps your cabinets look neat and last longer. Now, you can add handles or knobs with confidence. Enjoy your improved cabinets and the new look you created!