Are you struggling to fit fasteners into your SolidWorks assemblies quickly and accurately? If you want to save time and avoid frustrating errors, mastering the right techniques to mate fasteners is essential.
This guide will show you simple, step-by-step methods to make your assembly process faster and more precise. By the end, you’ll feel confident handling fasteners like a pro, speeding up your projects and improving your designs. Ready to make your SolidWorks workflow smoother?
Keep reading!

Credit: cadbooster.com
Preparing Your Components
Preparing your components is the first step to mate fasteners in SolidWorks. Good preparation saves time and prevents errors. It also makes the assembly process smoother. Focus on importing the right parts and organizing them well.
Start with clean, well-made parts. Check each component for any missing features or errors. Make sure all parts fit the design requirements before moving to the assembly stage.
Importing Parts
Import parts carefully to keep the model accurate. Use supported file formats like STEP, IGES, or native SolidWorks files. Avoid importing large files that slow down the system. Check each part after importing to ensure no details are lost. Rename parts clearly to avoid confusion later.
Organizing The Assembly
Create folders or groups to keep parts organized. Place fasteners in a separate folder for easy access. Use clear, simple names for each component. Arrange parts in the order you plan to mate them. This method keeps the workspace tidy and efficient.
Selecting The Right Fasteners
Selecting the right fasteners is key to creating strong assemblies in SolidWorks. Fasteners hold parts together and affect the design’s durability. Choosing the correct fastener type and size helps avoid assembly issues and ensures proper fit.
Fasteners come in various shapes and sizes. Each type serves a different purpose. Understanding common fastener types makes it easier to pick the right one for your design. Size matters too. The wrong size can cause weak joints or damage parts.
Standard Fastener Types
Bolts, screws, nuts, and washers are standard fastener types in SolidWorks. Bolts usually join two or more parts with a nut. Screws fasten parts by threading directly into material. Nuts secure bolts from the opposite side. Washers distribute pressure evenly and protect surfaces.
Each type has subcategories. For example, screws can be machine screws or self-tapping screws. Bolts include hex bolts and carriage bolts. Using standard fasteners simplifies your design process and improves compatibility with real-world hardware.
Choosing Fastener Sizes
Fastener size depends on the thickness of parts and load requirements. Diameter and length are the main size factors. Diameter affects strength. Length ensures the fastener passes through all parts and tightens properly.
Use SolidWorks tools to measure part thickness and choose matching fastener sizes. Avoid oversized fasteners that add weight. Avoid undersized fasteners that may fail under load. Correct sizing increases assembly strength and reliability.
Using The Mate Tool
The Mate Tool in SolidWorks helps join parts together. It is useful when working with fasteners like screws and bolts. Using this tool saves time and ensures parts fit perfectly. It controls how parts move or stay still. This makes your assembly accurate and realistic.
Accessing The Mate Feature
Find the Mate tool on the Assembly toolbar. Click the “Mate” icon or press the shortcut key “M”. A Mate PropertyManager window will open. You can select faces, edges, or points of parts to mate. The interface guides you step-by-step. This makes the process easy and fast.
Types Of Mates For Fasteners
Fasteners need specific mates to work correctly. The most common mates are:
- Coincident Mate: Aligns two faces or edges perfectly.
- Concentric Mate: Aligns holes or cylindrical parts, like bolts and nuts.
- Distance Mate: Sets a fixed distance between parts.
- Lock Mate: Fixes parts so they cannot move.
Using these mates helps position fasteners accurately in assemblies. It ensures the parts stay connected as designed.

Credit: www.reddit.com
Aligning Fasteners With Components
Aligning fasteners with components is a key step in SolidWorks assembly. Proper alignment ensures parts fit together correctly. It helps avoid errors in your design. You can use different mate types to position fasteners precisely. Each mate type controls how parts connect and move.
Face To Face Mates
Face to face mates align two flat surfaces. This mate brings the faces into direct contact. It works well for bolts and nuts touching parts. Select the faces on the fastener and component to mate. This mate fixes the distance between faces to zero.
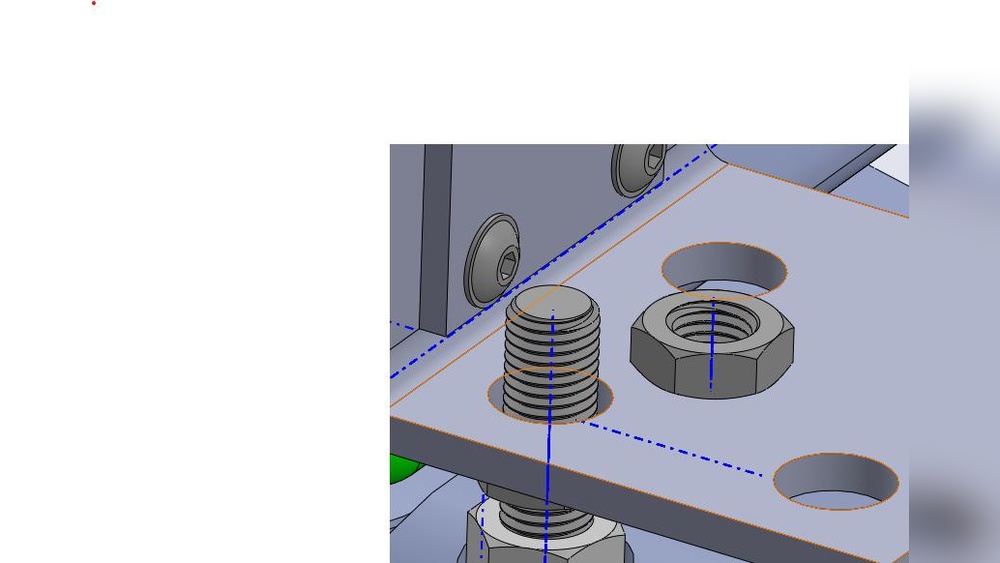
Concentric Mates
Concentric mates align cylindrical parts along a common center axis. Use this to position screws inside holes. It makes the fastener rotate around the hole’s center line. Select the circular edges or cylindrical faces of both parts. This mate keeps the parts centered perfectly.
Coincident Mates
Coincident mates bring points or edges to the same location. Use this to align fastener edges with component edges. It fixes two points or lines on the same plane. Select matching edges or vertices for the mate. This helps fasteners line up exactly with components.
Speeding Up The Mating Process
Mating fasteners in SolidWorks can take time if done one by one. Speeding up this process helps save effort and finish designs faster. Using smart tools and methods reduces repetitive tasks. This section shares simple ways to mate fasteners quickly and easily.
Using Mate References
Mate References let you set default mates for parts. Create mate references on fasteners before adding them. SolidWorks automatically applies mates when you insert parts. This cuts down clicking and searching for faces. It keeps your workflow smooth and fast.
Copying Mates
Copying Mates duplicates existing mates to new parts. Select a mate, then copy it to another fastener. This saves time by avoiding the need to mate every fastener again. It works best when fasteners are similar or identical.
Using Patterns For Multiple Fasteners
Patterns help place many fasteners at once. Use linear or circular patterns to repeat fastener mates. Create one mate, then pattern it along a path. This method quickly handles large groups of fasteners. It keeps spacing equal and assembly neat.
Troubleshooting Common Issues
Troubleshooting common issues in SolidWorks while mating fasteners can save time and reduce errors. Problems often arise due to incorrect mate definitions or limits. Understanding how to fix these issues helps create accurate assemblies. Below are key tips to resolve common mate problems quickly.
Fixing Mate Conflicts
Mate conflicts happen when two mates try to control the same part differently. SolidWorks shows an error or prevents the mate from being added. To fix this, identify conflicting mates in the FeatureManager design tree. Suppress or delete the mate causing the problem. Reapply the mate carefully to avoid overlap or contradiction. Use simpler mate types like concentric or coincident for fasteners. Check the part positions and adjust them before mating again.
Adjusting Mate Limits
Mate limits control how far parts can move relative to each other. Sometimes limits are too tight or too loose, causing assembly issues. Edit the mate and open the limit options. Change the minimum and maximum distance to allow proper movement. For fasteners, ensure limits match the thread length or clearance needed. Test the movement after adjustment to confirm the limits work well. Proper limits help prevent parts from colliding or floating apart.
Finalizing And Testing The Assembly
After assembling fasteners in SolidWorks, finalizing and testing the assembly is crucial. This step ensures all parts fit well and move as expected. It helps avoid issues during production or use. Carefully checking the assembly saves time and effort later.
Checking Movement And Clearances
Check how the fasteners and parts move together. Rotate, slide, or simulate motion in the assembly. Look for any parts that collide or stick. Make sure there is enough space between moving parts. Adjust mates if parts are too tight or overlap. Proper clearances prevent damage and ensure smooth operation.
Saving And Documenting
Save your assembly with a clear and descriptive name. Use version control to track changes over time. Add notes or comments about key mates or adjustments. Create drawings or exploded views for better understanding. Documentation helps others follow your work easily. It also supports future edits and reviews.

Credit: www.youtube.com
Frequently Asked Questions
How Do I Mate Fasteners In Solidworks Quickly?
To mate fasteners fast, use SolidWorks Toolbox. Select the fastener, insert it, and apply standard mates automatically. This saves time and ensures proper alignment.
What Are The Best Mate Types For Fasteners?
Use concentric and coincident mates for fasteners. Concentric mates align holes and shafts, while coincident mates fix surfaces. These mates guarantee precise positioning.
Can I Automate Fastener Mating In Solidworks?
Yes, SolidWorks Toolbox automates fastener mating. It inserts fasteners and applies suitable mates based on part geometry. This speeds up assembly creation.
How To Fix Fastener Alignment Issues In Solidworks?
Check mate references and constraints. Use concentric mates for cylindrical parts and adjust mate order. Rebuild the model to resolve alignment problems.
Conclusion
Mating fasteners in SolidWorks becomes easier with practice. Follow the right steps for proper alignment and fit. Use the mate tools to connect parts quickly and accurately. Check your assembly to avoid errors or clashes. This skill saves time and improves your designs.
Keep experimenting to gain confidence and speed. Soon, you will build complex assemblies with ease. SolidWorks helps bring your ideas to life efficiently.