Are you looking to control all four of your lights with just one switch? It might sound tricky, but it’s easier than you think.
Imagine turning on or off every light in your room with a single flick—no more running around flipping multiple switches. In this guide, you’ll discover simple steps to connect 4 lights to one switch safely and effectively. Keep reading, and by the end, you’ll have the confidence to tackle this project yourself and brighten up your space exactly how you want.
Tools And Materials Needed
To connect 4 lights to one switch, you need the right tools and materials. This helps ensure the job is safe and works well. Having everything ready saves time and avoids problems during installation.
Basic Electrical Tools
Start with a good set of basic electrical tools. A screwdriver set is essential for opening switch boxes and securing wires. Wire strippers help remove insulation without damaging wires. A voltage tester checks if the power is off before you start. Needle-nose pliers assist in bending and twisting wires. Electrical tape is useful for covering wire connections. A drill might be needed to mount the switch or lights in place.
Required Materials
You will need four light fixtures that match your space and style. A single-pole switch is used to control all four lights together. Electrical wire, usually 14 or 12 gauge, connects the lights and switch. Wire connectors, also called wire nuts, safely join wires together. A switch box holds the switch securely in the wall. Make sure to have enough wire length to reach between the switch and all lights.

Credit: www.cockam.com
Safety Precautions
Working with electrical wiring can be risky. Safety must be your top priority. Taking the right precautions protects you from shocks and injuries. Follow these simple steps to stay safe while connecting 4 lights to one switch.
Turning Off Power
Always turn off power at the main circuit breaker. This stops electricity from flowing to the wires. Use a voltage tester to confirm no power is present. Never skip this step. It prevents dangerous shocks and accidents.
Using Protective Gear
Wear safety gloves to protect your hands. Use goggles to shield your eyes from sparks or dust. Avoid loose clothing that might catch on wires or tools. Protective gear reduces injury risk and keeps you safe during work.
Understanding Your Switch And Lights
Connecting four lights to one switch requires a basic understanding of your switch and lights. Knowing the types of switches and how light fixtures are wired helps you set up the connection safely. This knowledge also ensures your lights work properly without any electrical issues.
Types Of Switches
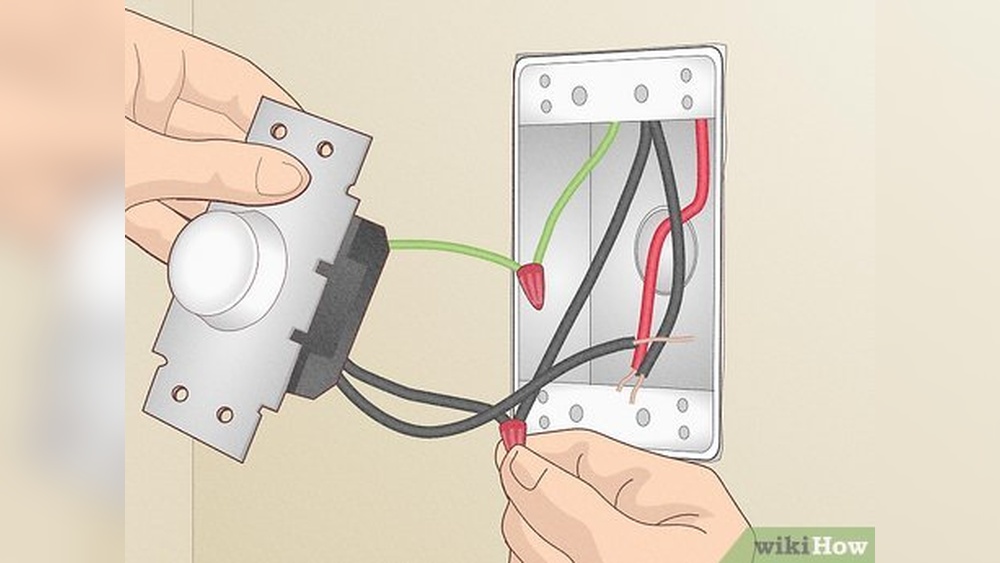
There are several switch types used in homes. The most common is the single-pole switch. It controls one light or a group of lights from one location. Another type is the three-way switch, which controls lights from two different spots. Dimmer switches adjust light brightness. Knowing your switch type helps plan the wiring correctly.
Light Fixture Wiring Basics
Light fixtures usually have two or three wires: live, neutral, and sometimes ground. The live wire carries electricity from the switch to the light. The neutral wire completes the circuit by returning electricity to the panel. The ground wire offers safety by preventing shocks. Understanding these wires helps connect multiple lights to one switch safely.
Preparing The Wiring
Preparing the wiring is the first important step to connect four lights to one switch. It ensures safety and smooth installation. You need to handle wires carefully to avoid damage or mistakes.
Organizing the wires before connecting them makes the process easier. Clear wiring also helps in future repairs or upgrades.
Identifying Wires
Start by turning off the power at the breaker box. Use a voltage tester to confirm no electricity flows through the wires. Identify the live (hot), neutral, and ground wires. The live wire is usually black or red. The neutral wire is white. The ground wire is green or bare copper. Label each wire with tape for easy recognition.
Stripping And Organizing
Use a wire stripper to remove about half an inch of insulation from each wire end. Be careful not to cut the wire strands. Twist the wire strands tightly to avoid loose ends. Group the wires by type and arrange them neatly. This prevents confusion and ensures safe connections.
Connecting The Lights To The Switch
Connecting four lights to a single switch is simple and effective. This setup lets you control all lights with one click. It saves space and wiring effort. The key is to connect the lights correctly to the switch. Safety and proper wiring are essential for a good connection.
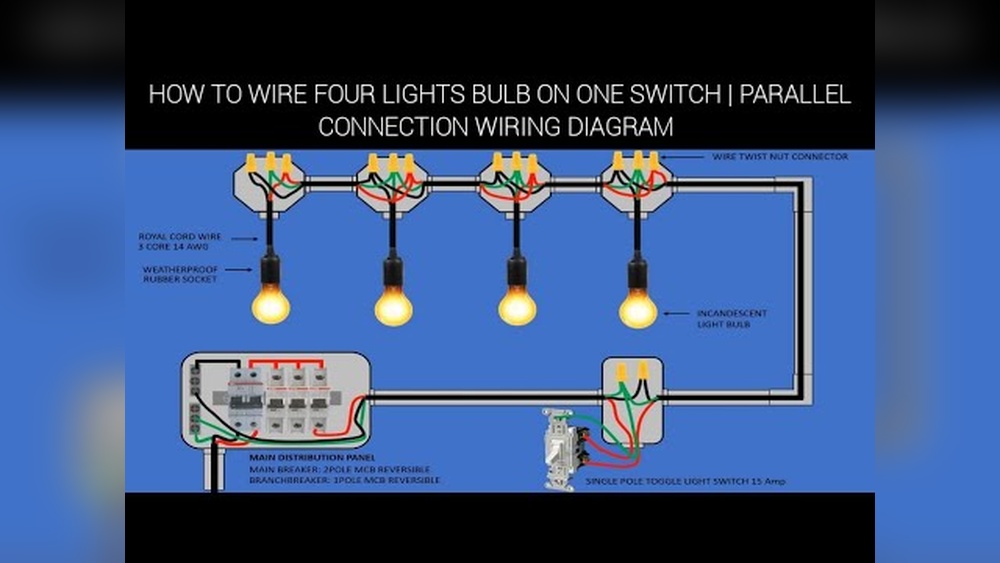
Wiring In Parallel
Wire the lights in parallel to keep the same voltage across each. Connect all the live wires from the lights to the switch’s output. Then, join all neutral wires together. This way, each light works independently. If one light fails, the others stay on. This method ensures all lights receive equal power.
Securing Connections
Use wire nuts or connectors to join wires tightly. Loose connections can cause flickering or hazards. Wrap exposed wires with electrical tape for safety. Double-check each connection before turning on power. Secure wires inside the switch box to avoid strain. Proper connections protect your home and ensure lights work well.

Credit: diy.stackexchange.com
Testing The Setup
Testing the setup is a key step after wiring four lights to one switch. It confirms the connection works properly. This step ensures safety and function before using the lights daily.
Restoring Power
Turn the main power back on at the breaker box. Make sure the switch is in the off position before restoring power. This prevents sudden sparks or shocks.
Once power is restored, flip the switch to the on position. Check for any signs of electrical issues like flickering or sparks. If all looks safe, move to the next step.
Checking Light Functionality
Turn the switch on and watch each light carefully. All four lights should turn on evenly and stay lit. If any light does not come on, check the wiring again.
Turn the switch off to confirm all lights turn off at the same time. This confirms the switch controls all lights correctly. Repeat this test a few times for safety.
Troubleshooting Common Issues
Troubleshooting common issues is key when connecting four lights to one switch. Problems can happen even with the best setup. Fixing these issues quickly keeps your lights working well and saves time.
Check the basics first. Make sure the power is on and connections are tight. Small errors often cause big problems. Below are common issues and how to fix them.
Lights Not Turning On
Start by checking the switch. Sometimes it is faulty or loose. Tighten any loose screws on the switch and wiring. Check the circuit breaker to ensure it is not tripped.
Test the bulbs one by one. A burned-out bulb can stop all lights from working. Replace any bad bulbs with new ones.
Look at the wiring carefully. Incorrect connections may stop power flow. Confirm that all wires match the switch and light terminals correctly.
Flickering Or Dim Lights
Flickering often means loose wiring or poor contact. Turn off power and tighten all wire connections. Check the wire nuts and terminals for corrosion or damage.
Dim lights may result from low voltage. This happens if the wires are too thin or too long. Use the right wire size to ensure proper current.
Check if the bulbs match the switch type. Dimmer switches need compatible bulbs to work well. Replace bulbs with ones made for dimmer use if needed.

Credit: www.youtube.com
Frequently Asked Questions
How Do I Wire 4 Lights To One Switch Safely?
To wire 4 lights to one switch, connect all light wires in parallel. Use proper wire connectors and ensure power is off. Follow local electrical codes and use a single switch to control all lights simultaneously.
Can I Use One Switch For Multiple Light Fixtures?
Yes, a single switch can control multiple light fixtures. Connect the switch’s output to each light’s live wire. This setup allows you to turn all lights on or off at once, simplifying control and saving energy.
What Tools Do I Need To Connect 4 Lights To One Switch?
You will need a screwdriver, wire stripper, electrical tape, wire nuts, voltage tester, and appropriate cables. These tools help you safely strip wires, connect fixtures, and secure electrical connections following safety standards.
Is It Possible To Control 4 Lights From One Switch Dimmer?
Yes, you can use a compatible dimmer switch to control 4 lights. Ensure the dimmer supports the total wattage of all lights combined. This setup allows adjustable brightness for all connected fixtures.
Conclusion
Connecting four lights to one switch is simple with the right steps. Always turn off power before starting any wiring. Use proper tools and follow safety rules closely. Check each connection twice to avoid mistakes. Once done, test the lights to ensure they work well.
This setup saves space and adds convenience. Now, you can control multiple lights easily from one place. Enjoy brightening your room with just one switch!