Are your light switch covers looking dull or boring? What if you could turn them into eye-catching pieces that add charm to any room?
Decoupaging light switch covers is an easy and affordable way to refresh your space without spending a lot of money. In this guide, you’ll discover simple steps to transform plain switch covers into personalized decor that reflects your style. Ready to make your switches stand out and impress your guests?
Keep reading—you’re just moments away from creating something truly unique.
Materials Needed
Decoupage light switch covers is a fun and creative project. Having the right materials makes the process smooth. Gather all supplies before starting. This helps avoid interruptions and keeps the work neat.
Choosing Switch Covers
Select plain switch covers for easy decoration. Plastic covers work best. They are smooth and simple to paint or glue on. Avoid metal covers because paint and glue may not stick well. Pick covers that fit your switches perfectly.
Selecting Paper And Fabrics
Use thin paper or lightweight fabric for decoupage. Scrapbook paper, napkins, or printed tissue paper work well. Fabric with small patterns adds texture. Make sure materials are cut to fit the cover size. Avoid thick or heavy materials that wrinkle easily.
Adhesives And Sealants
Choose glue made for decoupage or craft projects. Mod Podge is a popular choice. It sticks well and dries clear. Use a small brush to apply glue evenly. After gluing, seal the cover with a clear varnish or sealant. This protects your design and makes it last longer.

Credit: www.youtube.com
Preparing Switch Covers
Preparing switch covers is the first step in a successful decoupage project. Clean and smooth surfaces help the glue and paper stick better. This step prevents bumps and peeling later. Follow simple steps to get your switch covers ready.
Cleaning And Sanding
Start by wiping the switch covers with a damp cloth. Remove dirt, dust, and oils that block glue. Use mild soap if needed. Let covers dry completely before moving on. Next, gently sand the covers with fine-grit sandpaper. Sanding roughens the surface slightly. This helps the paper and glue stick firmly. Wipe away sanding dust with a dry cloth.
Removing Hardware
Remove screws and any attached parts from the switch covers. This makes decorating easier and cleaner. Use a screwdriver to take out screws carefully. Keep screws in a safe place for later use. Avoid damaging covers during removal. Working without hardware lets you cover every part smoothly.
Cutting And Arranging Designs
Cutting and arranging designs is an important step in the decoupage process. This step helps your light switch cover look neat and stylish. Proper cutting and placement give the final piece a clean and polished appearance. Taking time here makes your project stand out.
Careful planning of your paper and design shapes ensures a perfect fit. It also helps avoid waste. Let’s explore how to measure and create patterns for your switch cover.
Measuring Paper
Start by measuring your light switch cover with a ruler. Note the height and width in millimeters or inches. Write these numbers down for accuracy. Add a small margin, about 1/8 inch, around the edges. This margin helps cover the edges fully.
Cut a piece of paper slightly larger than your measurements. This allows room for adjustment while arranging. Use a pencil to mark the paper before cutting. Straight lines make cutting easier and cleaner.
Creating Patterns
Next, plan your design layout on the paper. You can draw shapes or trace patterns with a pencil. Think about how the design fits the switch cover’s shape. Simple shapes like circles or squares work well. Overlapping patterns add depth and interest.
Cut out the shapes carefully with sharp scissors or a craft knife. Keep your cuts smooth to avoid rough edges. Arrange the pieces on the switch cover without glue first. This lets you move shapes until you find the best look.
Once happy with the layout, start gluing from the center outwards. This method prevents air bubbles and wrinkles. Take your time to create a neat and attractive design.
Applying Decoupage
Applying decoupage to light switch covers is a simple way to add style to any room. It involves carefully attaching decorative paper or fabric to the surface. This process needs patience and attention to detail for the best results.
Start by choosing your design and cutting it to fit the switch cover. Use the right glue and tools to make the process smooth and neat. Follow each step carefully to avoid wrinkles and bubbles.
Gluing Techniques
Use a brush or sponge to apply a thin layer of glue on the cover. Spread the glue evenly to avoid thick spots. Place the paper or fabric gently on the glue. Press down lightly from the center outwards. This helps the design stick well and prevents air pockets. Add another thin layer of glue over the top to seal the design. Let it dry completely before handling.
Smoothing Out Bubbles
Bubbles can ruin the smooth look of your switch cover. Use a soft cloth or a plastic card to smooth out bubbles. Start from the center and move toward the edges. Work carefully to push out trapped air. Small bubbles can be popped gently with a pin. Smooth the area again after popping. This step makes the surface look flat and neat.
Sealing And Finishing
Sealing and finishing are key steps in decoupaging light switch covers. They protect your design from damage and make it last longer. A good seal also gives a smooth, polished look. Without sealing, the paper can peel or fade. Finishing adds extra shine or a matte effect. Follow these tips to get the best results.
Choosing The Right Sealant
Pick a sealant that works with paper and paint. Water-based sealants dry fast and have low odor. They are safe for indoor use. Look for a sealant that is clear and won’t yellow over time. Matte or glossy finishes are available. Choose one that fits your style. Some sealants also protect against water and scratches.
Applying Multiple Coats
Apply the sealant in thin, even layers. Let each coat dry fully before adding the next. This builds strong protection without bubbles or streaks. Usually, two to three coats work best. Use a soft brush or sponge for smooth application. Light sanding between coats helps the next layer stick better. Be patient. Multiple coats give your switch cover a durable finish.
Creative Design Ideas
Creative design ideas make decoupaging light switch covers fun and unique. You can transform plain covers into art pieces that brighten any room. Simple materials and a little imagination bring amazing results. Explore different styles and techniques to match your home’s vibe.
Themed Covers
Themed covers create a strong visual impact. Choose themes like nature, vintage, or holidays. Use matching paper patterns and colors. For a beach theme, add seashell images and soft blues. For a vintage look, try old newspaper prints or floral patterns. Themed covers make rooms feel more connected and lively.
Using Mixed Media
Mixed media adds texture and depth to your covers. Combine paper, fabric, and small objects like buttons or beads. Use thin lace or ribbon for a delicate touch. Layer different materials for a rich, creative effect. This approach makes each cover one of a kind and interesting to touch.
Personalized Touches
Personalized touches make covers special. Add initials, names, or favorite quotes with paint or markers. Use photos of family, pets, or travels. Customize colors to fit your style. These covers show your personality and make your space truly yours. Small details create big smiles.
Maintenance Tips
Maintaining your decoupaged light switch covers helps keep them looking fresh. Proper care prevents damage and extends their beauty. Small efforts can make a big difference in preserving your work.
Cleaning Decoupaged Covers
Use a soft, dry cloth to remove dust regularly. Avoid water or harsh cleaners that can ruin the paper and glue. For stubborn spots, gently wipe with a slightly damp cloth. Do not soak the cover or scrub hard. Let the cover dry completely before touching it again.
Repairing Minor Damage
Small tears or chips can be fixed easily. Apply a thin layer of decoupage glue over the damaged area. Press down any loose paper carefully and smooth it out. Allow the glue to dry fully to avoid peeling. Touch up with matching paint or paper if needed. Regular checks help catch problems early.
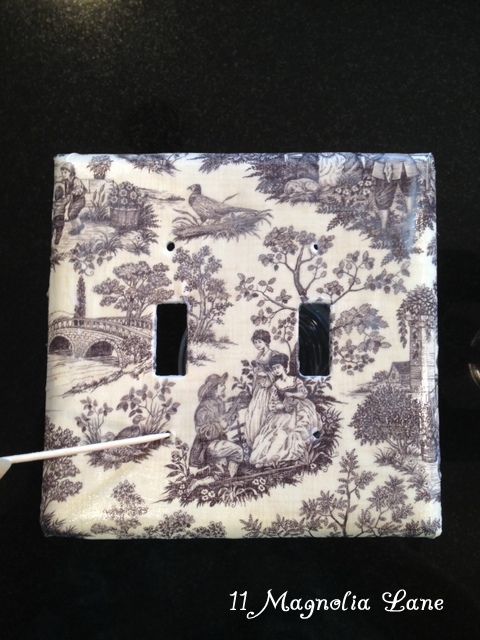
Credit: www.11magnolialane.com
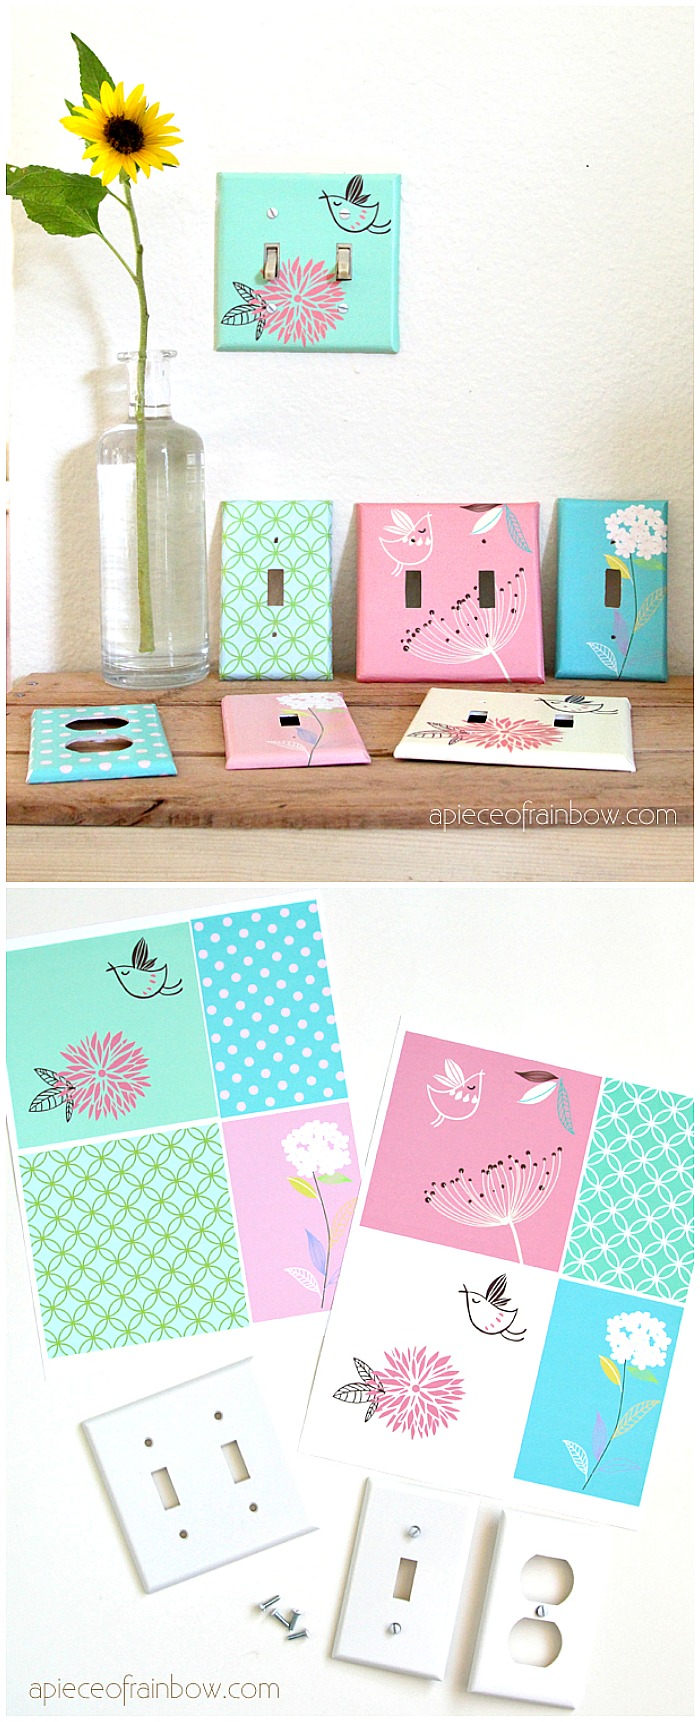
Credit: www.the36thavenue.com
Frequently Asked Questions
How Do I Prepare Light Switch Covers For Decoupage?
Clean the cover with soap and water. Remove any dust or grease. Lightly sand the surface for better glue adhesion. Ensure the cover is dry before starting decoupage.
What Materials Are Needed For Decoupaging Switch Covers?
You need switch covers, decorative paper or fabric, Mod Podge or glue, a brush, and scissors. Optionally, use acrylic sealant for durability.
How Long Does It Take To Decoupage A Switch Cover?
Decoupage typically takes 30 to 60 minutes. Drying time varies but usually requires 1 to 2 hours. Total time depends on layering and sealing steps.
Can Decoupaged Switch Covers Be Cleaned Easily?
Yes, use a damp cloth to gently wipe the surface. Avoid harsh chemicals or soaking. Proper sealing makes covers water-resistant but not waterproof.
Conclusion
Decoupage light switch covers add charm to any room. You can customize covers with your favorite designs easily. This project needs only a few supplies and little time. Try different papers and colors for unique looks. It’s a fun way to refresh your space cheaply.
Enjoy the creative process and personal touch it brings. Your walls deserve a little extra style, don’t they? Give it a try and see the difference yourself. Simple, quick, and satisfying—decoupage makes decorating fun.