Have you ever wished you could control your lights from two different spots in the same room? Adding an extra light switch to your existing one can make your space more convenient and functional.
Whether it’s for a long hallway, a large living room, or a tricky staircase, this simple upgrade can change the way you use your lighting. In this guide, you’ll discover easy steps to add that extra switch without calling an electrician.
Ready to take control of your lighting and make your home smarter? Let’s dive in and make it happen!
Tools And Materials Needed
Adding an extra light switch to an existing switch requires specific tools and materials. Having the right items makes the process smoother and safer. Prepare everything before starting your project.
Gathering tools and materials helps avoid interruptions. It also ensures you work efficiently and correctly. Safety gear is important to protect yourself during the work.
Basic Tools
- Screwdriver (flathead and Phillips)
- Wire stripper
- Voltage tester
- Needle-nose pliers
- Drill with bits
- Measuring tape
Electrical Materials
- Extra light switch (matching existing type)
- Electrical box
- Romex wire (14/2 or 12/2 depending on circuit)
- Wire nuts
- Electrical tape
Safety Equipment
- Insulated gloves
- Safety glasses
- Flashlight or work light

Credit: www.do-it-yourself-help.com
Safety Precautions
Working with electrical switches involves risks. Following safety steps protects you and your home. Always respect electricity to avoid accidents. Simple precautions keep the work safe and smooth.
Turn Off The Power
Find the correct breaker in your electrical panel. Switch it off before starting any work. Test the switch with a voltage tester. Make sure no current flows to the switch box.
Use Proper Tools And Equipment
Choose insulated screwdrivers and pliers for electrical work. Wear rubber-soled shoes to avoid shocks. Use a sturdy ladder if needed. Avoid metal ladders or wet surfaces.
Check Local Electrical Codes
Follow rules set by your city or state. Codes ensure safe and legal installations. You might need a permit before starting. Inspectors check your work for safety.
Wear Safety Gear
Put on safety glasses to protect your eyes. Gloves help avoid cuts and shocks. Keep your clothes tight to prevent snagging. Remove jewelry that might touch wires.
Work In Good Lighting
Use a bright flashlight or lamp near your work area. Clear visibility helps avoid mistakes. Avoid working in dark or cluttered spaces.
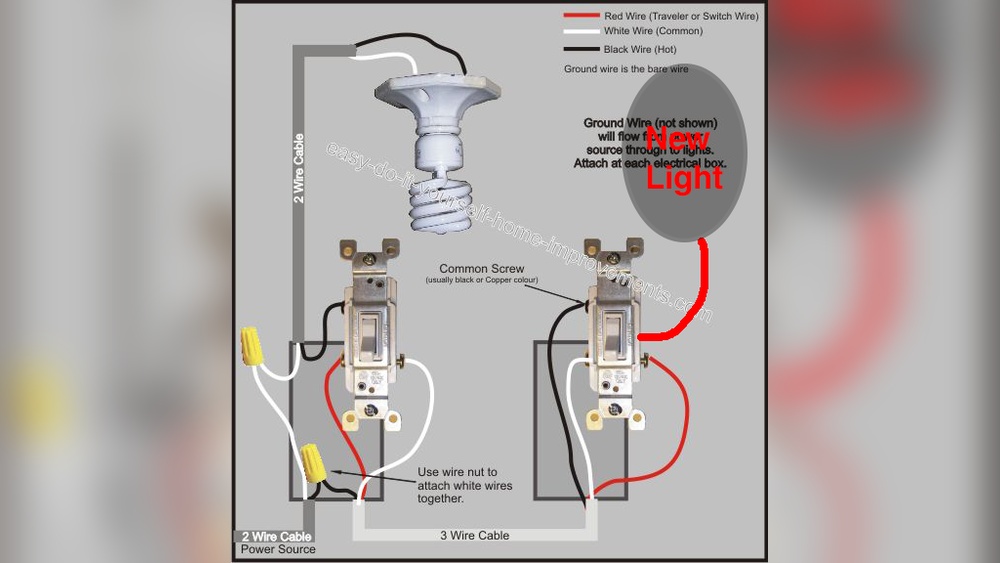
Identify Existing Switch Wiring
Start by turning off the power to the switch at the breaker. Check the wires connected to the existing switch to see their types and colors. Understanding the current wiring helps plan adding the new switch safely.
Understanding The Purpose Of Existing Wiring
Identifying the wiring of the current switch is the first step. It helps to know how power flows through your switch. This step ensures safe and proper installation of the new switch. You can avoid electrical hazards by understanding the wiring setup.
Turning Off The Power
Safety is key. Always turn off the power at the breaker box. Use a voltage tester to confirm no electricity flows to the switch. This prevents shocks while working on the wiring.
Removing The Switch Plate
Unscrew the switch plate carefully. Pull it off to expose the wires behind. Take a clear look at the wires connected to the switch. Note their colors and positions for easy reference.
Identifying Wire Types And Functions
Look for black, white, and green wires. Black wires usually carry power. White wires are neutral, and green or bare wires are ground. Knowing each wire’s role helps in adding your extra switch correctly.
Using A Voltage Tester To Check Wires
Test each wire with a voltage tester. Confirm which wire is live. Identify the load wire that controls the light. This step avoids confusion during installation.
Choose The Right Switch Type
Choosing the right switch type is important when adding an extra light switch. The correct switch ensures safety and smooth operation. It also matches the existing switches in your home.
Different switches serve different purposes. Picking the right one makes installation easier and avoids future problems. Consider the wiring setup and the light fixture type.
Single-pole Switch
A single-pole switch controls one light from one location. It is the most common switch type. Use it if you only want to add a simple on/off control.
Three-way Switch
A three-way switch controls one light from two locations. It requires special wiring with an existing three-way switch. Choose this switch if you want to control a light from two places.
Four-way Switch
A four-way switch works with two three-way switches. It controls a light from three or more locations. Use this switch for larger rooms or long hallways.
Smart Switch
A smart switch connects to Wi-Fi for remote control. It works with voice assistants and apps. Choose a smart switch if you want modern features and easy control.
Turn Off Power Supply
Turning off the power supply is the first and most important step. It keeps you safe from electric shocks. Always make sure the power is completely off before starting any work on switches.
Even a small mistake can cause serious injury. Never trust the switch’s off position alone. Confirm the power is off by testing with a voltage tester or multimeter. Safety comes first.
Locate The Circuit Breaker
Find the main electrical panel in your home. This panel controls the power to all rooms. Look for the breaker that controls the switch you want to work on.
Switch Off The Correct Breaker
Flip the breaker to the off position. This stops electricity flow to the switch. Double-check by trying to turn the light on. It should not work.
Use A Voltage Tester
Use a voltage tester to check the switch wires. This tool tells if electricity is still present. Test all wires carefully before touching them.
Wear Safety Gear
Put on rubber gloves and safety glasses. These protect you from accidental shocks and sparks. Always use safety gear when handling electricity.

Credit: www.youtube.com
Remove Existing Switch Cover
Removing the existing switch cover is the first step in adding an extra light switch. This step gives you access to the wiring inside the electrical box. It is important to work safely and carefully.
Turn off the power to the switch at the circuit breaker. This prevents electric shock while you work. Use a voltage tester to confirm the power is off.
Gather The Right Tools
Prepare a flathead or Phillips screwdriver. Most switch covers use one of these screws. Having the right tool makes removal easier and safer.
Unscrew The Switch Cover Plate
Locate the screws on the switch cover plate. Usually, there are two screws, one at the top and one at the bottom. Turn the screws counterclockwise to remove them.
Carefully Remove The Cover Plate
Gently pull the cover plate away from the wall. Avoid forcing it to prevent damage. Set the cover plate and screws aside in a safe place.
Inspect The Switch Box
Look inside the switch box for wires and connections. Check if the box is large enough for an additional switch. This helps plan the next steps.
Connect New Switch Wiring
Connecting the new switch wiring is a key step in adding an extra light switch. This process involves running wires from the existing switch box to the new switch location. Careful handling ensures safety and proper function.
Start by preparing the wires carefully. Follow electrical codes and use the right tools. This helps avoid common wiring mistakes.
Run Wire From Existing Switch
First, turn off the power at the breaker. Use a voltage tester to confirm the power is off.
Next, remove the cover plate from the existing switch. Pull out the switch gently to access the wires.
Run a new cable from this box to the new switch location. Use a cable with the correct gauge for your circuit.
Secure the wire along the wall or ceiling using staples or clips. Avoid sharp bends or damage to the wire.
Attach Wires To New Switch
Strip about half an inch of insulation from each wire end. This exposes the copper for connection.
Connect the black (hot) wire to the brass terminal on the new switch. Tighten the screw firmly but don’t over-tighten.
Attach the white (neutral) wire to the silver terminal if your switch requires it. Some switches only need the hot wire.
Connect the ground wire to the green screw or grounding terminal. This step is important for safety.
Push the wires carefully back into the box. Secure the switch with screws and replace the cover plate.
Turn the power back on and test the switch. It should control the light along with the original switch.

Credit: diy.stackexchange.com
Install The New Switch
Installing the new switch is a key step in adding an extra light switch. This process involves connecting wires safely and securing the switch in place. Doing this carefully ensures the switch works properly and stays safe.
Turn Off The Power
Before starting, turn off the power from the main circuit breaker. This stops electricity and protects you from shocks. Use a voltage tester to check that the wires are dead.
Connect The Wires To The New Switch
Match the wires from the wall to the switch terminals. Usually, black wires connect to brass screws, and white wires to silver screws. Ground wires attach to the green screw. Tighten the screws firmly.
Secure The Switch In The Electrical Box
Push the wires gently back into the box. Align the switch with the box holes. Use screws to fix the switch tightly. Make sure it is not loose or tilted.
Attach The Switch Cover Plate
Place the cover plate over the switch. Use the small screws to secure it. The cover protects the wiring and gives a clean look.
Test The Switch Functionality
Testing the switch functionality is a crucial step after adding an extra light switch. It ensures the wiring is correct and the switch works safely. Without testing, problems may go unnoticed, causing inconvenience or hazards.
This section guides you through simple tests to confirm your new switch controls the light properly. Follow each step carefully for the best results.
Turn Power Back On
Restore power at the circuit breaker before testing. This reactivates electricity to your switches and lights. Never test switches without power.
Check Switch Operation
Flip the new switch on and off. The light should respond immediately. If it does not, wiring may need rechecking.
Test Both Switches
Operate both the original and new switches. Each should control the light independently. This confirms the extra switch is wired correctly.
Look For Flickering Or Delays
Observe the light for flickering or delayed response. These issues suggest loose connections or wiring errors. Fix them before finalizing.
Use A Voltage Tester
Use a voltage tester to ensure no current leaks. Test both switches and wires for safety. This step prevents electrical hazards.
Troubleshooting Common Issues
Adding an extra light switch can sometimes cause problems. Troubleshooting helps fix these issues quickly. Understanding common problems saves time and effort. This guide covers simple fixes for typical issues.
Check The Wiring Connections
Loose or wrong wiring is a common cause of switch problems. Make sure all wires are tight and connected to the right terminals. Use a voltage tester to confirm power is off before touching wires. Look for damaged or frayed wires and replace them if needed.
Sometimes the new switch itself is faulty. Test the switch with a multimeter to check for continuity. Replace the switch if it does not work properly. Make sure the switch is rated for the correct voltage and current.
Verify The Power Supply
No power to the switch can stop it from working. Check the circuit breaker or fuse box for tripped breakers or blown fuses. Reset the breaker or replace the fuse if needed. Confirm that power is reaching the switch box using a voltage tester.
Inspect The Light Fixture
The problem may be with the light fixture, not the switch. Test the bulb to see if it is burned out. Replace the bulb with a new one if needed. Check the fixture’s wiring for loose connections or damage.
Frequently Asked Questions
How Do I Add An Extra Switch To An Existing Light?
Turn off power first. Run a new cable from the existing switch box to the new switch location. Connect wires properly, matching colors. Install the new switch and restore power. Test functionality to ensure proper operation and safety.
What Tools Are Needed To Install An Additional Light Switch?
You need a voltage tester, wire stripper, screwdriver, electrical tape, and a drill. Also, use a new switch, wire cable, and wire nuts. These tools ensure safe and efficient installation of the extra light switch.
Can I Add A Light Switch Without Rewiring The Entire Circuit?
Yes, you can add a switch using existing wiring if accessible. Use a switch loop or piggyback off the existing switch. Ensure the wiring supports the added switch to avoid overload or safety hazards.
Is It Safe To Install An Extra Switch Myself?
Yes, if you follow safety steps carefully. Always turn off power at the breaker before starting. Use proper tools and check wiring codes. If unsure, consult a licensed electrician to avoid risks.
Conclusion
Adding an extra light switch to an existing switch can brighten your space. Follow each step carefully and take safety seriously. Use the right tools and double-check your wiring. This small project can improve your room’s lighting control. Take your time and don’t rush the work.
A well-done switch adds convenience and value to your home. Remember to turn off power before starting any electrical work. With patience and care, you can complete this task safely. Enjoy the ease of controlling your lights from two spots.
Simple changes like this make a big difference.