Looking to save space and keep your Google Mini safe from accidental knocks? Mounting your Google Mini on the wall is a smart and stylish way to do just that.
But if you’re unsure how to get started, don’t worry—you’re in the right place. In this guide, you’ll find simple, step-by-step instructions that make the process easy and quick. By the end, you’ll have a neat setup that keeps your device secure and your space clutter-free.
Ready to transform your Google Mini’s spot? Let’s dive in!

Credit: www.amazon.com
Choosing The Right Spot
Choosing the right spot to hook your Google Mini to the wall makes a big difference. It helps the device work better and keeps it safe. Pick a place that fits your room and daily use. Think about where it can get power, avoid troubles, and stay easy to reach.
Consider Power Outlet Location
Place the Google Mini near a power outlet. It needs to stay plugged in all the time. Avoid spots where the cord will stretch or hang loosely. A close outlet keeps the setup neat and tidy. This also prevents damage to the cord or device.
Avoid Interference Sources
Keep the Google Mini away from devices that cause interference. Wireless routers, microwaves, and cordless phones can disrupt the signal. This reduces the device’s performance and response time. Find a quiet area without many electronics nearby.
Optimal Height And Position
Mount the Google Mini at ear level or slightly higher. This helps it hear your voice clearly. Avoid placing it too low or inside cabinets. Open spots let sound travel freely and improve voice detection. Aim for a central spot in the room for best results.

Credit: www.amazon.com
Gathering Required Tools
Before you start mounting your Google Mini on the wall, gather all necessary tools. Having everything ready saves time and avoids interruptions. It also ensures a smooth, safe installation process. This section helps you understand what hardware and tools to prepare.
Mounting Hardware Options
Choose the right mounting hardware for your wall type. Adhesive strips work well for smooth surfaces. They cause no damage and hold the device firmly. For drywall or brick walls, screws and anchors provide stronger support. Some mounts come with brackets designed specifically for Google Mini. Select the option that fits your wall and device best.
Tools You’ll Need
Gather basic tools for a quick installation. A screwdriver is essential for screws and anchors. A drill might be needed for tougher walls like brick or concrete. A level helps position the device straight on the wall. Measuring tape ensures accurate height and placement. Lastly, keep a pencil handy to mark drill spots or adhesive positions.
Preparing The Wall
Preparing the wall is a key step before mounting your Google Mini. It ensures the device stays secure and works well. Taking time here saves trouble later.
Marking Drill Points
Start by holding the mount against the wall. Use a pencil to mark where the screws will go. Make sure the marks are level and spaced correctly. Double-check to avoid mistakes that cause misalignment.
Checking Wall Material
Identify the type of wall you have. Drywall, concrete, or wood each need different tools and anchors. Choose proper screws and plugs that fit your wall material. This choice keeps the mount stable and safe.
Safety Precautions
Wear safety glasses to protect your eyes from dust. Use a mask if drilling creates a lot of dust. Check for wires or pipes inside the wall before drilling. Avoid accidents by using a stud finder or similar tool.
Mounting The Google Mini
Mounting the Google Mini on your wall saves space and keeps it within easy reach. It also protects the device from spills or falls. The process is simple and requires just a few tools. Follow the steps below to securely mount your Google Mini.
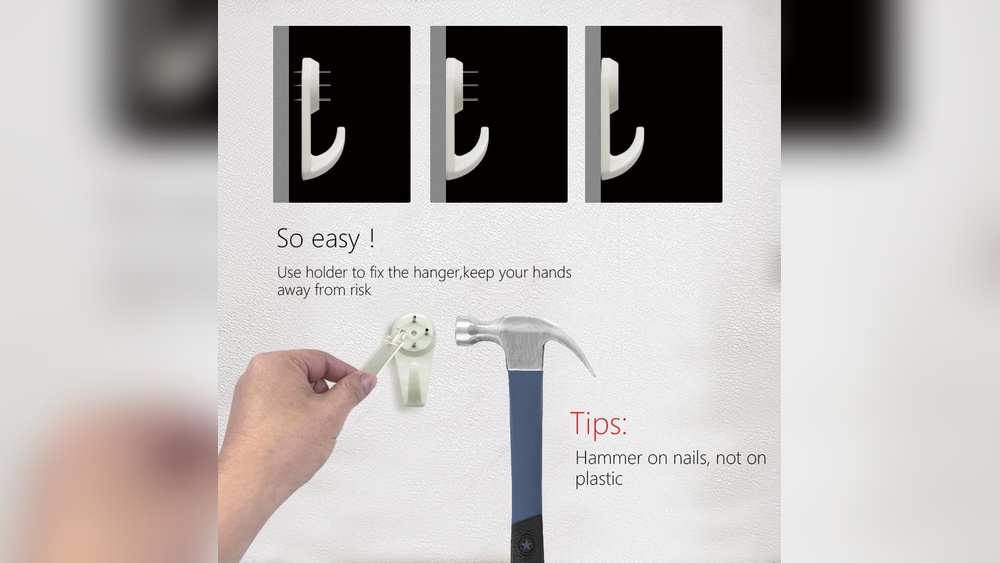
Installing Wall Bracket
Start by choosing the right spot on your wall. Make sure it is near a power outlet. Use a pencil to mark holes for the wall bracket. Drill holes carefully following the marks. Insert wall plugs to hold screws tightly. Attach the bracket with screws until it feels stable.
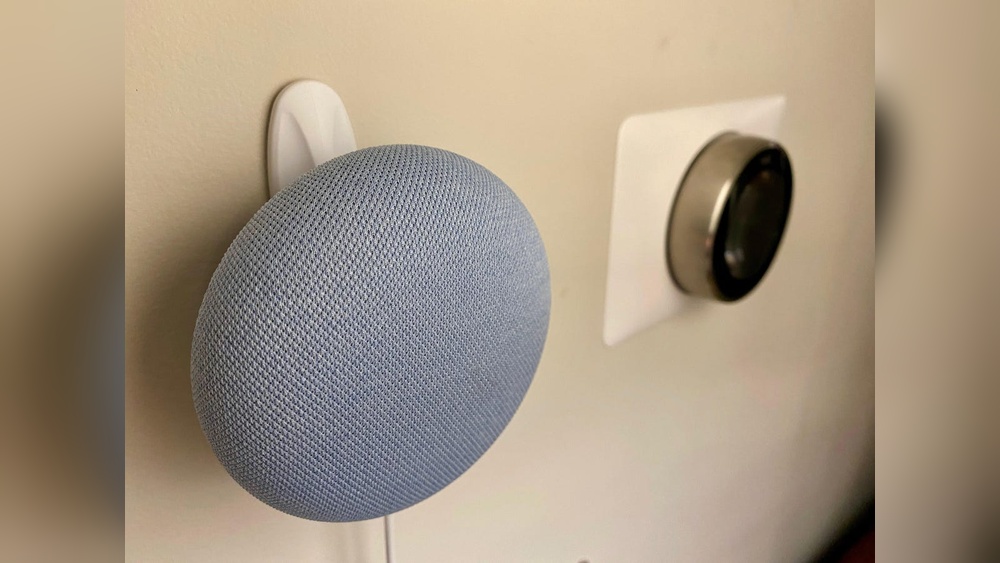
Attaching The Device
Next, place the Google Mini on the bracket. Align the holes on the device with the bracket hooks. Press gently to secure the device in place. Check if the Google Mini fits snugly. Avoid forcing it, which might cause damage.
Managing Power Cables
Plug the power cable into the Google Mini. Run the cable along the wall to keep it neat. Use cable clips or ties to hold it in place. Avoid loose cables that can cause tripping. Hide the cable behind furniture if possible. A tidy setup looks better and lasts longer.
Setting Up Google Mini
Setting up your Google Mini is the first step to enjoy hands-free help at home. This process helps connect the device to your network and personalizes it to your preferences. Follow these simple steps to get your Google Mini ready for daily use.
Connecting To Wi-fi
Plug in your Google Mini and wait for it to power on. Open the Google Home app on your phone or tablet. The app will detect your Google Mini automatically. Select your device and follow the prompts to connect it to your Wi-Fi network. Enter your Wi-Fi password carefully. Wait a few moments while the device connects. A confirmation sound will tell you it’s ready.
Testing Voice Commands
Try saying “Hey Google” or “OK Google” to wake the device. Ask simple questions like “What’s the weather today?” or “Set a timer for five minutes.” Listen carefully to the responses. This step ensures the microphone works well. If it doesn’t respond, check the mute button on your Google Mini.
Adjusting Device Settings
Open the Google Home app to customize your device. Change the device name for easy recognition. Adjust the volume to a comfortable level. Set your preferred language and location. Enable or disable features like voice match and personal results. These settings help tailor the Google Mini to your needs.
Credit: www.cnet.com
Troubleshooting Mounting Issues
Mounting your Google Mini on the wall can save space and improve sound quality. Still, some issues might happen during or after installation. Troubleshooting these problems early helps keep your device working well and secure.
This section covers common mounting problems and quick fixes. Follow these tips to get your Google Mini working perfectly on the wall.
Device Not Powering On
Check the power cable connection first. Make sure the cable plugs firmly into the Google Mini and the power outlet. Try a different outlet to rule out power issues.
Inspect the power adapter for damage. A broken adapter can stop the device from turning on. Replace it if needed.
Sometimes, the device resets slowly after plugging in. Wait a few minutes before testing again.
Connectivity Problems
Mounting can block Wi-Fi signals. Place the Google Mini where the signal is strong and clear. Avoid metal surfaces that can interfere with Wi-Fi.
Restart your router and the Google Mini to refresh connections. This often solves weak or lost signals.
Check the Google Home app for network settings. Confirm the device connects to the correct Wi-Fi network.
Mount Stability Concerns
Use the right screws or adhesive for your wall type. Drywall, wood, and concrete need different mounting tools.
Make sure the mount fits the Google Mini tightly. A loose fit can cause the device to fall.
Test the mount by gently shaking it. If it feels weak, reinforce it with extra support or a different mount.
Frequently Asked Questions
How Do I Mount Google Mini On The Wall Securely?
Use a compatible wall mount bracket designed for Google Mini. Attach the bracket with screws or adhesive strips. Ensure it is level and firmly fixed to avoid falls.
What Tools Are Needed To Hook Google Mini To The Wall?
You typically need a screwdriver, wall anchors, screws, and a wall mount bracket. Optionally, use a drill for precise hole placement. Always use tools carefully for safety.
Can I Use Adhesive Strips To Hang Google Mini?
Yes, strong adhesive strips can hold Google Mini if the wall surface is smooth. Avoid rough or dusty walls for better adhesion. Check weight limits before applying.
Where Is The Best Location To Install Google Mini On The Wall?
Choose a central location near a power outlet. Avoid placing it inside cabinets or behind furniture. Ensure the microphone and speaker are unobstructed for optimal performance.
Conclusion
Mounting your Google Mini on the wall saves space and keeps it safe. It also improves sound quality and makes voice commands easier. Use the right tools and follow the steps carefully. Take your time to avoid mistakes. Now, your Google Mini looks neat and works better.
Enjoy hands-free help anywhere in the room!