If you’re looking to remove your Kwikset SmartKey deadbolt, you might be wondering where to start. Maybe you want to replace it, fix a problem, or upgrade your door’s security.
Whatever your reason, you don’t have to struggle or guess your way through the process. This guide will walk you through each step clearly and simply, so you can get the job done quickly and confidently. Keep reading, and you’ll learn exactly how to remove your Kwikset SmartKey deadbolt without stress or confusion.
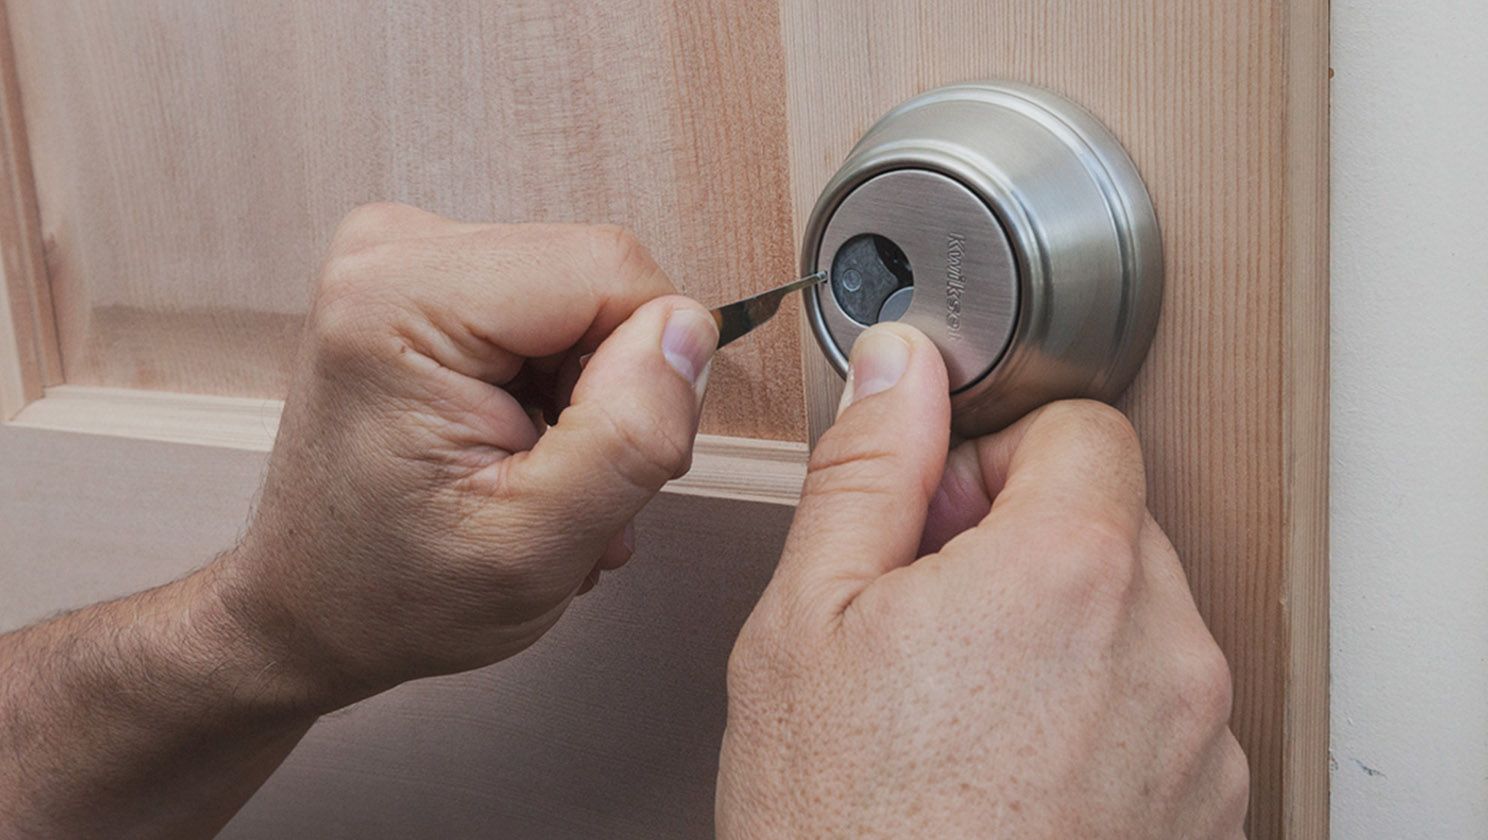
Credit: www.kwikset.com
Tools Needed
Removing a Kwikset SmartKey deadbolt requires some basic tools. Having the right tools makes the job easier and faster. You do not need many tools, just a few common ones.
These tools help you take apart the lock and remove it safely. Keep them close before starting the removal process. Below are the main tools needed.
Phillips Head Screwdriver
This screwdriver fits the screws on the lock. Most Kwikset SmartKey deadbolts use Phillips screws. A good screwdriver helps avoid stripping the screw heads.
Flathead Screwdriver
A flathead screwdriver helps pry off parts gently. It is useful for removing covers and trim pieces without damage.
Allen Wrench (hex Key)
Some models have small hex screws. An Allen wrench set helps remove these screws easily. It is good to have various sizes ready.
Needle-nose Pliers
These pliers help grip small parts and springs inside the lock. They offer better control when pulling or adjusting pieces.
Tape Or Container For Screws
Keep screws safe in a small container or tape them on a surface. This prevents losing small parts during removal.
Locate The Smartkey Cylinder
Finding the SmartKey cylinder is the first step to remove a Kwikset SmartKey deadbolt. This part holds the keyhole and allows the lock to work. Knowing its exact location helps you take the lock apart safely and easily.
The SmartKey cylinder sits on the outside part of the door. It is where you insert your key. This cylinder is different from the inside thumb turn or knob. You must focus on the outside to find it correctly.
Check The Outside Face Of The Deadbolt
Look at the door’s exterior. The SmartKey cylinder is visible here. It has a small keyhole in the middle. The shape is round and fits your key. This is the part you need to access for removal.
Identify The Small Reset Slot
Next to the keyhole, find a tiny reset slot. This slot is unique to SmartKey locks. It looks like a small hole or notch. It helps confirm you found the right cylinder.
Remove The Key And Inspect The Cylinder
Take out the key before removing the cylinder. Check the cylinder closely for any screws or tabs. These parts hold the cylinder in place. Knowing their position helps during removal.
Remove The Interior Cover Plate
Removing the interior cover plate is the first step to take off a Kwikset SmartKey deadbolt. This plate covers the screws and internal parts of the lock. Taking it off gives access to the lock’s internal mechanism. Handle this step carefully to avoid damage.
Gather The Right Tools
Use a Phillips screwdriver or a flathead screwdriver. Check the screws on the cover plate to know which tool fits best. Having the right tool makes the job easier and safer.
Locate The Screws On The Interior Cover Plate
Look closely at the inside part of the door. Find two screws holding the cover plate. Usually, they are near the edge of the plate. These screws keep the plate in place.
Unscrew The Interior Cover Plate
Turn the screws counterclockwise to loosen them. Do this slowly to avoid stripping the screws. Keep the screws safe to use later during reassembly.
Remove The Cover Plate Carefully
Gently pull the plate away from the door. If it feels stuck, check for any hidden screws. Avoid forcing the plate off to prevent damage to the lock or door.
Extract The Retaining Clip
Extracting the retaining clip is a key step in removing the Kwikset SmartKey deadbolt. This small clip holds parts of the lock together. Removing it allows you to take apart the lock safely. The process requires care and the right tools. Follow these clear steps to remove the clip without damage.
Locate The Retaining Clip
First, find the retaining clip on the side of the deadbolt. It looks like a small, thin metal piece. Usually, it sits near the latch mechanism. Use a flashlight for better visibility if needed. Knowing its exact position helps avoid mistakes.
Choose The Right Tool
Use needle-nose pliers or a flathead screwdriver. These tools fit best for gripping and pulling the clip. Avoid using large tools that may break the clip. Small and precise tools make the job easier and safer.
Remove The Retaining Clip Carefully
Grip the clip gently with your tool. Pull it straight out without twisting. Twisting can bend or break the clip. Take your time. If the clip feels stuck, wiggle it slightly to loosen.
Store The Clip Safely
Place the clip in a small container or safe spot. You will need it for reassembling the lock. Losing the clip can cause problems later. Keep it with other lock parts during the process.
Pull Out The Smartkey Cylinder
Pulling out the SmartKey cylinder is a key step in removing your Kwikset SmartKey deadbolt. This part holds the lock’s keyhole and is central to the lock’s function. Removing it carefully ensures you don’t damage the lock or door.
Follow these steps to pull out the SmartKey cylinder safely. Take your time and work patiently. The right tools and method make the job easier and cleaner.
Locate The Retaining Screw
First, find the small retaining screw on the side of the lock. This screw holds the cylinder in place. Use a screwdriver to remove this screw carefully. Keep the screw safe for reassembly.
Turn The Cylinder To The Correct Position
Insert the key into the lock. Turn the key slightly to align the cylinder. This position allows the cylinder to slide out smoothly. Do not force the key or cylinder.
Pull The Cylinder Straight Out
Hold the cylinder firmly. Pull it straight out from the door. Avoid twisting or bending it. A steady pull helps the cylinder come out easily.
Check For Resistance
If the cylinder does not come out, check the key’s position again. Ensure the retaining screw is fully removed. Sometimes a gentle wiggle helps loosen the cylinder.
Replace Or Reinstall The Deadbolt
Replacing or reinstalling the Kwikset SmartKey deadbolt is a straightforward process. It helps keep your home secure and the lock functioning well. You can choose to replace the deadbolt with a new one or reinstall the old deadbolt after maintenance.
Follow clear steps to make the task easier. It saves time and ensures the lock works correctly.
Remove The Old Deadbolt
Start by unscrewing the screws on the interior side of the door. Pull the interior and exterior parts apart. Remove the deadbolt from the edge of the door. Keep all screws and parts safe for reinstallation.
Prepare The Door For Installation
Check the door hole and latch area for any damage. Clean the area to remove dust and debris. Make sure the latch fits well into the hole. Adjust the hole if necessary for a smooth fit.
Install The New Or Existing Deadbolt
Insert the latch into the edge of the door. Align the exterior and interior parts of the lock. Fit the lock parts through the door holes carefully. Secure the screws tightly to hold the lock in place.
Test The Lock Function
Turn the key or thumb turn to test the lock. Check if the deadbolt moves smoothly in and out. Lock and unlock the door several times. Confirm the door closes and locks securely each time.
Test The Lock Functionality
Testing the lock functionality is a key step after removing the Kwikset SmartKey deadbolt. It ensures the lock works properly and safely. This step helps avoid problems like the door not locking or unlocking.
Check all parts carefully. Make sure the lock opens and closes smoothly. If anything feels wrong, fix it before finishing the job.
Check The Lock Bolt Movement
Push the bolt in and out with your hand. It should move without sticking or resistance. The bolt must slide fully into the door frame to lock securely.
Use The Key To Test Locking
Insert the key into the lock cylinder. Turn the key both ways. The lock should turn easily and the bolt should move with it. No jamming or roughness.
Test The Thumb Turn Inside
Turn the thumb turn from the inside of the door. It should move the bolt smoothly. Check that the bolt extends fully and retracts without trouble.
Try Locking And Unlocking Multiple Times
Lock and unlock the door several times. This confirms the lock works consistently. Watch for any sticking or failure to lock properly.
Listen For Any Strange Sounds
Pay attention to clicks or grinding noises. These sounds could mean a problem inside the lock. The lock should operate quietly and smoothly.
Credit: www.homedepot.com
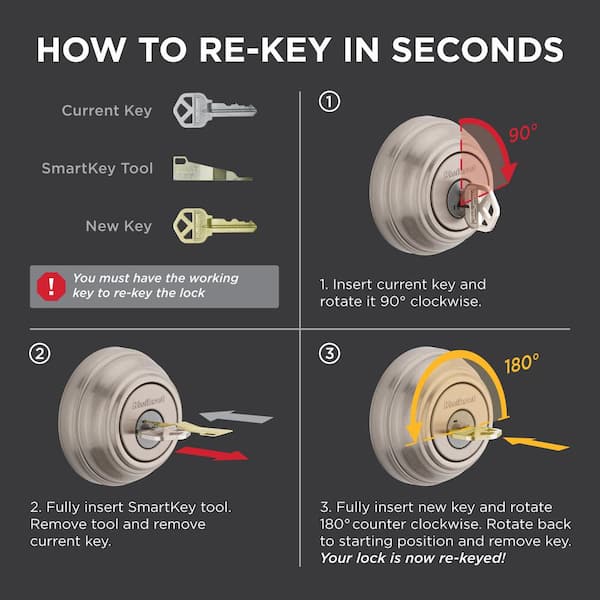
Credit: www.kwikset.com
Frequently Asked Questions
How Do I Remove A Kwikset Smartkey Deadbolt?
To remove a Kwikset Smartkey deadbolt, first unscrew the interior mounting screws. Then, carefully pull off the interior and exterior assemblies. Finally, remove the latch mechanism by unscrewing it from the door edge.
Can I Remove Kwikset Smartkey Deadbolt Without A Key?
Yes, you can remove the deadbolt without a key by unscrewing the interior side. The key is not needed to detach the lock from the door.
What Tools Are Needed To Remove Kwikset Smartkey Deadbolt?
You will need a Phillips screwdriver and a flathead screwdriver. These tools help remove screws and pry off the lock components safely.
How Long Does It Take To Remove A Kwikset Smartkey Deadbolt?
Removing a Kwikset Smartkey deadbolt typically takes about 10 to 15 minutes. Time may vary depending on your experience and tool availability.
Conclusion
Removing a Kwikset SmartKey deadbolt is simple with the right steps. Take your time and follow each instruction carefully. Use basic tools and stay patient throughout the process. This guide helps avoid damage and frustration. Now, you can replace or fix your lock safely.
Keep your home secure by handling locks correctly. Practice makes the task easier over time. Feel confident to manage your lock without help.