Are you tired of your indoor motion sensor light switch turning off too quickly or not detecting your movements properly? Adjusting it the right way can save you from constant frustration and unnecessary trips to the switch.
In this guide, you’ll learn simple steps to fine-tune your motion sensor light switch so it works perfectly for your space. Keep reading, and you’ll soon enjoy lights that respond just the way you want—effortlessly and reliably.
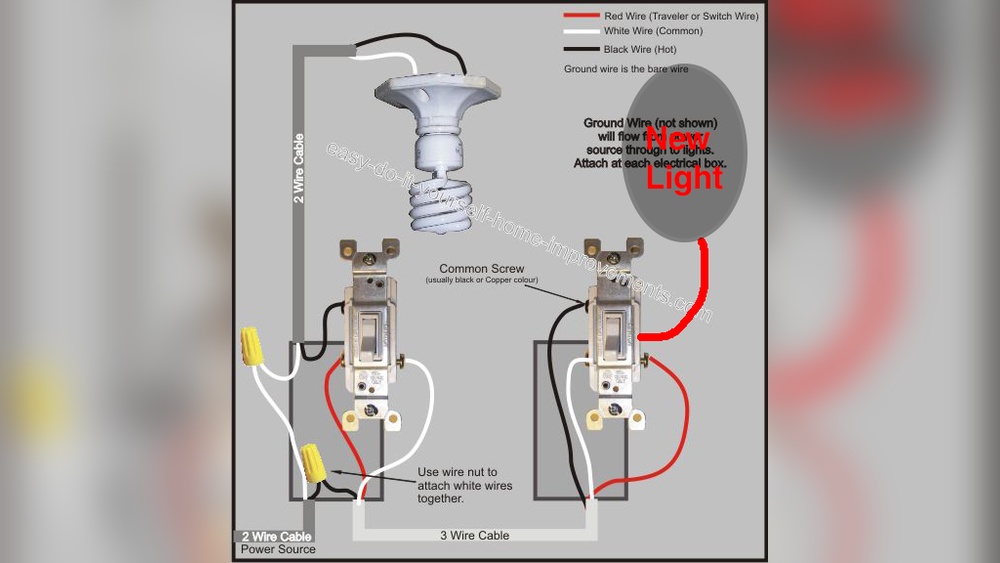
Credit: zavala.es
Choosing The Right Sensor
Choosing the right sensor is key for your indoor motion sensor light switch. The sensor detects movement to turn the light on or off. Picking the correct type improves performance and saves energy. It also avoids false triggers and dark spots in the room.
Consider the room size, lighting needs, and typical movement patterns. Some sensors work better in small rooms, others in larger spaces. The sensor’s range and detection angle matter too. Understanding these basics helps you select the best sensor for your space.
Types Of Motion Sensors
PIR (Passive Infrared) sensors detect body heat. They work well indoors and save energy by turning lights on only when needed. Ultrasonic sensors send sound waves and detect movement by changes in echoes. They sense motion even behind objects. Dual-technology sensors combine PIR and ultrasonic features. They reduce false triggers and improve accuracy.
Sensor Placement Tips
Place sensors where movement is most common. Avoid pointing them at windows or heating vents to reduce false alarms. Mount sensors at a height of 6 to 8 feet for best detection. Avoid obstacles like furniture that block the sensor’s view. Test the sensor after installation to ensure it covers the intended area well.
Credit: www.homedepot.com
Tools Needed For Adjustment
Adjusting an indoor motion sensor light switch needs a few basic tools. These tools help you make precise changes easily. Having the right tools saves time and avoids damage to the switch or wall.
Gathering the tools before you start makes the process smooth. Each tool serves a specific purpose in the adjustment.
Flathead Screwdriver
A flathead screwdriver is essential for removing the switch cover. It also helps adjust small screws on some sensors. Choose a screwdriver that fits well to avoid slipping.
Phillips Screwdriver
Many motion sensor switches use Phillips screws. This screwdriver fits cross-shaped screws perfectly. It helps tighten or loosen screws without stripping them.
Voltage Tester
A voltage tester checks if power is off before you start. Safety first. It prevents electric shocks and accidents during adjustment.
Small Adjustable Wrench
Some sensors have nuts or bolts that need tightening. A small adjustable wrench fits different sizes. It helps secure parts firmly without damage.
Flashlight
A flashlight lights up dark areas inside the switch box. It helps you see tiny screws and wires clearly. Good lighting makes adjustment easier and safer.
Safety Precautions
Adjusting an indoor motion sensor light switch can improve convenience and save energy. Safety is the top priority during this process. Taking proper precautions protects you and your home from accidents.
Follow these safety guidelines before starting any work. Basic steps can prevent electric shock and damage to the device.
Turn Off The Power Supply
Always switch off the power at the circuit breaker. Do not rely only on the wall switch. Use a voltage tester to confirm no electricity flows to the switch.
Use Proper Tools And Equipment
Use insulated tools designed for electrical work. Avoid using damaged or worn tools. Wear rubber-soled shoes and avoid standing on wet surfaces.
Read The Manufacturer’s Instructions
Each motion sensor switch has unique features. Read the manual carefully before adjusting settings. Follow all safety warnings and installation tips provided.
Work In A Well-lit Area
Good lighting helps you see wires and connections clearly. Avoid working in dark or cluttered spaces. This reduces the chance of mistakes or injuries.
Do Not Touch Live Wires
Never touch wires with bare hands. Use insulated gloves if possible. Keep fingers away from wire ends and terminals during adjustment.
Ask For Help If Unsure
Call a licensed electrician for complex tasks or if unsure. Professional help ensures safety and correct installation. Avoid risking injury or damage to your electrical system.

Credit: www.youtube.com
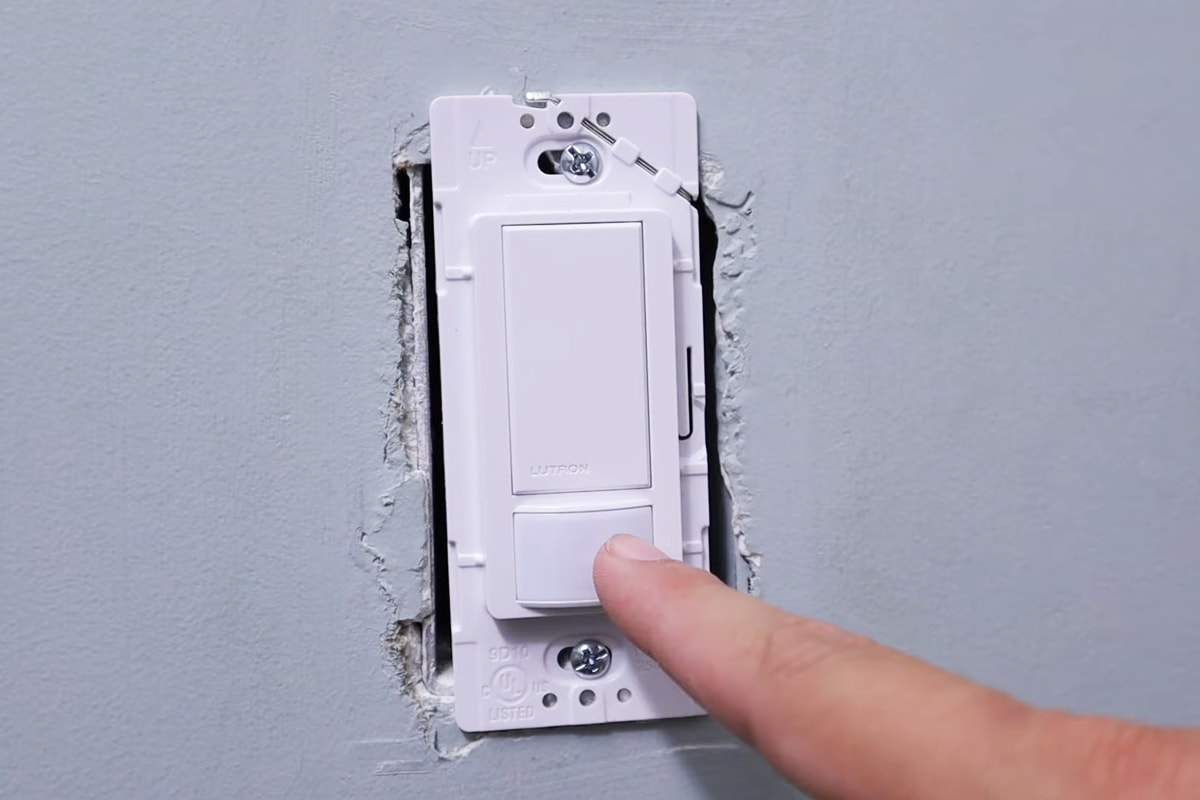
Accessing The Sensor Controls
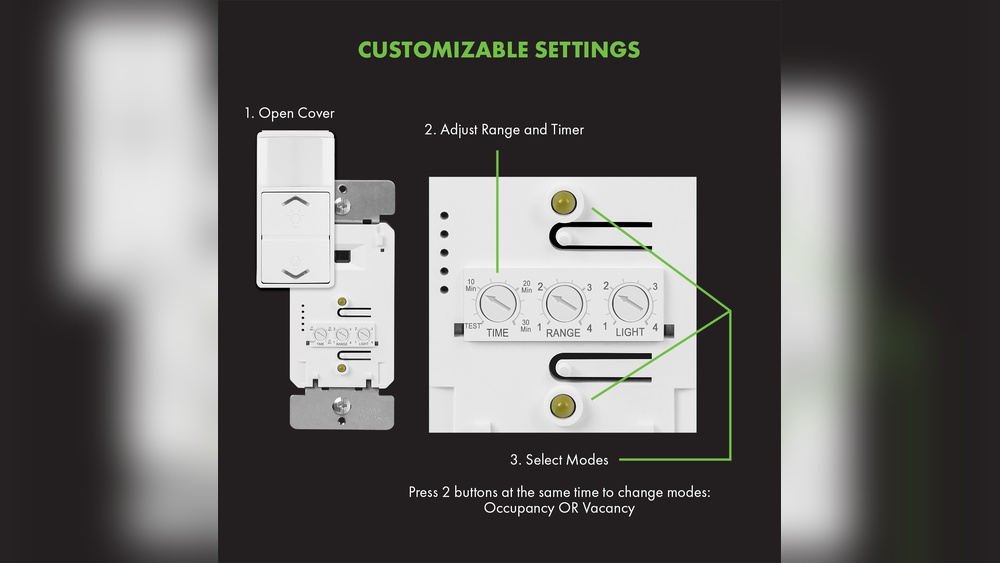
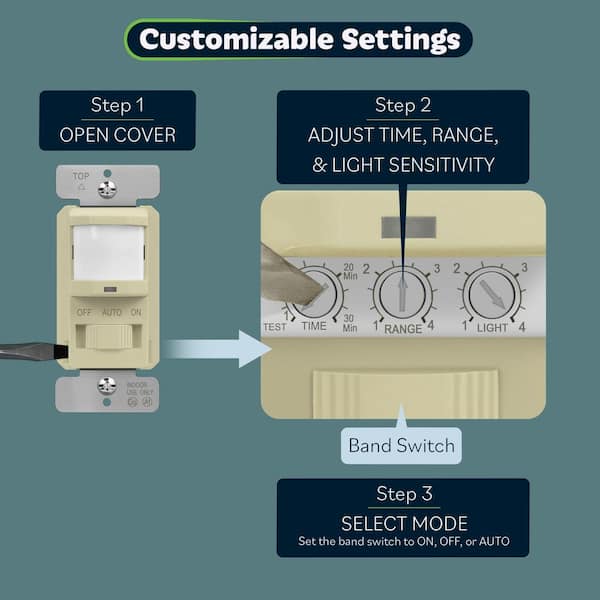
Adjusting the sensitivity settings on your indoor motion sensor light switch helps control how it responds to movement. Sensitivity determines how much motion the sensor detects before turning the light on. Proper adjustment saves energy and avoids false triggers from small movements or pets.
Most motion sensor switches have a small dial or button for sensitivity control. This setting lets you find the right balance for your space. Too sensitive and the light may switch on too often. Not sensitive enough, and it might miss people moving around.
Increasing Sensitivity
Turn the sensitivity dial clockwise to increase detection. The sensor will respond to smaller movements at a farther distance. This setting works well in large rooms or areas with less foot traffic. It helps ensure the light activates quickly when someone enters.
Be careful not to set sensitivity too high. It might cause the light to turn on with minor vibrations or pets moving. Test the setting by walking through the area. Adjust until the light reacts just right.
Decreasing Sensitivity
Turn the sensitivity dial counterclockwise to reduce detection. The sensor will ignore small or distant movements. This is useful in busy rooms or places with pets. It prevents the light from switching on unnecessarily.
Lower sensitivity may require you to move closer to trigger the light. Check the setting by walking slowly in different parts of the room. Find a level that avoids false triggers but still lights the area promptly.
Adjusting Sensitivity Settings
Setting the timer duration on your indoor motion sensor light switch controls how long the light stays on. Adjusting this timer helps save energy and suits your daily needs. You can make the light stay on for a shorter or longer time depending on your preference.
Shortening Light On Time
To shorten the light on time, find the timer dial or button on the switch. Turn the dial towards the shorter time setting or press the button to reduce the time. This change means the light will turn off faster after no motion is detected. It helps save electricity in rooms with quick visits.
Extending Light On Time
To extend the light on time, adjust the timer dial or button to a longer setting. This keeps the light on for more minutes after motion stops. Use this setting in rooms where you stay longer or need more light. It prevents the light from turning off too soon.
Setting The Timer Duration
Adjusting the light level threshold on your indoor motion sensor light switch helps control when the light turns on. This setting tells the sensor how dark it must be before activating the light. Setting it correctly can save energy and improve comfort.
Too high a threshold means the light turns on even in bright rooms. Too low, and the light might not come on when needed. Fine-tuning this setting makes the sensor work just right for your space.
Daylight Sensor Settings
The daylight sensor detects natural light levels in the room. You can adjust the threshold so the light stays off during daylight. Turn the dial or press buttons to set this level.
For bright rooms, set a higher threshold so the light stays off. In darker rooms, lower the threshold so the light turns on sooner. Test different settings to find the best balance.
Nighttime Activation
At night, the motion sensor should activate the light when it detects movement. Adjust the threshold so the light turns on only in low light.
This prevents the light from turning on unnecessarily in well-lit areas. Set the threshold low enough to avoid false triggers. Check the sensor’s response after each adjustment.
Adjusting Light Level Threshold
Testing the sensor is a key step after installing your indoor motion sensor light switch. It ensures the sensor detects movement correctly and the light responds as expected. Proper testing helps avoid false triggers or missed detections.
This process lets you adjust settings for sensitivity and timing. Testing also confirms the sensor works well in your room’s lighting and layout. Take your time to check the sensor thoroughly before regular use.
Walk Test Method
The walk test method is simple and effective. Start by turning on the sensor’s test mode if available. Walk slowly across the sensor’s field of view.
Watch if the light turns on as you move. Move at different speeds and angles. Check the range by walking closer and farther from the sensor.
This test shows if the sensor detects motion well. It also reveals any blind spots or weak areas. Adjust the sensor’s position or sensitivity if needed.
Troubleshooting Common Issues
Sometimes the sensor may not work properly. The light might stay on too long or not turn on at all. Check the sensor’s settings first.
Clean the sensor lens if it looks dusty or dirty. Dust can block motion detection. Make sure nothing blocks the sensor’s view, like furniture or curtains.
Verify the sensor’s power supply is stable. Loose wiring can cause problems. Reset the sensor by turning off the power for a few seconds.
Test the sensor again after adjustments. Repeat the walk test to confirm fixes. Most issues clear up with simple steps.
Testing The Sensor
Maintaining your indoor motion sensor light switch helps it work properly for a long time. Dirt, dust, and damage can cause problems. Simple care keeps the sensor sensitive and reliable. Check it often to catch small issues early.
Cleaning Tips
Turn off the power before cleaning the sensor. Use a soft, dry cloth to wipe the sensor surface gently. Avoid wet cloths or sprays near the sensor. Dirt and dust block the sensor’s view and reduce sensitivity. Clean the sensor every few weeks for best results.
Regular Inspection
Look at the sensor and surrounding area regularly. Check for cracks or damage on the sensor cover. Make sure no objects block the sensor’s path. Test the sensor by moving in front of it to see if lights turn on. Fix or replace parts if the sensor does not respond well.
Frequently Asked Questions
How Do I Adjust The Sensitivity Of An Indoor Motion Sensor?
To adjust sensitivity, locate the sensor’s dial or switch. Turn it clockwise to increase sensitivity or counterclockwise to decrease it. This controls how far the sensor detects movement, helping avoid false triggers or missed activations.
What Is The Best Placement For A Motion Sensor Light Switch?
Install the sensor at a height of 6 to 8 feet. Avoid pointing it directly at windows or heat sources. Proper placement ensures accurate detection and prevents unnecessary light activation.
How Can I Change The Light Timer Duration On The Switch?
Most switches have a timer dial labeled “time. ” Rotate it to increase or decrease how long the light stays on after motion stops. Adjust to fit your room’s usage and save energy.
Why Is My Motion Sensor Light Switch Not Turning On?
Check if the switch has power and is properly wired. Clean the sensor lens to remove dust or dirt. Also, ensure the sensor’s sensitivity and timer settings are correctly adjusted.
Conclusion
Adjusting your indoor motion sensor light switch is simple and useful. You can control when and how the light turns on. This saves energy and makes your space safer. Remember to test settings after each change. Small tweaks can make a big difference in performance.
Taking time to set it right helps avoid unwanted light triggers. Keep your home comfortable and bright without wasting power. Try these steps and enjoy smart lighting every day.