Are you looking to control your lights from three different switches but don’t know where to start? Connecting a 3 switch light setup might seem tricky, but with the right guidance, you can do it yourself and save time and money.
Imagine turning your lights on or off from any spot in the room—sounds convenient, right? You’ll discover simple steps to wire your 3-way switches safely and effectively. Keep reading, and soon you’ll have full control over your lighting with confidence and ease.

Credit: www.youtube.com
Tools And Materials Needed
Connecting a 3 switch light requires specific tools and materials. Having the right items makes the job easier and safer. Below is a list of what you need to gather before starting.
Essential Tools
A screwdriver set is necessary for loosening and tightening screws. Use a wire stripper to remove insulation from wires cleanly. A voltage tester helps check if wires carry electricity. Needle-nose pliers are useful for bending and holding wires. A tape measure ensures correct wire length. Lastly, electrical tape secures wire connections.
Required Materials
Three-way switches are a must for this setup. Use electrical wires rated for home wiring. Wire connectors join wires safely and securely. A switch box holds the switches in place. Light fixtures and bulbs complete the system. Make sure all materials meet local electrical codes.
Basic Wiring Concepts
Understanding the basic wiring concepts is key to connecting a 3 switch light. It helps you know how electricity flows through switches and wires. This knowledge makes installation safer and easier. Learning about each component lets you avoid common mistakes.
Start by grasping how a 3-way switch works. Then, identify the common wires involved. These steps create a clear path to connect your light properly.
Understanding The 3-way Switch
A 3-way switch controls one light from two places. It has three terminals for wires. Two are traveler terminals, and one is the common terminal. The common terminal connects to power or the light. The travelers carry current between switches. Flipping either switch changes the light’s state. This setup lets you turn the light on or off from different locations.
Identifying Common Wires
Wires in a 3-way switch system have specific roles. The black wire is usually the “hot” wire carrying power. White wires are neutral and complete the circuit. Red wires often act as traveler wires between switches. Ground wires are green or bare copper for safety. Knowing these wires helps you connect switches correctly and safely.
Safety Precautions
Safety is the top priority when connecting a 3 switch light. Working with electricity can be dangerous. Taking the right safety steps protects you from shocks and accidents. This section covers essential precautions before and during the installation.
Turn Off Power At The Circuit Breaker
Always switch off the power at the main circuit breaker. This stops electricity from flowing to the wires. Use a voltage tester to confirm no current is present. Never trust the wall switch alone.
Use Proper Tools And Equipment
Choose insulated tools designed for electrical work. Avoid using damaged or worn-out tools. Wear rubber-soled shoes to reduce shock risk. Keep your workspace dry and clean.
Double Check Wiring Instructions
Follow the wiring diagram that comes with the switches. Match wires by color and function. Incorrect wiring can cause short circuits or fires. If unsure, consult a professional electrician.
Avoid Working Alone
Have someone nearby in case of emergencies. They can help or call for assistance quickly. This simple step increases safety during the installation.
Wear Protective Gear
Use safety glasses to protect your eyes from sparks. Gloves help prevent cuts and electric shocks. Dress in clothes that cover your arms and legs.

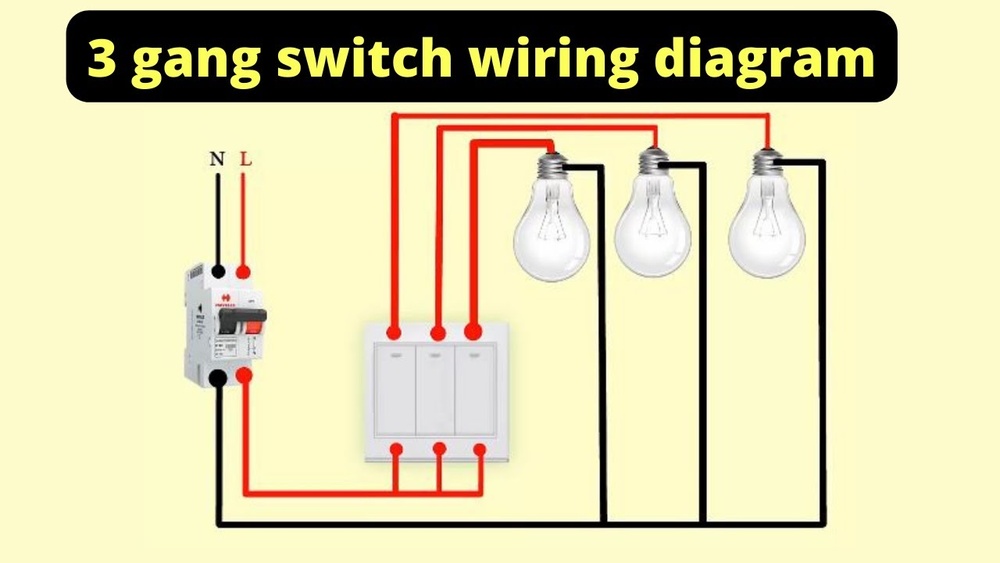
Credit: diy.stackexchange.com
Step-by-step Wiring Guide
Wiring a 3-switch light can seem tricky. This step-by-step guide breaks it down clearly. Follow each step carefully for a safe and working setup. Stay focused and take your time.
Turn Off Power Supply
Start by turning off the power at the circuit breaker. Use a tester to confirm no electricity flows. Safety first. Never work on live wires.
Locate And Prepare Switch Boxes
Find the three switch boxes controlling the light. Remove the cover plates. Pull out the switches gently to access the wires. Check for any damage or loose wires.
Connect The Common Wire
Identify the common wire on each switch. It is usually a darker or black wire. Connect the common wire to the common terminal on the switch. Tighten the screw firmly.
Wire The Traveler Wires
Traveler wires link the switches together. These are typically red and black wires. Connect the traveler wires to the traveler terminals on each switch. Ensure tight and secure connections.
Attach Ground Wires
Locate the ground wires, usually green or bare copper. Connect each ground wire to the grounding terminal on the switches. This step protects against electric shock.
Connect To The Light Fixture
Run the wires from the last switch to the light fixture. Connect the common wire to the fixture’s black wire. Attach the neutral wire to the fixture’s white wire. Secure the ground wire to the fixture’s grounding point.
Testing The Connections
Testing the connections is a key step after wiring a 3-switch light setup. It ensures everything works safely and correctly. Skipping this step can cause problems or hazards later.
Testing helps find wiring mistakes early. Fixing errors now saves time and effort. It also guarantees the light switches control the light as expected.
Using A Voltage Tester
Start by turning off the main power. Use a voltage tester to check each wire. Confirm no current flows before touching wires. This prevents shocks and accidents.
After the power is off, test wires at each switch. The tester should show no voltage. If it does, double-check the circuit breaker.
Powering On And Observing
Turn the power back on at the breaker. Test each switch one by one. The light should turn on and off from every switch. Watch for flickering or unexpected behavior.
Try all switch combinations. Make sure the light responds correctly each time. If not, inspect your connections again.
Using A Continuity Tester
A continuity tester checks if wires connect properly. Turn off power before using it. Attach the tester leads to switch terminals.
The tester shows a signal if the circuit is complete. This confirms switches and wires link as they should. No signal means a loose or broken connection.
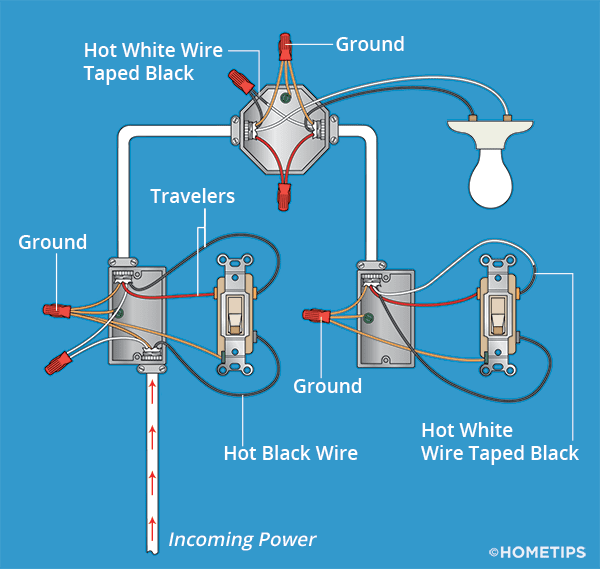
Credit: www.hometips.com
Troubleshooting Common Issues
Connecting a 3 switch light can be tricky. Sometimes, issues arise that stop the light from working correctly. Knowing how to fix common problems saves time and frustration. Below are some frequent issues and easy ways to troubleshoot them.
Light Doesn’t Turn On
Check if the bulb is burned out. Replace it with a new one to test. Make sure the power is on at the breaker box. Loose wires can also cause this problem. Turn off power and tighten all wire connections carefully.
Switch Feels Hot
A switch that feels hot might have a loose wire or be overloaded. Turn off the power before inspecting. Tighten any loose wires connected to the switch. If the problem continues, the switch may need replacing. Avoid using a hot switch to prevent fire risks.
Flickering Light
Flickering usually means a loose connection or faulty bulb. Check the bulb first by tightening or replacing it. Inspect wire connections at the switch and light fixture. Make sure all wires are secure and not damaged. Flickering can also come from a bad switch, so consider changing it if needed.
Tips For Neat And Safe Wiring
Keeping your wiring neat and safe is important when connecting a 3 switch light. Tidy wiring helps prevent accidents and makes future repairs easier.
Organized wires reduce the risk of electrical shorts and improve the overall look of your work. Follow these tips to create clean and secure wiring.
Use Proper Wire Lengths
Cut wires to just the right length. Avoid leaving long, loose wires inside the box. This keeps the space neat and prevents wire tangling.
Label Each Wire
Mark each wire with a simple label. It helps you know which wire connects to each switch or light. Labels save time and avoid confusion.
Secure Wires With Wire Nuts
Use wire nuts to join wires firmly. Tight connections stop wires from coming loose. Check each nut to ensure it is tight and covers all exposed copper.
Arrange Wires Carefully Inside The Box
Place wires flat and avoid sharp bends. Keep wires away from screws and metal edges. This reduces wear and the chance of shorts.
Use Electrical Tape For Extra Safety
Wrap electrical tape around wire nuts and exposed areas. Tape adds a layer of protection against accidental contact and moisture.
Turn Off Power Before Starting
Always switch off the power at the breaker before handling wires. Safety first. Use a tester to confirm the wires are not live.
Frequently Asked Questions
What Is A 3-way Switch Light Connection?
A 3-way switch light connection lets you control one light from two locations. It uses two switches wired together. This setup is ideal for hallways or large rooms. It improves convenience and safety by allowing multiple control points.
How Do I Wire A 3-way Switch Light?
To wire a 3-way switch, connect the traveler wires between switches. Attach the common terminal to the power source or light fixture. Ensure the ground wires are connected properly. Always turn off power before wiring for safety.
Can I Replace A Single Switch With A 3-way Switch?
Yes, you can replace a single switch with a 3-way switch. You need to add another 3-way switch at a different location. Proper wiring of traveler and common terminals is essential. This allows controlling the light from two places.
What Tools Are Needed For 3-way Switch Installation?
You need a screwdriver, wire stripper, voltage tester, and electrical tape. A wire cutter and pliers may also help. Always use insulated tools for safety. Proper tools make installation easier and safer.
Conclusion
Connecting a 3 switch light can seem tricky at first. Step-by-step, it becomes clear and simple. Always follow safety rules and double-check your wiring. Using the right tools helps avoid mistakes and saves time. This setup lets you control one light from three places.
It adds convenience to any room or hallway. Practice makes the process easier and builds your confidence. Now, you have the knowledge to try this project yourself. Keep learning, and electrical tasks will feel less hard.