Want to connect a wall to WiFi but don’t know where to start? You’re not alone.
Getting strong, reliable WiFi right where you need it can seem tricky. But what if hooking up your wall to WiFi was simpler than you think? In this guide, you’ll discover easy steps to boost your internet connection exactly where you want it.
Keep reading, and by the end, you’ll have the tools to make your space fully connected without frustration.
Assess Wall Material
Assessing the wall material is a key step to connect a wall to WiFi. Different materials affect WiFi signals in unique ways. Knowing the wall type helps in choosing the right setup. It also ensures a stronger and stable connection.
Identify Wall Composition
First, find out what the wall is made of. Common materials include drywall, brick, concrete, or wood. Drywall is thin and lets signals pass easily. Brick and concrete are thick and block signals more. Wood is somewhere in between. You can often tell by looking or tapping the wall. Sometimes, a small hole or inspection can help identify the material better.
Impact On Wifi Signals
Wall material directly affects WiFi signal strength. Thick materials like concrete and brick reduce signal range. Signals must pass through these dense walls, causing loss. Drywall and wood cause less interference. Metal inside walls can also block signals completely. Knowing this helps place WiFi devices better. It also guides whether extra equipment like extenders is needed.

Credit: www.amazon.com
Choose Wifi Equipment
Choosing the right wifi equipment is key to connecting your wall to wifi. Good equipment makes the connection strong and stable. It helps reach every corner of your home. Here are some options to consider.
Select Router Type
A router sends internet signals through your home. Basic routers work for small areas. For bigger spaces, choose dual-band or tri-band routers. They handle more devices and reduce slowdowns. Some routers have extra features like parental controls and guest networks. Pick one that fits your needs and budget.
Consider Wifi Extenders
Wifi extenders boost your existing wifi signal. They help reach rooms far from the router. Place extenders halfway between the router and the wall you want to connect. They repeat the wifi signal to cover dead zones. Extenders are affordable and easy to set up. They improve coverage without rewiring your home.
Use Powerline Adapters
Powerline adapters send internet through your home’s electrical wires. Plug one adapter near your router and connect it with a cable. Plug the second adapter near the wall where you want wifi. This method gives a strong and stable connection. It works well if wifi signals are weak or blocked by walls.
Position Router Strategically
Positioning your router correctly is key to a strong WiFi signal. The right spot helps your wall connect better. It reduces dead zones and gives faster internet. Small changes in location can make a big difference. Focus on where and how you place the router to boost your WiFi’s reach.
Centralize Router Location
Place your router near the center of your home. This helps the signal spread evenly in all directions. Avoid placing it in a corner or far edge. A central spot covers more area and improves connection strength. Think about where you use WiFi most. Try to keep the router close to those places.
Avoid Signal Blockers
Keep the router away from thick walls and metal objects. These block or weaken WiFi signals. Large furniture, mirrors, and appliances can also interfere. Open spaces help the signal travel freely. Clear the area around your router to prevent obstacles. This ensures a cleaner and stronger connection.
Elevate Router Placement
Put your router higher up, like on a shelf or table. Signals travel better from a height. Avoid placing it on the floor or behind objects. Higher placement reduces interference from furniture and people. This small step can improve WiFi coverage across your walls.

Credit: www.jennair.com
Setup Wifi Access Point
Setting up a WiFi access point on a wall extends your network’s reach. It helps improve signal strength in rooms far from your main router. This setup creates a new spot where devices can connect to WiFi easily. Follow these steps to install and configure your access point for better coverage.
Install Access Point On Wall
Choose a central spot on the wall for the access point. Avoid places near metal objects or thick walls. Mount the device using screws or the included bracket. Make sure it is secure and not loose. Power the access point using its adapter or PoE (Power over Ethernet).
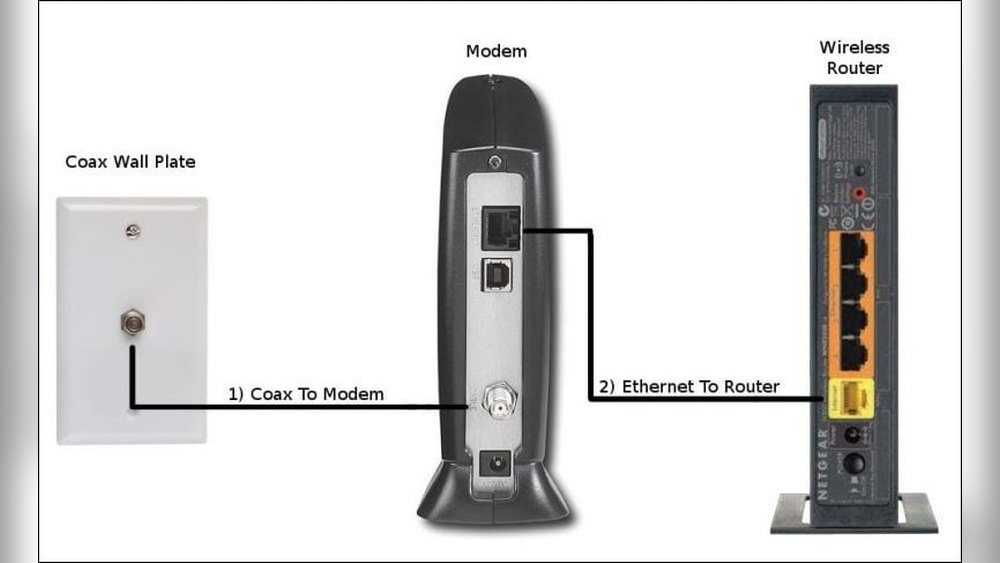
Connect To Main Router
Use an Ethernet cable to connect the access point to your main router. Plug one end into the access point’s LAN port. Connect the other end to a free LAN port on the router. This wired link helps the access point share internet access. Check that the cable is firmly plugged in on both ends.
Configure Network Settings
Access the access point’s setup page through a web browser. Enter the IP address provided in the manual. Log in with the default username and password. Change the WiFi name (SSID) to match your network or give it a new one. Set a strong password to keep your network safe. Choose the right channel to avoid interference. Save the settings and restart the access point if needed.
Optimize Wifi Signal
Optimizing your WiFi signal helps connect your wall devices smoothly. Strong signals reduce dropouts and speed up internet access. Small changes can make a big difference in your home network. Let’s explore easy ways to improve your WiFi strength.
Adjust Channel Settings
WiFi routers use channels to send signals. Many routers use the same channel by default. This causes signal overlap and slows down speeds. Changing the channel can reduce overlap and boost signal quality. Use your router’s settings to pick a less crowded channel. Tools and apps can show which channels are free. Choose one with less interference for better WiFi.
Reduce Interference
Other devices can block your WiFi signal. Microwaves, cordless phones, and Bluetooth devices cause interference. Thick walls and metal objects also weaken signals. Keep your router away from these items. Place it in a central, open spot for best reach. Use the 5GHz band for less interference if possible. Less interference means a clearer and stronger WiFi signal.
Use Mesh Network Systems
Mesh networks use multiple devices to spread WiFi evenly. They create a web of signals covering your entire home. This is helpful in large or thick-walled houses. Mesh systems eliminate weak spots by boosting the signal. Each node talks to others to keep your connection strong. Setting up a mesh network is simple and improves coverage.

Credit: www.reddit.com
Test Signal Strength
Testing the WiFi signal strength is a key step to connect your wall to WiFi properly. It helps find the best spots for your devices. Strong signals mean faster and stable internet. Weak signals can cause slow speeds or drops. Checking signal strength saves time and frustration.
Use Wifi Analyzer Apps
Wifi analyzer apps show how strong your signal is in different places. They work on phones and laptops. These apps display signal bars or numbers. Higher numbers mean better signal. Use them to check near the wall and other rooms.
Identify Dead Zones
Dead zones have no or very weak WiFi signal. These spots cause slow internet or no connection. Walk around your home with the analyzer app. Mark places where the signal is poor. Knowing dead zones helps plan device placement or boosters.
Reposition Devices As Needed
Move your router or WiFi devices to fix weak signals. Place routers high and in open spaces. Avoid walls, metal, and microwaves that block signals. Test signal strength again after moving devices. Repeat until you find the best spot for strong WiFi.
Frequently Asked Questions
How Can I Connect A Wall Jack To Wifi?
To connect a wall jack to WiFi, use an Ethernet cable from the jack to a wireless router. This setup transfers internet from the wired connection to a wireless signal for your devices.
What Tools Are Needed To Hook A Wall To Wifi?
You need an Ethernet cable, a wireless router, and a screwdriver. Optionally, a network tester can ensure proper connection and signal strength.
Can I Use Existing Wall Wiring For Wifi?
Yes, existing Ethernet wall wiring can connect to a WiFi router. It provides stable internet by converting wired data into a wireless signal.
How Do I Test Wifi From A Wall Connection?
Use a WiFi analyzer app or device near the wall jack. Check signal strength and internet speed to ensure proper WiFi performance.
Conclusion
Connecting a wall to WiFi is easier than it seems. Start with the right tools and follow simple steps. Check your router and signal strength first. Use a WiFi extender if the signal is weak. Secure your connection with a strong password.
Test the setup to ensure it works well. This helps keep your home or office connected. Enjoy smooth internet without wires in the wall. Stay patient and take your time. Soon, your devices will have better WiFi access.