Are you ready to upgrade your home lighting but unsure how to connect your Legrand light switch? You’re not alone.
Many people hesitate because wiring switches can seem tricky. But what if you could do it yourself, quickly and safely, without waiting for an electrician? In this guide, you’ll find simple, step-by-step instructions that make connecting your Legrand light switch easier than you think.
By the end, you’ll have the confidence to take control of your lighting setup and enjoy the benefits immediately. Keep reading, and let’s make your home lighting smarter together!
Tools And Materials Needed
Connecting a Legrand light switch requires the right tools and materials. Using proper items ensures safety and a smooth installation. Prepare everything before starting the work to avoid interruptions.
Essential Tools
A few basic tools make the process easier and safer. You need a screwdriver, preferably with interchangeable heads. A voltage tester helps check if the power is off. Wire strippers are important to remove insulation cleanly. Pliers assist in bending and twisting wires. A flashlight can help if the area is dark.
Required Materials
Choose the correct Legrand light switch model for your setup. Use electrical tape to secure wire connections. Wire nuts keep wires tightly joined and insulated. Make sure to have extra screws in case some are lost. Always have a small container to hold these small parts.
Safety Gear
Safety is key while working with electricity. Wear insulated gloves to protect your hands. Safety glasses shield your eyes from sparks or debris. Avoid loose clothing that might catch on wires or tools. Work in a well-lit area to see clearly.

Credit: device.report
Safety Precautions
Turn off the power at the circuit breaker before starting any wiring. Always use insulated tools to avoid electric shocks. Double-check connections to ensure safety and proper function.
Turn Off The Power
Always switch off the power at the main circuit breaker. This stops electricity from flowing to the switch. Never trust the wall switch alone to cut power. Use a voltage tester to check wires before touching them. Safety first. Avoid electric shocks by making sure no current runs through the wires.
Use Proper Tools
Use insulated tools designed for electrical work. This helps protect against accidental shocks. Avoid metal tools without insulation. Keep your tools organized and within reach. Using the right tools makes the job safer and easier.
Wear Safety Gear
Wear rubber-soled shoes to reduce shock risk. Use safety goggles to protect your eyes. Gloves made for electrical work add extra protection. Avoid loose clothing or jewelry that might catch on wires or tools. Safety gear reduces injury chances.
Follow Manufacturer Instructions
Read Legrand’s installation guide carefully before starting. Follow each step exactly as described. Use the recommended wiring diagrams. Ignoring instructions can cause damage or danger. Manufacturer instructions ensure correct and safe installation.
Check For Damaged Wires
Inspect wires for cracks, frays, or burns. Replace any damaged wires before connecting the switch. Damaged wires can cause short circuits or fires. Good wiring is essential for safety and switch performance.
Work In A Dry Area
Never work with electrical parts in wet or damp conditions. Water conducts electricity and increases shock risk. Make sure your hands are dry. A dry workspace protects you and the electrical system.
Identify Your Legrand Switch Model
Knowing your Legrand switch model is the first step to connect it safely and correctly.
Different models have different wiring and installation rules. Identifying the model helps avoid mistakes.
Check The Switch Faceplate
Look at the front of your switch. Many Legrand models have the model number printed there.
Remove the faceplate gently. Sometimes, the model number hides underneath the cover.
Look For Labels On The Switch Body
Turn off power before removing the switch from the wall.
Labels on the side or back of the switch often show the model number and specifications.
Refer To The Installation Manual
Find the manual that came with your switch. It usually has the model name and details.
If you lost the manual, visit Legrand’s official website to download it using product images.
Use Legrand’s Online Tools
Legrand offers online tools to help identify your switch by appearance or features.
These tools guide you step-by-step to find the exact model for your device.
Turn Off Power Supply
Turning off the power supply is the first and most important step before connecting a Legrand light switch. It keeps you safe from electric shocks. It also protects your electrical system from damage during installation. Never skip this step.
Always treat electrical work with care. Safety should be your top priority. Follow the steps below to turn off the power supply correctly.
Locate The Main Circuit Breaker
Find your home’s main electrical panel. It is usually in the basement, garage, or utility room. Look for a box with switches or breakers inside. This box controls all the electricity in your home.
Identify The Correct Breaker
Look for the breaker labeled for the room or area where you will work. If the label is missing, turn off the main breaker to cut power to the entire house. This ensures no power flows to the light switch wires.
Switch Off The Breaker
Flip the breaker switch to the OFF position. You should feel or hear a click. This action stops the electrical current from reaching the light switch. It makes the wires safe to handle.
Verify Power Is Off
Use a voltage tester or a non-contact tester to check the wires. Touch the tester to the wires at the light switch box. If the tester shows no electricity, it is safe to proceed. Never assume the power is off without testing.
Remove Old Switch
Removing the old light switch is the first step in installing your new Legrand switch. This step requires care and attention to safety. Ensure the power is off before touching any wires. The old switch must be taken out carefully to avoid damage to the wiring or wall.
Start by removing the switch plate cover. It is usually held by one or two screws. Use a screwdriver to take off the cover and set it aside safely.
Turn Off Power At The Circuit Breaker
Find your home’s circuit breaker panel. Flip the switch for the light circuit to the off position. This stops electricity from flowing to the switch. Use a voltage tester to double-check no power is present at the switch.
Unscrew The Old Switch
Use a screwdriver to remove the screws holding the switch to the electrical box. Keep the screws in a safe place. Gently pull the switch out from the wall box. Do not pull too hard to avoid pulling wires loose.
Note Wire Connections
Look at how the wires connect to the old switch. Take a photo or make notes. This will help when connecting the new switch. Usually, there are three types of wires: live, neutral, and ground.
Disconnect The Wires
Loosen the screws that hold the wires on the old switch. Carefully remove each wire. Keep the wires separated and straight. This prevents confusion and damage before connecting the new switch.
Prepare Wires For New Switch
Preparing the wires for your new Legrand light switch is an important step. It ensures the switch works safely and correctly. Proper preparation also helps avoid electrical problems later. Follow these simple steps to get your wires ready.
Turn Off The Power
Start by switching off power at the circuit breaker. Use a voltage tester to check wires. Make sure no electricity flows before touching any wires. Safety first.
Remove Old Switch And Inspect Wires
Unscrew the old switch from the wall box. Gently pull it out to see the wires. Check for damaged or frayed wires. Cut and strip the ends clean if needed.
Strip Wire Ends Correctly
Use a wire stripper to remove about ½ inch of insulation. Expose enough copper for a good connection. Avoid nicking or cutting the wire strands. Smooth, clean ends connect better.
Organize Wires By Color
Separate wires by color: black (hot), white (neutral), and green or bare (ground). This helps match wires to the new switch terminals. Keep wires untangled and easy to handle.
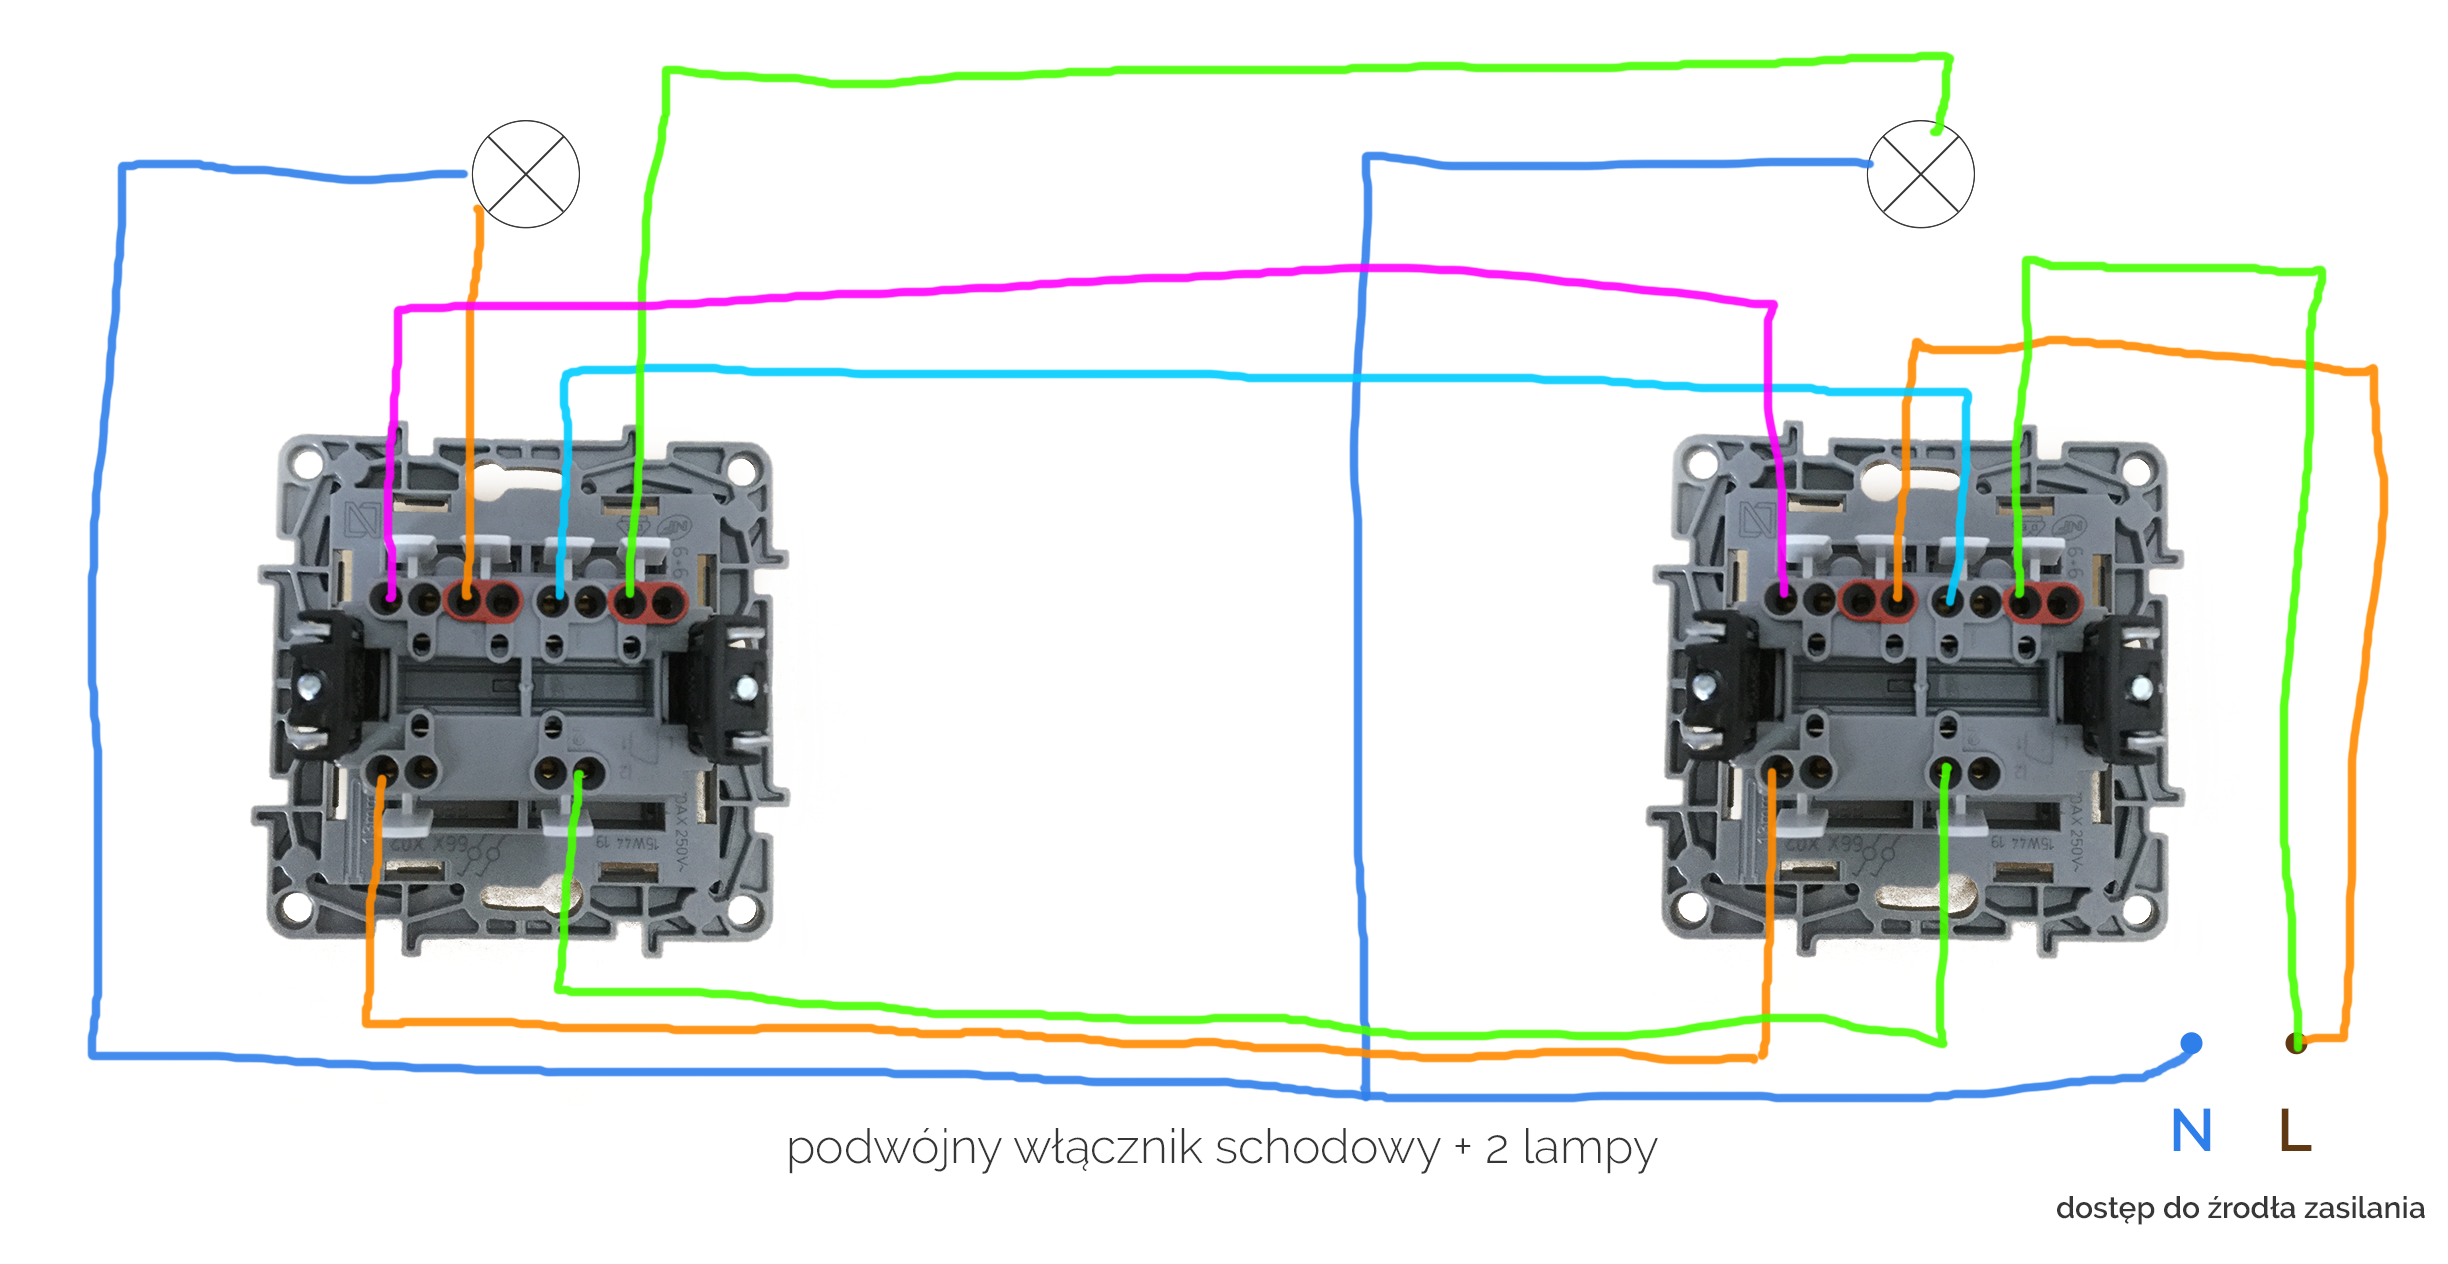
Connect Wires To Legrand Switch
Connecting wires to a Legrand light switch is a key step in installing your new switch safely and correctly. This process requires careful handling to ensure the switch functions as expected. Follow these steps to connect your wires properly and avoid common mistakes.
Identify Wire Types
First, recognize each wire in your electrical box. Usually, you will find three types: hot, neutral, and ground wires. The hot wire carries power from the breaker. The neutral wire completes the electrical circuit. The ground wire protects against electrical faults. Use a voltage tester to confirm the hot wire if unsure.
Match Wires To Terminals
Next, connect each wire to its matching terminal on the Legrand switch. The hot wire attaches to the brass or black screw. The neutral wire goes to the silver screw. The ground wire connects to the green screw or grounding terminal. Ensure each wire fits securely under the terminal screw for a good connection.
Secure Wire Connections
Tighten each terminal screw firmly without over-tightening. Pull gently on each wire to test the connection strength. Loose wires can cause switch malfunction or electrical hazards. Use wire nuts to join wires if required by your switch model. Cover exposed wires with electrical tape for added safety.

Credit: www.legrand.us
Mount The Switch
Mounting the Legrand light switch is a key step in your installation. This task ensures the switch fits securely and works properly. Follow clear steps to mount it right.
Prepare The Wall Box
Start by checking the wall box. Make sure it is clean and free of debris. The box should be deep enough to hold the switch. Tighten any loose screws on the box.
Align The Switch
Hold the switch against the wall box. Line up the screw holes on the switch with those on the box. The switch should sit flush against the wall surface.
Secure The Switch
Insert the mounting screws into the holes. Tighten the screws evenly. Avoid over-tightening to prevent damage. The switch must be stable and not move.
Check The Switch Position
Ensure the switch lever moves smoothly. Check that the switch is straight. A crooked switch looks unprofessional and may cause issues later.
Restore Power And Test
After wiring your Legrand light switch, restoring power is the next step. This lets you check if the installation works correctly. Testing the switch helps find any issues early. It ensures safety and functionality before regular use.
Turn On The Circuit Breaker
Go to your home’s electrical panel. Find the breaker that controls the light switch. Flip it back to the “on” position. This restores electricity to the switch and connected lights. Make sure the breaker stays firmly in place.
Test The Light Switch
Press the switch to see if the light turns on. Try turning it off as well. Check for any flickering or unusual sounds. The light should respond smoothly and quickly. If it does, your switch works properly.
Check For Safety
Look around the switch and wires carefully. Ensure no sparks or burning smells appear. The switch should not feel hot to touch. If anything seems wrong, turn off the power again. Call a professional electrician for help.
Troubleshooting Common Issues
Troubleshooting common issues helps fix problems with your Legrand light switch. It saves time and avoids extra costs. Knowing simple checks can restore your switch quickly. Below are easy solutions for usual problems.
Check Power Supply
First, verify the power is on. Use a tester to confirm electricity reaches the switch. A tripped breaker or blown fuse stops power flow. Reset the breaker or replace the fuse as needed.
Inspect Wiring Connections
Loose or wrong wires cause the switch to fail. Turn off power before checking wires. Make sure each wire fits tightly to the correct terminal. Follow the wiring diagram in the manual carefully.
Test The Switch Itself
The switch might be faulty. Use a multimeter to test continuity. If no continuity exists, replace the switch. Using a bad switch can cause flickering or no light.
Look For Overloaded Circuits
Too many devices on one circuit can trip breakers. Remove some devices to reduce load. Overloaded circuits prevent the switch from working properly.
Confirm Proper Grounding
Ground wire prevents electrical shocks. Check if the ground wire is connected securely. A missing ground can cause safety issues and malfunction.
Credit: www.elektroda.com
Frequently Asked Questions
How Do I Connect A Legrand Light Switch Safely?
Turn off the power at the circuit breaker before starting. Use a voltage tester to confirm no electricity flows. Follow the wiring diagram in the manual carefully. Connect wires to the corresponding terminals securely and mount the switch properly.
What Tools Are Needed To Install A Legrand Switch?
You will need a screwdriver, wire stripper, voltage tester, and electrical tape. These tools help safely strip, connect, and secure wires. Having them ready before starting ensures a smooth installation process.
Can I Replace Any Switch With A Legrand Switch?
Legrand switches are compatible with most standard wiring setups. Check the switch type and electrical specifications before replacing. Ensure the voltage and current ratings match your circuit to avoid damage or hazards.
How To Troubleshoot A Legrand Light Switch Not Working?
First, confirm the power is on and wiring is correct. Tighten all wire connections if loose. Replace the switch if it shows signs of damage. If issues persist, consult a professional electrician.
Conclusion
Connecting a Legrand light switch is simple with the right steps. Always turn off power before starting to stay safe. Follow the wiring instructions carefully to avoid mistakes. Double-check connections before restoring electricity. A well-installed switch works smoothly and lasts long.
Take your time and don’t rush the process. This guide helps you feel confident handling the task. Brighten your space with ease and safety.