If you’ve just bought a Schlage deadbolt or need to fix one, putting it together might seem tricky at first. But don’t worry—you can do it yourself with the right steps.
Imagine having a sturdy, reliable lock that keeps your home safe, and knowing you installed it perfectly. In this guide, you’ll learn exactly how to put your Schlage deadbolt together quickly and easily. By the end, you’ll feel confident and secure, ready to protect what matters most.
Keep reading, and let’s get started!
Tools Needed
Gathering the right tools is the first step to assemble a Schlage deadbolt properly. Using the correct tools saves time and ensures the lock fits securely. Each tool has a specific role during the installation process.
Preparing these tools before starting helps avoid interruptions. Keep them close to your work area for easy access.
Screwdriver
A Phillips-head screwdriver is essential for tightening screws. It fits most screws used in deadbolt assembly. A flat-head screwdriver might be needed for some parts.
Measuring Tape
Use a measuring tape to check door thickness and alignment. Accurate measurements help the deadbolt fit perfectly. Measure twice to avoid mistakes.
Drill And Drill Bits
A drill with appropriate drill bits makes holes for screws and the lock cylinder. Choose bits that match screw sizes. This tool speeds up the installation.
Chisel
A chisel helps create space for the lock plate on the door edge. It ensures the plate sits flush with the door surface. Use it carefully for neat results.
Pencil
A pencil marks drilling spots and alignment lines. Marking helps keep everything precise. Use light marks to avoid visible stains.
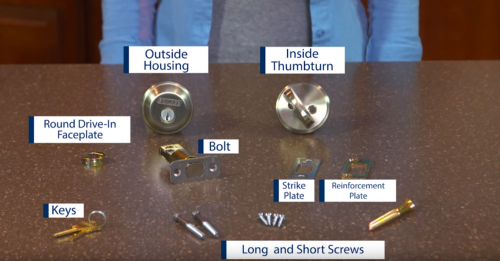
Identify Deadbolt Parts
Knowing each part of a Schlage deadbolt is key to assembling it correctly. Each piece plays a specific role in locking and unlocking your door. Identifying these parts first makes the process easier and faster.
Exterior Assembly
The exterior assembly includes the part you see outside your door. It has the key cylinder where you insert your key. This part connects to the internal mechanism to lock or unlock the door.
Interior Assembly
The interior assembly sits on the inside of your door. It has a thumb turn that you twist to lock or unlock without a key. This piece connects to the bolt mechanism inside the door.
Deadbolt
The deadbolt is the metal piece that slides into the door frame. It secures the door when locked. It moves back and forth when you turn the key or thumb turn.
Strike Plate
The strike plate attaches to the door frame. It has a hole where the deadbolt slides in. It keeps the door firmly shut when locked.
Screws And Fasteners
Screws hold all parts together. Different screws fit various pieces. Keep them organized for easy assembly.
Prepare The Door
Preparing the door is the first step in installing a Schlage deadbolt. This step ensures the lock fits correctly and works smoothly. Proper preparation saves time and avoids mistakes during installation.
Check the door carefully before starting. The door must be in good condition with no cracks or damage near the lock area. The edge of the door should be smooth and straight for the deadbolt to fit well.
Measure And Mark The Door
Use a tape measure to find the right height for the deadbolt. Most deadbolts go about 6 to 12 inches above the doorknob. Mark the spot clearly with a pencil. Make sure the mark is level and centered on the door’s edge.
Drill The Holes
Drill a hole through the door where you marked. This hole holds the lock cylinder. Use a hole saw that matches the size of the lock. Drill carefully to avoid splinters. Then, drill a smaller hole in the door’s edge for the latch.
Check The Door Frame
The door frame needs a hole for the deadbolt to slide into. Mark the spot on the frame that matches the latch. Drill a hole or chisel out space for the strike plate. The hole must be deep enough for the bolt.
Test The Fit
Insert the latch into the door edge. The latch should fit snugly and sit flush. Close the door to see if the bolt reaches the hole in the frame. Adjust the holes if the fit is too tight or loose.
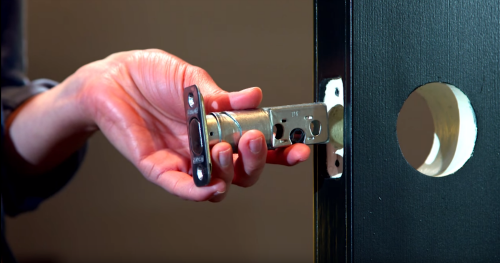
Install The Latch
Start by placing the latch into the door edge. Secure it tightly with screws to keep it stable. Ensure the latch moves smoothly before moving on.
Prepare The Door For The Latch
Start by checking the door edge. Make sure the hole for the latch is clean and smooth. Remove any wood splinters or dust. This helps the latch fit well and work smoothly.
Next, align the latch with the hole. The angled part of the latch should face the door frame. This allows the door to close easily.
Insert The Latch Into The Door
Push the latch into the hole carefully. Do not force it. The latch should sit flush with the door edge. If it sticks out, gently tap it with a small hammer.
Ensure the latch bolt moves freely. Slide it in and out to check. A smooth movement means it is installed right.
Secure The Latch With Screws
Find the screw holes on the latch plate. Hold the latch in place and insert screws. Tighten screws with a screwdriver. Do not over-tighten; this can strip the holes.
Check the latch again. It should stay firmly in place. The bolt should still move smoothly after securing the screws.
Attach The Exterior Assembly
Attaching the exterior assembly is a key step in putting a Schlage deadbolt together. This part connects the lock’s outside components to the door. It holds the key cylinder and the thumb turn on the inside.
Proper placement is important for smooth operation. The exterior assembly must fit snugly and align with the door’s holes. Follow these steps to attach it correctly.
Prepare The Exterior Assembly
Start by checking the exterior assembly parts. Make sure the key cylinder is in place. The tailpiece should extend through the back of the assembly. This tailpiece connects to the inside mechanism.
Align The Assembly On The Door
Place the exterior assembly on the outside of the door. Line up the tailpiece with the hole in the door. Ensure the assembly fits flush against the door surface. The keyhole should be easy to access.
Secure The Assembly With Screws
Use the screws provided to secure the exterior assembly. Insert screws through the mounting holes. Tighten them evenly to hold the assembly firmly. Avoid over-tightening to prevent damage.
Credit: www.schlage.com
Install The Interior Assembly
Installing the interior assembly of a Schlage deadbolt is a key step. It connects the lock mechanism inside your door. This part helps you lock and unlock from the inside.
Careful installation ensures smooth operation and security. Follow the steps closely for a tight fit.
Align The Interior Assembly With The Door
Start by placing the interior assembly on the inside of the door. Make sure the tailpiece fits through the latch mechanism. The assembly should sit flush against the door surface.
Secure The Assembly With Screws
Use the screws provided with your deadbolt kit. Insert them into the holes and tighten with a screwdriver. Do not overtighten to avoid damage.
Attach The Interior Thumbturn
Fit the thumbturn onto the interior assembly spindle. Press it firmly until it clicks into place. This allows easy locking and unlocking from inside.
Test The Interior Lock Function
Turn the thumbturn to lock and unlock the door. The deadbolt should move smoothly without sticking. Adjust screws if needed for better movement.
Secure With Screws
Securing the Schlage deadbolt with screws is an important step. It ensures the lock stays firmly in place and works correctly. Proper tightening of screws keeps the deadbolt strong and secure for daily use.
Follow these steps to secure the lock with screws easily and safely. Taking care here prevents problems like a loose lock or difficulty turning the key.
Align The Deadbolt And Door Plate
First, make sure the deadbolt and door plate line up perfectly. The holes must match. Check that the deadbolt slides smoothly into the strike plate on the door frame. Adjust if needed before adding screws.
Insert Screws Carefully
Place the screws into the holes of the door plate and deadbolt. Use a screwdriver or drill with a low setting. Tighten screws gently to avoid stripping or breaking them. Keep the parts steady while screwing.
Tighten Screws Securely
Once screws are in place, tighten them firmly. The deadbolt should feel solid and not wiggle. Avoid over-tightening, which can damage the lock or door. Check the deadbolt movement after tightening.
Test The Deadbolt
Testing the Schlage deadbolt is a key step after assembly. It ensures the lock works smoothly and secures your door properly. This step avoids problems later on, such as sticking or jamming.
Take time to check the deadbolt’s movement. Confirm it slides in and out easily. Test both sides of the lock. This simple check saves time and frustration.
Check The Bolt Movement
Turn the key or thumb turn slowly. Watch the bolt extend and retract. It should move smoothly without any resistance. If the bolt sticks, adjust the lock or strike plate.
Test Lock Operation From Inside And Outside
Lock and unlock the deadbolt from both sides. The key should turn with ease outside. The thumb turn should rotate smoothly inside. Make sure the bolt fully extends each time.
Ensure Proper Alignment With The Strike Plate
Close the door and lock the deadbolt. The bolt must fit cleanly into the strike plate hole. Misalignment causes the bolt to bind or not lock fully. Adjust the strike plate if needed for perfect fit.
Troubleshooting Tips
Putting a Schlage deadbolt together usually goes smoothly. Still, some problems may happen. These tips help solve common issues fast. Clear steps keep your lock working well. Follow these easy fixes to avoid frustration and save time.
Check The Alignment Of The Deadbolt
Make sure the deadbolt fits into the strike plate smoothly. Misalignment can stop the lock from turning. Adjust the strike plate or the bolt position. Test the lock after every small change. Proper alignment ensures easy locking and unlocking.
Ensure The Cylinder Is Installed Correctly
The cylinder must sit flush with the door surface. A loose or uneven cylinder causes the key to jam. Tighten the screws holding the cylinder. Confirm it does not move when you turn the key. Correct installation improves lock operation.
Tighten All Screws Securely
Loose screws affect the lock’s function. Check all screws on both sides of the lock. Use a screwdriver to tighten them without overdoing it. Screws that are too tight can cause damage. Proper screw tension keeps parts in place safely.
Test The Key And Thumb Turn Movement
Insert the key and turn it gently. The thumb turn should move smoothly too. Resistance can indicate wrong part placement or debris inside. Remove the lock and inspect for obstructions. Clean parts and try assembling again carefully.
Use The Correct Parts For Your Model
Different Schlage deadbolts have unique parts. Using wrong parts can cause fitting problems. Compare your parts with the instruction manual. Order replacements if any part looks different. Correct parts ensure perfect assembly and function.

Credit: www.youtube.com
Credit: www.schlage.com
Frequently Asked Questions
How Do I Assemble A Schlage Deadbolt Step-by-step?
To assemble a Schlage deadbolt, start by installing the latch into the door. Next, attach the exterior keypad or knob, then the interior thumb turn. Secure both sides with screws, ensuring alignment. Finally, test the deadbolt to confirm smooth operation and proper locking.
What Tools Are Needed For Schlage Deadbolt Assembly?
You need a Phillips screwdriver, a tape measure, and a drill (if holes are not pre-drilled). A pencil helps mark positions. Having the deadbolt kit instructions handy is essential for accurate assembly and installation.
How Can I Align The Deadbolt Properly During Assembly?
Ensure the latch bolt is centered in the door edge hole. Align the exterior and interior parts so the tailpiece fits through the latch. Tighten screws evenly to avoid misalignment, allowing the deadbolt to slide smoothly into the strike plate.
Can I Install A Schlage Deadbolt Without Professional Help?
Yes, Schlage deadbolts are designed for DIY installation. Follow the included instructions carefully. Basic tools and some patience are required. If unsure, watching tutorial videos can provide additional guidance for a successful installation.
Conclusion
Putting a Schlage deadbolt together is simple with clear steps. Follow each part carefully, and take your time. Double-check your work to ensure the lock works smoothly. A well-installed deadbolt adds safety and peace of mind to your home. Practice helps you get better and faster.
Keep the instructions handy for future reference. Enjoy the feeling of completing a useful task on your own.