Are you looking to add a new light to your room without rewiring everything from scratch? Connecting a new light to an existing switch is easier than you might think, even if you’re not an expert.
Imagine flipping your switch and instantly brightening up a space that was once dim or dark. In this guide, you’ll discover simple, step-by-step instructions that make the process safe and straightforward. Keep reading, and you’ll gain the confidence to upgrade your lighting like a pro—saving time, money, and a lot of hassle.
Your home deserves that extra glow, and you’re just a few steps away from making it happen.
Tools And Materials Needed
Before starting to connect a new light to an existing switch, gather all the necessary tools and materials. Having everything ready makes the job smoother and safer. It helps to avoid interruptions and mistakes.
Use tools that work well and materials made for electrical projects. Safety is very important, so choose items that meet quality standards. Below are the main tools and materials you will need.
Basic Electrical Tools
You need a screwdriver set to open switch covers and light fixtures. A wire stripper is essential to remove insulation from wires without damage. A voltage tester helps check if wires carry electricity. This tool prevents shocks. Pliers come handy for bending and twisting wires.
Materials For Wiring
Use electrical wires that match your home’s existing wiring. Usually, 14 or 12 gauge wires work well. Wire nuts are small caps to connect wires safely. Electrical tape adds extra protection to wire connections. Light fixtures and switches must fit your room’s style and electrical needs.
Safety Gear
Wear insulated gloves to protect your hands. Safety glasses keep your eyes safe from sparks or debris. Turn off the power at the breaker box before starting work. Use a sturdy ladder or step stool to reach the light fixture.
Safety Precautions
Safety is the top priority when connecting a new light to an existing switch. Electricity can be dangerous if not handled correctly. Taking the right precautions helps prevent shocks, burns, or damage to your home. Follow these simple safety steps to protect yourself and your property.
Turn Off Power At The Circuit Breaker
Always switch off the power at the circuit breaker before starting any electrical work. Do not rely on just turning off the light switch. Use a voltage tester to confirm the power is off. This step stops any electric current from flowing.
Use Proper Tools And Equipment
Use insulated tools made for electrical work. Avoid using damaged or worn tools. Wear safety gloves to protect your hands. Having the right tools makes the job safer and easier.
Work In A Dry Environment
Keep the work area dry and free from water. Never work with electricity in wet conditions. Water increases the risk of electric shock. Make sure your hands are dry before touching wires.
Follow Local Electrical Codes
Check your local electrical codes before starting. These rules ensure safe and proper installation. Following codes helps avoid fines and unsafe wiring. Use the right wire size and connectors as required.
Double-check Connections
Inspect all wire connections carefully. Loose wires can cause sparks or fires. Tighten screws and use wire nuts to secure wires. A strong connection keeps your new light working safely.
Turn Off Power
Turning off the power is the first and most important step before connecting a new light to an existing switch. It keeps you safe from electric shock. Working with electricity can be dangerous without proper precautions.
Always ensure the power is completely off. This step protects you and prevents damage to your electrical system. Take your time and be careful.
Locate The Circuit Breaker
Find the circuit breaker box in your home. It is usually in the basement, garage, or utility room. Look for the switch that controls the light or area where you will work.
Switch Off The Correct Breaker
Turn off the breaker that powers the switch and light fixture. This stops the flow of electricity. Double-check that you have the right breaker to avoid risks.
Verify The Power Is Off
Use a voltage tester or a simple light bulb to check. Confirm no electricity is running to the switch or wires. This step ensures your safety before touching any wires.

Credit: diy.stackexchange.com
Locate Existing Switch Wiring
Start by turning off the power to the switch at the breaker box. Then, open the switch plate to find the existing wires connected to the switch. Identify the hot, neutral, and ground wires to connect your new light properly.
Finding the existing switch wiring is the first step to add a new light. This helps you understand how power flows and where connections can be made. Safety is key. Always turn off power at the breaker before touching wires.
Start by removing the switch cover plate. Use a screwdriver to take off the screws. Gently pull the switch from the wall to see the wires behind it. Note the colors and how many wires you see.
Identify Wire Colors And Functions
Most switches have black, white, and green or bare copper wires. Black wires usually carry power. White wires are neutral, but may be marked with black tape near switches. Green or bare copper wires are ground. Knowing these helps avoid mistakes.
Check For Power Source And Load
Look for the wire bringing power in. This is called the “line” wire. The wire going to the light is the “load” wire. Use a voltage tester to confirm which wire is live. This step prevents shocks and incorrect connections.
Document Wire Connections
Take a photo or draw a diagram of the wires and their connections. This helps during installation of the new light. Proper documentation saves time and reduces errors.
Plan Your Wiring Route
Planning your wiring route is the first step to connect a new light to an existing switch. A clear plan saves time and prevents mistakes. It helps you know where to run the wires safely and efficiently.
Good planning avoids damage to walls and ceilings. It also ensures the wires reach the switch and light without extra length. Think about the path the wires will take before starting the work.
Identify The Switch And Light Locations
Start by finding the switch controlling the current light. Note the exact spot where you want the new light. This helps you understand the distance the wiring must cover.
Check For Obstacles In The Path
Look for obstacles like beams, pipes, or insulation. Plan a route that avoids these barriers. This keeps the wiring safe and easy to install.
Choose The Best Route For Wiring
Pick the shortest and simplest route between the switch and new light. This reduces the amount of wire you need. It also lowers the chance of wire damage.
Consider Access Points For Wiring
Find easy access points such as attic or basement spaces. These spots make running wires easier. Access points also help with future maintenance or repairs.
Plan For Wire Protection
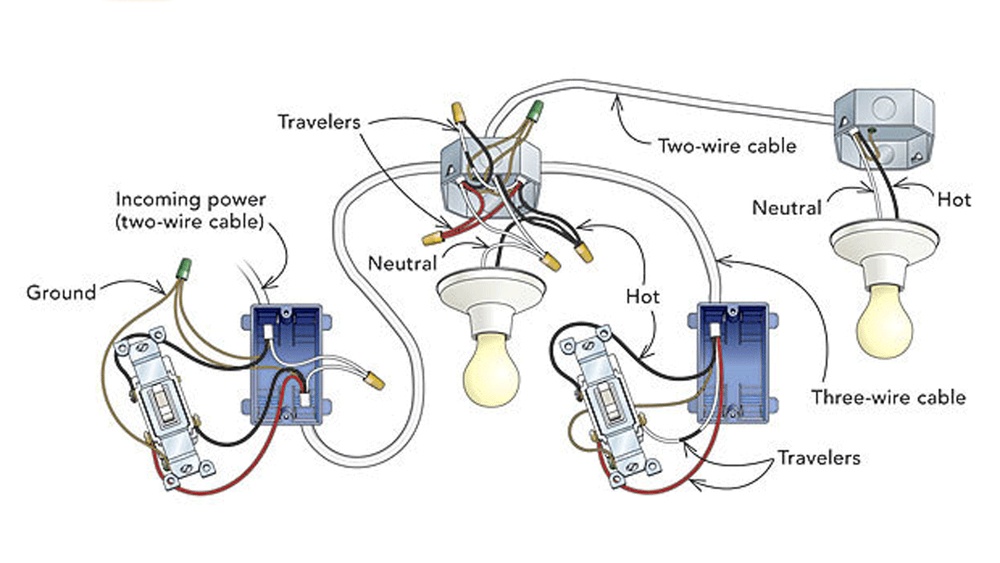
Think about protecting wires with conduit or cable covers. This prevents damage from nails or screws. Wire protection adds safety and durability to your setup.
Credit: www.reddit.com
Run New Wiring
Running new wiring is the key step to connect a new light to an existing switch. It involves adding electrical cables between the switch and the new light fixture. This step ensures the light will receive power and work properly with the switch.
Before starting, turn off the power at the circuit breaker. Safety is very important when working with electricity. Use the right tools and materials to make the wiring safe and effective.
Choose The Right Cable Type
Select cables that fit your home’s electrical system. Most homes use NM (non-metallic) cable, often called Romex. Use cables with the correct gauge, usually 14 or 12 gauge, based on your circuit needs.
Measure And Cut The Cable
Measure the distance between the switch and the new light. Add a little extra length for flexibility. Cut the cable carefully with wire cutters, avoiding damage to the insulation.
Run The Cable Through Walls Or Ceilings
Guide the cable through wall studs or ceiling joists. Use a fish tape or wire puller to help pull the wire through tight spaces. Avoid sharp bends or kinks that can damage the cable.
Secure The Cable Properly
Use cable staples or clamps to secure the wire along the run. Keep the cable neat and tight to prevent movement. Do not pinch or crush the cable during fastening.
Connect Wires To The Switch
Connecting wires to the switch is a key step in adding a new light. This task links the new light to the power source through the switch. Proper wire connections ensure the light works safely and correctly.
Take time to identify the wires before starting. Typically, you will see black, white, and green or bare copper wires. Each has a specific role in the circuit.
Turn Off The Power
Always turn off power at the breaker box first. This stops electricity flow and keeps you safe. Use a tester to confirm no current flows in the wires.
Identify The Wires
The black wire is usually the “hot” wire. It carries power from the breaker to the switch. The white wire is neutral and completes the circuit. Green or bare copper wires are ground wires for safety.
Connect The Ground Wire
Attach the ground wire to the green screw on the switch. This prevents electrical shock. If the box is metal, connect the ground wire to it too.
Attach The Hot Wires
Connect the black wire from the power source to one terminal on the switch. Connect the black wire going to the new light to the other terminal. Tighten the screws firmly.
Manage The Neutral Wire
Most switches do not connect to neutral wires. Twist the white wires together with a wire nut. This keeps the circuit complete and safe.
Secure And Test
Push the wires back into the box carefully. Screw the switch into place. Turn on the power and test the switch. The new light should turn on and off smoothly.
Install The New Light Fixture
Installing a new light fixture is the next step after wiring it to the switch. It involves securing the fixture safely and making sure it works correctly. This part is important for both the look and function of your room.
Follow clear steps to avoid mistakes and ensure safety. Use the right tools and take your time. A well-installed fixture brightens your space and lasts longer.
Turn Off The Power
Always switch off the power at the breaker box. This stops electrical shock and accidents. Double-check that the light switch does not turn on the power.
Attach The Mounting Bracket
Secure the mounting bracket to the electrical box. Use screws that fit tight. This bracket holds the fixture firmly in place.
Connect The Wires
Match the wires from the fixture to the house wires. Usually, black connects to black and white to white. Use wire nuts to twist the wires together safely.
Secure The Fixture
Lift the light fixture and attach it to the bracket. Use screws or clips given with the fixture. Make sure it is steady and does not wobble.
Install Bulbs And Covers
Put in the correct light bulbs for your fixture. Avoid bulbs that are too strong or weak. Attach any glass covers or shades that come with the light.
Test The New Light
Testing the new light is a vital step after installation. It ensures the wiring works and the light functions properly. This step prevents future issues and keeps you safe.
Before testing, make sure all connections are secure. Confirm the power is turned on at the circuit breaker. Safety first. Now you are ready to test the light.
Turn On The Switch
Flip the existing switch connected to the new light. Watch if the light turns on. If it does, the connection is good. If not, check the wiring again.
Check For Flickering Or Dim Light
Observe the light closely. Flickering or dim light may indicate loose wires. Tighten connections if needed. A steady light means a solid connection.
Test Multiple Times
Turn the switch on and off a few times. This helps confirm the light works reliably. Consistent operation shows your wiring is correct.
Use A Voltage Tester
If the light does not turn on, use a voltage tester. Check if power reaches the light socket. This tool helps identify wiring problems safely.
Troubleshooting Tips
Troubleshooting is key when adding a new light to an existing switch. Small mistakes can stop the light from working. Understanding common issues helps fix problems fast. This saves time and keeps the project safe.
Check connections carefully. Sometimes wires are loose or in the wrong place. Testing each step makes sure the switch and light work well together.
Check The Power Supply
Confirm the power is off before starting. Use a voltage tester to verify no electricity flows. If the power is off, the light should not turn on. If it does, double-check the wiring.
Inspect Wire Connections
Look for loose or disconnected wires. Tighten any loose screws on terminals. Match wire colors: black to black, white to white, and green or copper to ground. Wrong connections stop the light from working.
Test The Switch
Use a multimeter to test the switch. Switch off, then check continuity. A bad switch means no power reaches the light. Replace the switch if needed.
Examine The Light Fixture
Check if the light bulb is good. Replace it with a new one to test. Inspect the fixture for damage or corrosion. Fix or replace the fixture if it looks faulty.
Look For Tripped Breakers
Check the circuit breaker panel. A tripped breaker stops power flow. Reset the breaker by switching it off and on. If it trips again, call an electrician.

Credit: diy.stackexchange.com
Frequently Asked Questions
How Do I Connect A New Light To An Existing Switch?
Turn off power first. Run wiring from the switch box to the new light. Connect wires: black to black, white to white, and ground to ground. Secure connections with wire nuts and test the light.
What Tools Are Needed To Add A Light To A Switch?
You need a voltage tester, wire strippers, screwdriver, electrical tape, wire nuts, and a drill. These tools ensure safe and proper wiring when connecting a new light fixture.
Can I Add A Light To A Switch Without Rewiring?
If wiring is accessible, you can tap into the existing circuit. Use wire connectors to extend wiring safely. However, some rewiring might be necessary for code compliance and safety.
Is It Safe To Connect A New Light To An Old Switch?
Yes, if the switch and wiring are in good condition. Always turn off power and test wires before working. Use proper connectors and follow electrical codes for safety.
Conclusion
Connecting a new light to an existing switch is easier than it seems. Follow each step carefully and stay safe while working with electricity. Double-check all connections before turning the power back on. This project can brighten your room without needing extra switches or wires.
Taking your time helps avoid mistakes and keeps everything working well. With patience, your new light will work smoothly with the old switch. Enjoy the improved lighting and the satisfaction of doing it yourself.