Have you ever wished for an extra outlet where there’s only a light switch? Maybe you need more plugs for your devices but don’t want to deal with messy extension cords.
Converting a light switch to an outlet can solve this problem quickly and safely. In this guide, you’ll learn exactly how to make this change step-by-step, even if you’re not an expert. Keep reading, and you’ll discover simple tips that save you time, money, and frustration while improving your home’s functionality.

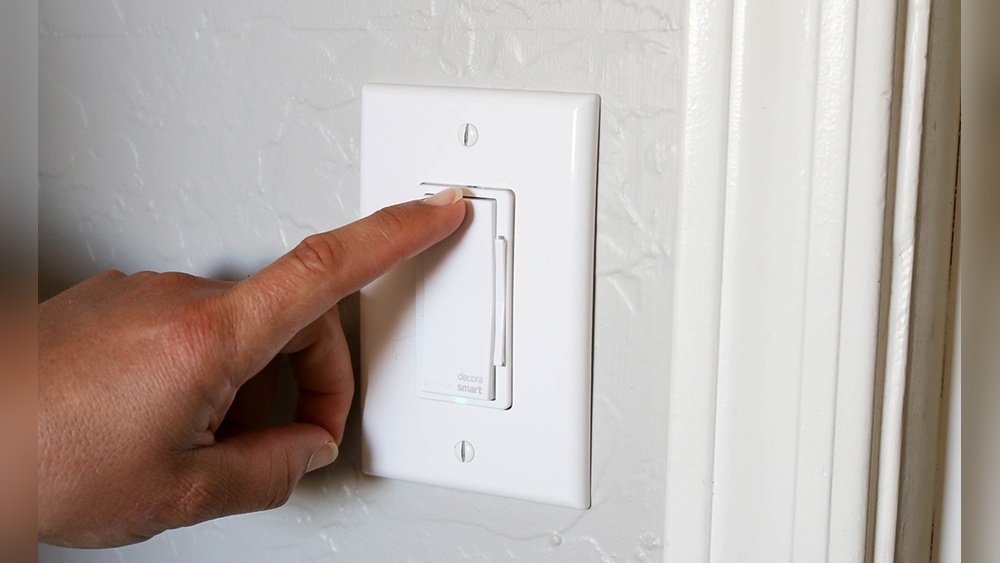
Credit: www.youtube.com
Tools And Materials Needed
Converting a light switch to an outlet needs specific tools and materials. Having the right items makes the task smooth and safe.
This section lists all tools and materials you need. Prepare them before starting the work to avoid delays.
Basic Tools
You need simple tools for electrical work. A screwdriver set with flathead and Phillips tips is essential. Use a voltage tester to check power. Wire strippers help remove insulation from wires. Needle-nose pliers assist with bending and holding wires. A utility knife comes in handy for cutting electrical tape and wires.
Electrical Components
Replace the switch with a proper outlet. Purchase a standard electrical outlet with the right voltage rating. Use a matching wall plate for a clean look. Get wire nuts to connect wires securely. Electrical tape is necessary to insulate wire connections. Make sure to use wires that meet local electrical codes.
Safety Gear
Safety is important during electrical work. Wear insulated gloves to protect against shocks. Safety goggles shield your eyes from debris. Use a dust mask if you work in dusty areas. Wear closed-toe shoes to protect your feet. Keep a fire extinguisher nearby for emergencies.
Credit: www.oneprojectcloser.com
Safety Precautions
Safety is the top priority when changing a light switch to an outlet. Electricity can cause serious injury or damage. Taking the right safety steps helps protect you and your home. Follow each step carefully to work safely and confidently.
Turn Off Power
Switch off the power at the circuit breaker. Do not trust the wall switch alone. Cutting power stops electric current from flowing. This step prevents shocks and accidents during work.
Test For Live Wires
Use a voltage tester to check wires. Make sure no wires carry electricity. Testing confirms the power is truly off. This extra check keeps you safe from shocks.
Use Insulated Tools
Choose tools with insulated handles. Insulation stops electricity from reaching your skin. Insulated tools reduce the risk of electric shock. Always use the right tools for electrical work.
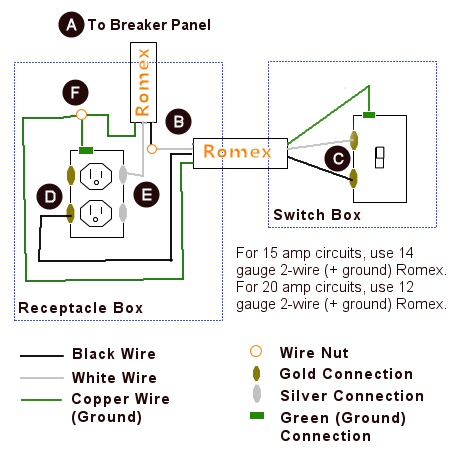
Identify Wiring Setup
Identifying the wiring setup is the first step to convert a light switch to an outlet. This process ensures safety and proper function. Understanding the wiring helps prevent mistakes and electrical hazards. Follow these steps carefully to check and know your wiring.
Check Existing Switch Wiring
Turn off the power at the circuit breaker. Remove the switch cover and unscrew the switch. Look inside the electrical box to see the wires connected. Note how many wires and their colors are present. Check if the wires are attached to screws or pushed in. Take a photo for reference before disconnecting anything.
Locate Power Source
Identify where the power comes from in the switch box. Look for the black or red wire bringing power in. This wire connects to the breaker in your panel. The power source is essential to feed the new outlet. Use a voltage tester to confirm the live wire. Mark this wire to avoid confusion later.
Determine Wire Functions
Identify each wire’s purpose: hot, neutral, or ground. The hot wire carries electricity to the device. The neutral wire completes the circuit back to the panel. The ground wire provides safety by preventing shocks. Use a voltage tester or multimeter for testing. Label wires to keep track of their roles.
Remove The Light Switch
Removing the light switch is the first step in converting it to an outlet. This task involves careful handling of electrical parts. Safety is very important. Turn off the power at the breaker before starting. Use a voltage tester to confirm no current flows. Follow these steps to remove the switch safely and prepare for the new outlet installation.
Unscrew Faceplate
Start by removing the faceplate covering the switch. Use a screwdriver to take out the screws. Keep the screws in a safe place. Gently pull the faceplate away from the wall. Avoid forcing it to prevent damage. This exposes the switch and wiring behind it.
Disconnect Wires
Next, unscrew the terminals holding the wires on the switch. Loosen each screw carefully. Pull the wires off the switch terminals. Note the wire positions or take a photo. This helps during the outlet wiring process. Keep the wires separate to avoid confusion.
Inspect Wiring Condition
Look closely at the wires for damage or wear. Check for frayed insulation or corrosion. Replace any damaged wires before proceeding. Ensure wires are clean and solid. Good wiring ensures safety and proper outlet function. Fix any issues before installing the new outlet.
Prepare For Outlet Installation
Preparing for outlet installation is a key step when converting a light switch. This step ensures safety and functionality. It makes the installation smooth and prevents future issues.
Start by knowing the type of outlet you need. Then, check if the electrical box fits the outlet size. Finally, prepare the wires correctly. These tasks set a strong base for the installation.
Choose Outlet Type
Pick an outlet that matches your needs. Standard outlets work for most rooms. GFCI outlets are best for wet areas like kitchens and bathrooms. Make sure the outlet fits the electrical code in your area. This choice affects safety and use.
Adjust Electrical Box If Needed
Look inside the electrical box. It must fit the new outlet well. If the box is too small, replace it with a larger one. The box should sit flush with the wall surface. Secure it firmly to avoid movement later.
Strip Wire Ends
Turn off power before handling wires. Use a wire stripper to remove insulation. Strip about half an inch from each wire end. Expose clean copper without damaging it. Proper stripping helps a good connection and prevents shorts.

Credit: diy.stackexchange.com
Wiring The New Outlet
Wiring the new outlet is a key step in converting a light switch to a power source. It involves connecting three main wires: hot, neutral, and ground. Each wire has a specific role to make the outlet work safely and correctly. Follow these steps carefully to ensure a proper connection.
Connect Hot Wire
The hot wire carries electricity from the power source. It is usually black or red. Attach this wire to the brass-colored screw on the outlet. Make sure the wire is tightly wrapped around the screw. This ensures a solid electrical connection and prevents sparks.
Attach Neutral Wire
The neutral wire completes the electrical circuit. It is typically white. Connect this wire to the silver-colored screw on the outlet. Secure the wire firmly to avoid any loose connections. A good connection helps keep the outlet safe and functional.
Ground The Outlet
The ground wire protects against electrical shocks. It is often green or bare copper. Attach this wire to the green grounding screw on the outlet. This step is very important for safety. It helps direct any stray electricity safely into the ground.
Secure And Test Outlet
Securing and testing the outlet is a key step after wiring. It keeps the outlet safe and ready for use. Follow these steps to finish the job properly.
Mount Outlet In Box
Carefully push the outlet into the electrical box. Make sure no wires are pinched or loose. Use screws to fasten the outlet tightly to the box. A secure outlet avoids movement and potential hazards.
Replace Faceplate
Put the faceplate over the outlet. Align it so screw holes match the outlet. Screw the faceplate in place gently. This covers wires and gives a clean look to the outlet.
Restore Power And Test
Turn the power back on at the circuit breaker. Use a tester or plug in a device to check the outlet. Confirm the outlet works correctly without sparks or flickering. Testing ensures safety and proper function.
Troubleshooting Tips
Troubleshooting is a key step after converting a light switch to an outlet. It helps find and fix common problems fast. Knowing what to check saves time and keeps you safe. Below are common issues and simple ways to solve them.
Outlet Not Working
Check if the outlet has power. Use a tester or plug in a device. Sometimes, the wiring might be wrong. Make sure the wires connect to the correct terminals. If unsure, double-check the switch box and outlet box connections.
Tripped Circuit Breaker
The circuit breaker may trip if there is too much load or a short. Locate your breaker panel and see if any switch is off. Flip it back on carefully. If it trips again, unplug devices and test the outlet again. Persistent trips need an electrician’s help.
Loose Connections
Loose wires cause outlets to fail or spark. Turn off the power before touching wires. Tighten all wire screws firmly. Check the ground wire is secure. Wires should not move when you gently pull them. Proper connections ensure safe and steady power flow.
When To Call A Professional
Changing a light switch to an outlet may seem easy. But some situations need expert help. Knowing when to call a professional keeps your home safe. It also ensures the job follows the rules.
Complex Wiring Issues
Wiring inside walls can be tricky. Some homes have old or tangled wires. A professional knows how to handle these safely. They can avoid mistakes that cause shorts or shocks.
Local Code Compliance
Electric rules differ by area. Professionals understand local codes well. They make sure your outlet meets all legal requirements. This avoids problems if you sell your home later.
Safety Concerns
Electric work involves risk. Wrong connections can cause fires or shocks. A professional uses the right tools and methods. This protects your family and home from danger.
Frequently Asked Questions
How Do I Safely Convert A Light Switch To An Outlet?
Turn off power at the circuit breaker before starting. Remove the switch, check wiring, and connect wires to the outlet terminals. Use a voltage tester to confirm no power is present. Follow local electrical codes and consider consulting a professional if unsure.
Can I Replace A Single-pole Switch With A Duplex Outlet?
Yes, you can replace a single-pole switch with a duplex outlet. Ensure the circuit supports the outlet’s amperage. Properly connect the hot, neutral, and ground wires to the outlet. Secure the outlet in the box and restore power to test functionality.
What Tools Are Needed To Convert A Switch To An Outlet?
You need a voltage tester, screwdriver, wire stripper, needle-nose pliers, electrical tape, and a new outlet. Safety gear like gloves and goggles is recommended. These tools help remove the switch, prepare wires, and install the outlet safely and correctly.
Is Converting A Switch To An Outlet A Diy Project?
It can be a DIY project if you understand basic electrical work. Always turn off power first and follow safety guidelines. If unsure about wiring or local codes, hire a licensed electrician to avoid hazards and ensure code compliance.
Conclusion
Converting a light switch to an outlet can be a useful upgrade. It adds extra power spots where you need them most. Always turn off the power before starting any work. Follow the steps carefully to avoid mistakes. If unsure, ask a professional for help.
This simple change can make your space more functional. Small projects like this save time and effort in the long run. Take your time and stay safe throughout the process. Now, you can enjoy the convenience of an added outlet.