Are you struggling to hang something heavy on your wall without it falling down? Getting an anchor into a wall might seem tricky, but with the right steps, you can do it quickly and securely.
Whether you’re mounting a shelf, a mirror, or a TV bracket, knowing how to properly install an anchor will save you time and frustration. In this guide, you’ll discover simple, clear instructions that anyone can follow. Keep reading, and you’ll gain the confidence to tackle your wall project like a pro.
Choosing The Right Anchor
Choosing the right anchor is important for a strong hold in your wall. The right anchor keeps your items safe and secure. Different walls need different anchors. Picking the correct one saves time and effort.
Types Of Wall Anchors
Plastic expansion anchors are common and work well for light loads. They expand when screws are driven in. Toggle bolts open behind the wall for heavy items. Molly bolts spread inside the wall for medium weight. Self-drilling anchors screw directly into drywall. Each type fits a different need.
Matching Anchors To Wall Material
Drywall needs light or medium anchors like plastic or self-drilling. Plaster walls require stronger anchors like toggle bolts. Concrete and brick need heavy-duty anchors like sleeve or wedge anchors. Wood walls often need just screws or lag bolts. Match anchor type to wall material for best results.
Credit: www.protoolreviews.com
Tools And Materials Needed
Getting an anchor into a wall requires the right tools and materials. This step is important for a strong hold. Using proper equipment makes the job easier and safer.
Essential Tools
You need a drill with the correct drill bit for the wall type. A screwdriver or a drill with a screwdriver bit is also required. A hammer may help to tap the anchor gently into the hole. A tape measure or ruler ensures accurate placement. A pencil is useful for marking where to drill. A level helps keep your anchor straight.
Safety Gear
Wear safety glasses to protect your eyes from dust and debris. Use gloves to avoid cuts and scrapes. Consider wearing a dust mask if drilling creates a lot of dust. Ear protection is helpful when using power tools. Always follow safety guidelines to avoid accidents.
Preparing The Wall
Preparing the wall is the first step to secure an anchor properly. It helps ensure the anchor holds strong and lasts long. A good preparation prevents damage and makes the installation easier.
Start by finding the best spots on the wall to place the anchors. Then check for any obstacles inside the wall that might cause trouble. These steps save time and avoid mistakes.
Locating Studs And Marking Spots
Studs are vertical wooden beams inside the wall. Anchors hold best when attached to studs. Use a stud finder to locate them. Move the finder slowly across the wall. Mark each stud’s edge with a pencil. Mark the center for accuracy. If no studs are found, choose solid drywall areas.
Checking For Obstacles
Walls hide pipes, wires, and cables. Drilling into these can cause damage or injury. Use a wire detector to scan the wall surface. Scan both horizontally and vertically. Mark any detected obstacles clearly. Avoid drilling near these marks. This step keeps your wall safe and intact.
Drilling The Hole
Drilling the hole is a critical step for installing an anchor securely. A clean, properly sized hole ensures the anchor fits well and holds strong. This process involves choosing the right drill bit and using the correct drilling technique. Both steps affect the strength and stability of the anchor in the wall.
Selecting The Drill Bit Size
Choose a drill bit that matches the anchor size exactly. A bit too small makes the hole tight, risking wall damage. A bit too large makes the anchor loose and weak. Check the anchor packaging for the recommended drill bit size. Use a drill bit designed for your wall type, such as masonry bits for brick or concrete.
Drilling Techniques
Hold the drill steady and straight to avoid angled holes. Start drilling slowly to create a guide hole. Increase speed once the bit grips the wall. Apply even pressure, but do not force the drill. Let the drill bit do the work. Clear dust from the hole with a brush or air blower. This helps the anchor fit tightly and hold better.
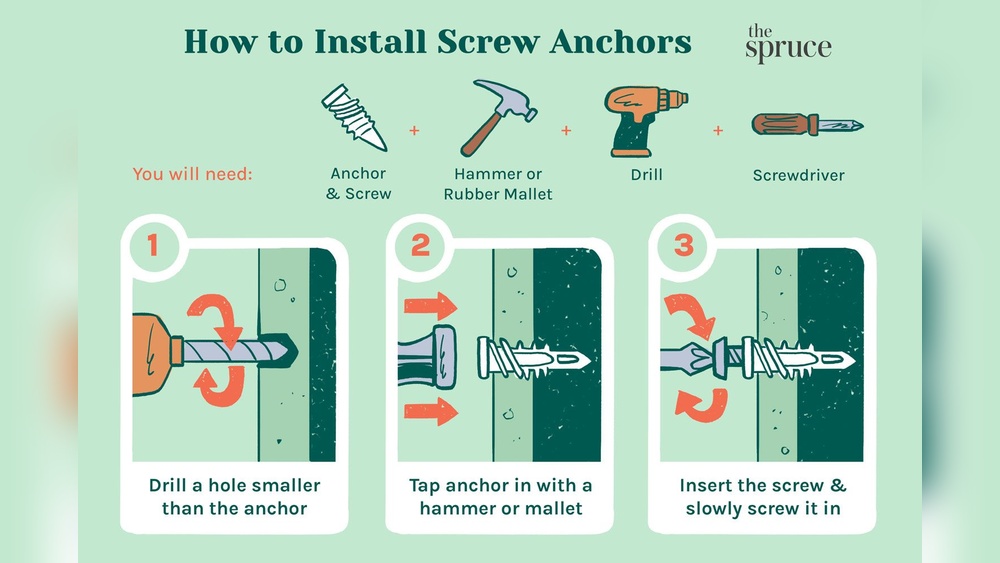
Inserting The Anchor
Inserting an anchor into a wall is a key step for hanging objects securely. This process involves placing the anchor correctly to hold weight and prevent damage. A proper insertion ensures the anchor grips tightly inside the wall material.
Different walls and anchors need specific methods. Understanding these methods helps achieve a strong hold. The goal is a stable anchor that supports your item without slipping or falling.
Types Of Insertion Methods
There are several ways to insert anchors, depending on the wall type and anchor kind. Plastic expansion anchors require a drilled hole matching the anchor size. Push the anchor into the hole until it sits flush with the wall.
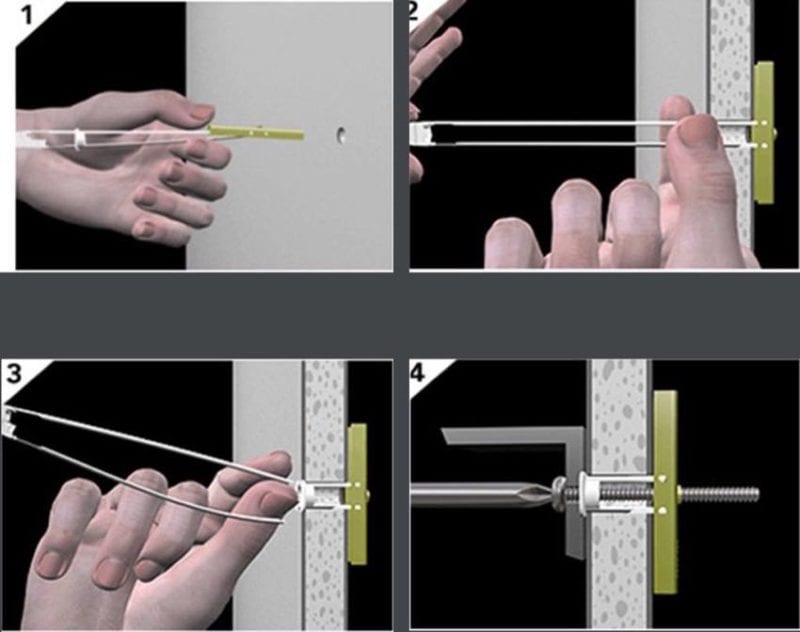
For toggle bolts, drill a hole big enough for the folded toggle. Insert the toggle through the hole, then pull it tight against the backside of the wall. Screw the bolt in to expand the toggle and lock it in place.
Self-drilling anchors need no pre-drilling. Screw them directly into drywall using a screwdriver. The threads cut into the wall, securing the anchor firmly.
Ensuring A Secure Fit
Check the hole size carefully before inserting the anchor. Too large a hole weakens the hold. Too small makes insertion difficult and may damage the wall.
Push or screw the anchor until it is level with the surface. Avoid leaving it protruding or too deep inside. Test the anchor by pulling gently to see if it moves.
Tighten screws slowly after placing the anchor. Over-tightening can break the anchor or damage the wall. Stop when the anchor feels firm and stable.
Securing The Anchor
Securing the anchor is the key step in making sure your wall mount stays strong. This process helps the anchor grip tightly inside the wall. It prevents the anchor from moving or falling out under pressure.
Every step must be done carefully. The right technique makes your anchor hold better. Let’s explore how to screw into the anchor and test its stability.
Screwing Into The Anchor
Start by choosing a screw that fits the anchor well. The screw should match the size of the anchor hole. Gently turn the screw into the anchor using a screwdriver. Do not force the screw too hard. Tighten it slowly until it feels secure. This helps the anchor expand and lock inside the wall. Stop tightening if you feel strong resistance. Over-tightening can damage the anchor or wall.
Testing For Stability
After screwing in, check if the anchor holds firmly. Pull the screw lightly to see if it moves. If it stays steady, the anchor is well secured. If it wiggles or feels loose, remove the screw and check the anchor again. You might need a bigger anchor or a different wall spot. Testing ensures your mounted item stays safe and steady.
Common Mistakes To Avoid
Getting an anchor into a wall seems simple but many make mistakes. These errors can cause damage or weak holds. Avoid these common pitfalls to keep your project safe and strong.
Using The Wrong Anchor
Not all anchors fit every wall type. Drywall needs different anchors than concrete or brick. Using the wrong kind can make the anchor slip or fail. Check the wall material before choosing an anchor. Match the anchor size to the weight of the object. A poor match leads to weak support and possible damage.
Over-tightening Screws
Turning screws too tight can break the anchor or damage the wall. Tight screws squeeze the anchor too hard, causing cracks or holes. Tighten screws just enough to hold the object firmly. Stop when you feel resistance. Over-tightening wastes effort and weakens the anchor’s grip.

Credit: www.picturehangsolutions.com
Tips For Heavy-duty Support
Heavy-duty support is essential for hanging heavy items securely on a wall. Choosing the right anchor and preparing the wall properly can prevent accidents and damage. Follow these tips to ensure strong, lasting support for your heavy loads.
Choosing Heavy-duty Anchors
Select anchors made for heavy loads. Metal anchors, toggle bolts, and sleeve anchors work well. Check the weight rating on the package before buying. Match the anchor size with your wall type. Use anchors designed for drywall, concrete, or brick as needed. Proper anchors hold weight safely and avoid wall damage.
Reinforcing The Wall
Strengthen the wall area before installing anchors. Use a wooden backer board if the wall is weak. Attach the board firmly to studs for extra support. Drill pilot holes carefully to avoid cracking. Reinforcing helps spread the weight and adds stability. It ensures the anchor holds heavy items without slipping.

Credit: www.do-it-yourself-help.com
Frequently Asked Questions
What Tools Do I Need To Install A Wall Anchor?
You need a drill, screwdriver, hammer, and the correct size anchor and screw. These tools ensure a secure installation.
How Do I Choose The Right Anchor For My Wall?
Select anchors based on wall type and weight load. Plastic anchors suit drywall; metal anchors are for masonry.
Can I Reuse A Wall Anchor After Removing It?
Generally, wall anchors lose grip after removal. It’s best to use a new anchor for secure holding.
How Deep Should I Drill For A Wall Anchor?
Drill a hole slightly deeper than the anchor length. This ensures the anchor fits snugly and securely.
Conclusion
Getting an anchor into a wall is simple with the right steps. Drill a hole carefully and choose the correct anchor size. Push or tap the anchor until it fits snugly in the hole. Tighten the screw slowly to secure the anchor firmly.
This method keeps your items safe and stable on the wall. Practice a few times to gain confidence. You can hang pictures, shelves, or other items without worry. Small tasks like this build your DIY skills over time. Easy, quick, and effective.