Are you ready to take control of your home’s heating and save on energy bills? Connecting a wall thermostat to your baseboard heater is easier than you might think.
Imagine setting the perfect temperature with just a simple dial or touch, keeping your space cozy without wasting energy. In this guide, you’ll discover clear, step-by-step instructions to hook up your wall thermostat quickly and safely. By the end, you’ll have the confidence to improve your comfort and efficiency—all on your own.
Keep reading to unlock the secret to smarter heating!
Tools And Materials Needed
Before starting to hook up a wall thermostat to a baseboard heater, gather all tools and materials. Having the right items ready saves time and avoids frustration. This list covers what you need for a smooth installation.
Basic Hand Tools
Basic hand tools include a screwdriver, wire strippers, and pliers. A flathead and Phillips screwdriver help remove and secure screws. Wire strippers prepare the wires for connections. Pliers assist in bending and holding wires.
Electrical Tape And Wire Nuts
Electrical tape insulates wire connections to prevent shorts. Wire nuts securely join wires inside the electrical box. Both ensure safety and a neat setup.
Voltage Tester
A voltage tester checks if the power is off before starting work. It helps avoid electric shocks and ensures safety during installation.
Wall Thermostat
Choose a thermostat compatible with your baseboard heater. Most baseboard heaters work with line voltage thermostats. Check product details to confirm compatibility.
Thermostat Mounting Plate And Screws
The mounting plate holds the thermostat on the wall. Use screws to secure the plate firmly. These usually come with the thermostat kit.
Electrical Cable
Use the correct gauge electrical cable to connect the thermostat and heater. The cable should handle the heater’s power load safely.
:max_bytes(150000):strip_icc()/SPR-install-240-volt-electric-baseboard-heater-3954745-step-05_30598-1c115d0a46ad4551ab951c652011a714.jpg)
Credit: www.thespruce.com
Safety Precautions
Working with electrical devices like wall thermostats and baseboard heaters needs great care. Safety should be the top priority before starting the hookup. Following simple safety rules protects you and your home from accidents.
Taking time to prepare and check tools is important. Knowing how to handle electricity safely reduces risks of shocks and fires. This section covers key safety precautions for hooking up your thermostat to a baseboard heater.
Turn Off Power At The Circuit Breaker
Always switch off the power from the main circuit breaker. This stops electricity from flowing to the heater and thermostat. Use a voltage tester to check no current is present before touching wires.
Use Proper Tools And Equipment
Choose tools designed for electrical work. Insulated screwdrivers and wire strippers protect your hands. Use wires that match the heater’s voltage and current ratings to avoid overheating.
Follow Manufacturer Instructions
Read the thermostat and heater manuals carefully. Each model may have specific wiring diagrams and requirements. Follow the instructions exactly to ensure safe and correct installation.
Wear Safety Gear
Wear rubber-soled shoes and safety glasses. These protect you from electric shocks and debris. Avoid loose clothing that can catch on wires or tools during the work.
Check Local Electrical Codes
Local codes set rules for safe electrical installations. Verify these rules before starting your project. Getting a permit or inspection may be required to comply with safety standards.
Choosing The Right Thermostat
Choosing the right thermostat is key to controlling your baseboard heater efficiently. The right device keeps your room comfortable and saves energy. Not all thermostats work with all heaters. Picking the correct one makes installation simple and performance reliable.
Compatibility With Baseboard Heaters
Baseboard heaters need thermostats made for electric heating. Check the voltage and wattage of your heater. Match these with the thermostat’s specifications. Some thermostats only support low voltage systems, while others handle line voltage. Using the wrong type can cause damage or poor heating.
Look for thermostats labeled for baseboard or electric heating. Confirm they can handle the power your heater uses. This ensures safety and proper operation. Compatibility matters for both wired and wireless thermostat models.
Types Of Thermostats
There are simple manual thermostats and programmable ones. Manual thermostats let you set temperature by turning a dial. They are easy to use and usually cheaper.
Programmable thermostats allow you to set different temperatures for different times. This helps save energy by lowering heat when you don’t need it. Some even connect to Wi-Fi for remote control via smartphone.
Choose a thermostat type that fits your needs and budget. Consider how often you want to adjust the temperature. Also, check if the thermostat’s controls are easy to understand.

Credit: www.liftingitalia.com
Preparing The Baseboard Heater
Preparing the baseboard heater is the first step to connect a wall thermostat properly. You must ensure the heater is safe and ready for installation. This helps avoid any problems later on.
Start by turning off the power to the heater at the circuit breaker. This step is very important for your safety. Without power, you can work on the heater without risk of electric shock.
Clean The Baseboard Heater
Dust and dirt can block heat flow and affect the thermostat’s performance. Use a vacuum or a soft brush to clean the heater fins and surface. Make sure the heater is cool before you clean it. A clean heater works better and lasts longer.
Inspect The Heater For Damage
Look for any signs of damage or wear on the heater. Check the fins, wiring, and mounting brackets. Broken parts can cause the heater to fail or become unsafe. Replace any damaged parts before proceeding.
Locate The Wiring Access Panel
Find the panel where the heater’s electrical wires connect. Remove the screws and open the panel carefully. This area allows you to connect the thermostat wires to the heater. Keep the screws safe to close the panel later.
Check The Heater’s Electrical Connections
Examine the wires inside the access panel. Look for loose or frayed wires that need fixing. Tighten any loose connections with a screwdriver. Proper wiring ensures the thermostat controls the heater correctly.
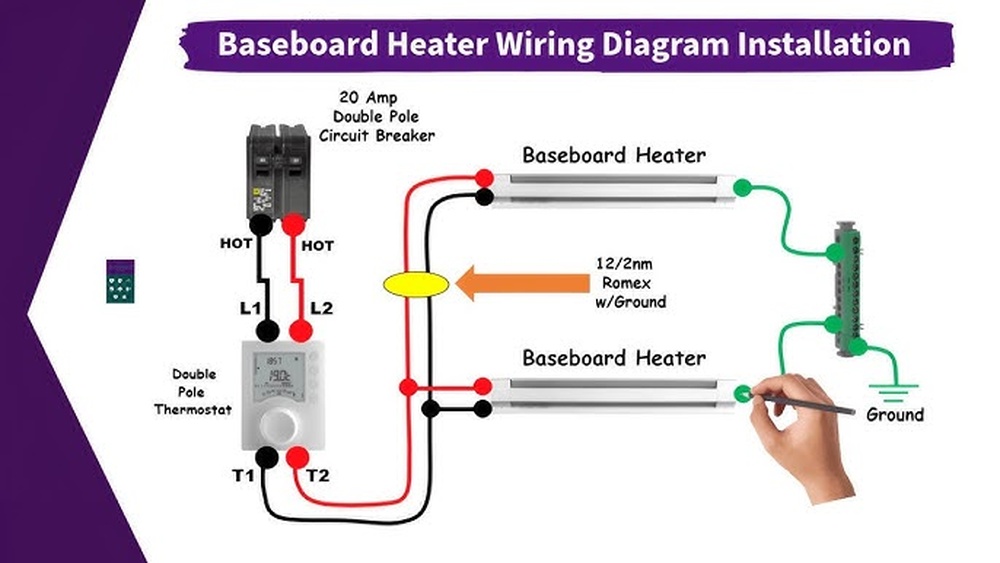
Wiring The Thermostat
Wiring the thermostat to a baseboard heater is a key step in setting up your heating system. It controls the heater’s temperature and helps save energy. Proper wiring ensures the system works safely and efficiently.
Pay close attention to each wire. Correct connections prevent damage to the thermostat and heater. Follow the steps carefully for a smooth installation.
Identifying Wires
First, turn off power to the heater at the breaker box. Safety matters most.
Look inside the thermostat and heater junction box. You will see several wires. Typically, these include a red wire, a white wire, and a ground wire.
The red wire usually carries power. The white wire connects to the heater. The ground wire is for safety and is often green or bare copper.
Use a voltage tester to confirm which wire is live. Label each wire with tape for easy identification.
Connecting Wires Correctly
Match each thermostat wire to the correct heater wire. Connect the red wire from the thermostat to the red wire on the heater.
Attach the white wire from the thermostat to the white wire of the heater. This controls the heater’s heating element.
Connect the ground wire to the heater’s ground screw or wire. This prevents electrical shocks.
Use wire nuts to secure connections tightly. Wrap them with electrical tape for extra safety.
Double-check all connections. Loose wires can cause shorts or poor performance.
Mounting The Thermostat
Mounting the thermostat is a key step in connecting it to your baseboard heater. The right placement ensures accurate temperature reading and efficient heating. A poorly mounted thermostat can cause uneven heating or frequent cycling.
Choose a spot on an interior wall, away from direct sunlight and drafts. Avoid locations near windows, doors, or vents that affect temperature readings. The thermostat should be about five feet above the floor for the best results.
Prepare The Wall Surface
Clean the wall area where the thermostat will go. Remove dust, dirt, and grease for better adhesion. Use a level to mark a straight line for mounting. This helps keep the thermostat balanced and neat.
Attach The Mounting Plate
Secure the mounting plate to the wall with screws or anchors. Use a drill if needed for hard walls. Check the plate is firmly fixed and does not move. This supports the thermostat and wiring safely.
Connect The Thermostat Wires
Follow the wiring instructions from the thermostat manual. Match wires by color or label to the baseboard heater terminals. Tighten connections to avoid loose contacts. Double-check wires before attaching the thermostat body.
Mount The Thermostat Body
Snap or screw the thermostat onto the mounting plate. Make sure it fits snugly and stays level. Test the controls to confirm proper installation. The thermostat is now ready to regulate your heating system.
Testing The Setup
Testing the setup of your wall thermostat and baseboard heater is crucial. It ensures that both parts work well together. Proper testing helps avoid problems later. You can confirm the wiring and settings are correct. Follow these simple steps to test your setup safely and effectively.
Check Power Supply To Thermostat
Turn on the main power to your heating system. Look at the thermostat display to see if it lights up. If the screen is blank, check the circuit breaker. Make sure the thermostat has power before moving forward.
Set Desired Temperature
Adjust the thermostat to a temperature higher than the room’s current level. This tells the baseboard heater to start heating. Wait a few minutes and listen for any sound from the heater. The heater should turn on if the thermostat works correctly.
Feel Heater Warmth
Stand near the baseboard heater and carefully feel if it gets warm. The heater should begin to emit heat within a few minutes. If it stays cold, double-check your wiring and thermostat settings. Proper warmth means the thermostat controls the heater correctly.
Test Thermostat’s Off Function
Lower the temperature setting on the thermostat below room temperature. The baseboard heater should switch off. Wait and feel the heater again. It should cool down, showing the thermostat stops heating as planned.
Troubleshooting Common Issues
Troubleshooting common issues helps ensure your thermostat and baseboard heater work well. Small problems can stop the system from heating properly. Checking and fixing these issues saves time and money.
Start by understanding the usual faults. Then, learn simple steps to fix them safely. This section covers common problems and easy solutions for your setup.
Check Thermostat Wiring Connections
Loose or wrong wiring is a frequent issue. Turn off power before inspecting wires. Make sure all wires connect firmly to the correct terminals. Use the thermostat’s manual to verify wiring colors and positions.
Test Power Supply To Heater
Without power, the heater won’t run. Use a voltage tester to check the heater’s power source. Confirm the circuit breaker is on and not tripped. Replace fuses or reset breakers as needed.
Verify Thermostat Settings
Incorrect settings can stop heating. Set the thermostat temperature above the room temperature. Choose the correct mode for heating, not cooling or off. Check if the display shows any error codes.
Inspect Baseboard Heater For Damage
Physical damage can cause failure. Look for signs of rust, broken fins, or loose parts. Clean dust and debris to improve heat output. Replace damaged sections for safe operation.
Reset The Thermostat
Sometimes, a reset fixes glitches. Turn off power to the thermostat. Wait 30 seconds, then power it on again. Resetting clears temporary faults and restarts the system.
Call A Professional For Complex Issues
Some problems need expert help. Electrical faults or heater replacements require skill. Contact a licensed technician to avoid risks. Professional service ensures safe and correct repairs.
Maintenance Tips For Longevity
Proper wiring and regular checks keep your wall thermostat and baseboard heater working well. Clean connections and avoid moisture to prevent damage and extend their life. Simple care helps your heating system run smoothly for years.
Regular Cleaning Of The Baseboard Heater
Dust and dirt reduce heater efficiency. Clean the heater surface with a soft cloth. Avoid using water or wet cloths. Use a vacuum with a brush attachment for deep cleaning inside vents. Clean monthly during the heating season for best results.
Check Thermostat Batteries Often
Many wall thermostats use batteries. Replace them at least once a year. Weak batteries cause poor temperature control. Always keep spare batteries on hand. This simple step keeps your system running smoothly.
Inspect Wiring For Safety
Loose or damaged wires can cause malfunctions. Turn off power before inspecting. Look for cracks, frays, or exposed wires. Tighten any loose connections carefully. Call a professional if you find serious damage.
Test Thermostat Accuracy Regularly
Use a separate thermometer to check room temperature. Compare it with the thermostat reading. Adjust settings if the thermostat shows wrong temperature. This ensures your heater works as expected. Test every few months for accuracy.
Keep Heater Area Clear
Do not block the heater with furniture or curtains. Clear space helps heat spread evenly. It also prevents overheating and fire risks. Make sure nothing rests on or near the heater. Safe and clear space improves heater life.

Credit: www.youtube.com
Frequently Asked Questions
How Do I Connect A Thermostat To A Baseboard Heater?
Turn off power first. Connect thermostat wires to heater terminals. Match wire colors and follow manufacturer’s instructions. Secure connections and test operation before restoring power.
What Type Of Thermostat Works With Baseboard Heaters?
Use a line voltage thermostat designed for baseboard heaters. These thermostats handle higher voltages and regulate electric heat efficiently. Avoid low voltage thermostats to prevent damage.
Can I Install A Thermostat On My Own?
Yes, if you have basic electrical knowledge. Always turn off power before starting. Follow wiring diagrams carefully. If unsure, consult a licensed electrician for safety.
Where Should I Place The Thermostat For Best Results?
Mount thermostat on an interior wall, about 5 feet high. Avoid direct sunlight, drafts, or heat sources. Proper placement ensures accurate temperature control and energy efficiency.
Conclusion
Hooking up a wall thermostat to a baseboard heater is simpler than it seems. Follow each step carefully for safe and effective installation. Double-check all wiring connections before turning the power back on. A properly installed thermostat helps control your room temperature easily.
Enjoy a cozy space with better energy use. Take your time and stay safe during the process. This small upgrade can improve comfort in any room.