Are you stuck with a stubborn deadbolt that just won’t budge? Removing a door deadbolt might seem tricky, but with the right steps, you can do it yourself quickly and safely.
Whether you want to upgrade your lock, fix a jam, or replace it with something better, this guide will walk you through the process. Keep reading, and you’ll learn exactly how to remove your door deadbolt without any hassle or expensive tools.
Let’s get your door back in perfect shape!
Tools Needed
Removing a door deadbolt requires a few basic tools. Having the right tools makes the task easier and faster. This section covers all the tools needed for removing a deadbolt safely and correctly.
Screwdriver
A screwdriver is the main tool for deadbolt removal. Most deadbolts use Phillips or flathead screws. Choose a screwdriver that fits the screw head well. Using the right size prevents damage to screws and the door.
Allen Wrench
Some deadbolts have small hex screws. An Allen wrench set is useful for these screws. It fits into the hexagonal slots to loosen or tighten them. Keep a set handy to cover different sizes.
Drill
A drill helps speed up screw removal. Use a drill with screwdriver bits. It reduces hand effort and saves time. Use low speed to avoid stripping screws.
Pliers
Pliers help pull out stubborn parts. Needle-nose pliers work well for tight spaces. They grip small screws or clips firmly. Use pliers carefully to avoid scratching the door.
Utility Knife
A utility knife removes paint or caulk around the deadbolt. This helps expose screws fully. It also prevents damage when prying off the lock. Use a sharp blade and cut gently.
Credit: www.homedepot.com
Identify Deadbolt Type
Start by checking the shape and style of your deadbolt. Different types like single-cylinder or double-cylinder need different removal steps. Knowing the type helps make the process easier and faster.
Before removing a deadbolt, you must know its type. Deadbolts come in various styles. Each style has a different removal method.
Identifying the deadbolt type helps avoid damage. It saves time and effort during removal. This step is simple but important.
Single Cylinder Deadbolt
A single cylinder deadbolt has a keyhole on the outside. The inside uses a thumb turn to lock or unlock. This type is common on most doors.
To identify it, check the outside of your door. If you see only one keyhole, it is a single cylinder. The inside knob or lever is easy to turn by hand.
Double Cylinder Deadbolt
A double cylinder deadbolt has keyholes on both sides. Both sides need a key to lock or unlock the door. This type adds extra security but can be tricky in emergencies.
Look at both sides of your door. If there are keyholes on each side, you have a double cylinder deadbolt. Removing it may require careful handling.
Lockable Thumbturn Deadbolt
This deadbolt has a thumbturn on the inside, which locks or unlocks. It also has a keyhole on the outside. The thumbturn can be locked with a key.
To spot this type, check the inside thumbturn. If it has a small key slot, it is lockable. This adds security but needs special steps to remove.
Prepare The Door
Preparing the door is the first step to remove a deadbolt safely. This step ensures easy access and avoids damage to the door or lock parts. A well-prepared door makes the removal process smooth and quicker.
Clear the area around the door. Remove any decorations or obstacles. This creates enough space to work comfortably.
Check the door’s surface for damage or wear. Note any cracks or loose parts. Repairing these before removal helps protect the door.
Gather all necessary tools. Common tools include a screwdriver, drill, and a tape measure. Having tools ready prevents interruptions during work.
Turn the door handle to unlock it. Make sure the door is in the unlocked position. This step allows easier access to the deadbolt screws.
Remove Door Accessories
Take off door accessories like chains or additional locks. These can block access to the deadbolt. Removing them clears the way for smooth work.
Clean The Door Surface
Wipe the door surface around the deadbolt. Use a clean cloth to remove dust and dirt. A clean surface prevents slipping and helps see screws clearly.
Protect The Door Frame
Place painter’s tape or a cloth on the door frame edges. This protects the frame from scratches during removal. Small protection steps save repair time later.

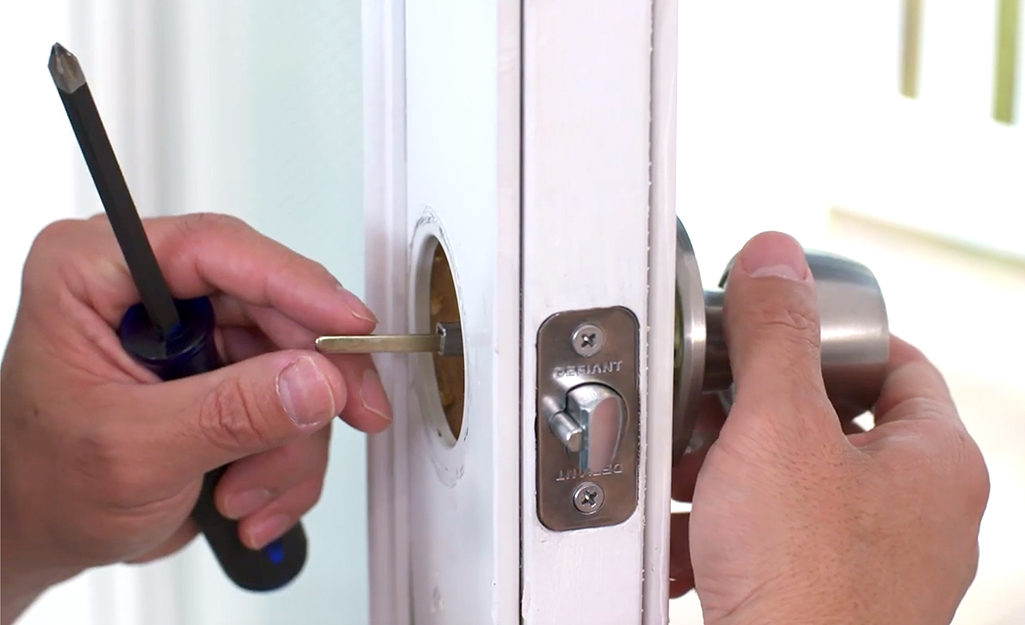
Credit: www.youtube.com
Remove Interior Thumb Turn
The interior thumb turn is the small knob you twist to lock or unlock the deadbolt from inside. Removing this part is key to taking out the entire deadbolt. It helps you access screws or parts hidden behind it. This step is simple but important.
Follow these steps carefully to remove the interior thumb turn without damage. Basic tools and a bit of patience are enough to complete this task.
Locate The Set Screw On The Thumb Turn
Look closely at the base of the thumb turn. A small set screw holds it in place. It may be on the side or underneath the thumb turn. Use a flashlight if needed to see it clearly.
Use The Correct Screwdriver
Choose a screwdriver that fits the set screw perfectly. Usually, a small flathead or Phillips screwdriver works. Avoid a loose fit to prevent stripping the screw.
Loosen The Set Screw
Turn the screwdriver counterclockwise to loosen the set screw. Do this slowly and gently. Once loose, the thumb turn should move freely.
Pull The Thumb Turn Off The Spindle
Hold the base of the thumb turn and pull it straight off. It may need a little force but do not twist or bend it. If stuck, double-check the set screw is fully loose.
Unscrew Exterior Plate
The first step to remove a door deadbolt is to unscrew the exterior plate. This plate covers the lock mechanism on the outside of the door. It holds the deadbolt in place and must be taken off carefully.
Unscrewing the exterior plate frees the lock from the door. This step allows you to access the inner parts of the deadbolt. Use the right tools and be gentle to avoid damage.
Locate The Screws On The Exterior Plate
Look closely at the exterior plate. Find the screws holding it to the door. These screws are usually on the face of the plate or hidden under a small cover.
Check both the top and bottom of the plate. Sometimes screws are hard to see. Use a flashlight if needed to spot them clearly.
Choose The Correct Screwdriver
Identify the type of screws on the plate. Most screws are either Phillips or flathead. Pick a screwdriver that fits snugly into the screw head.
A proper fit prevents stripping the screws. Stripped screws are hard to remove and can cause frustration.
Unscrew The Exterior Plate Carefully
Turn the screwdriver slowly to loosen each screw. Keep a steady hand and apply gentle pressure. Remove all screws completely before trying to lift the plate.
Place the screws in a small container. This keeps them safe and stops them from getting lost during removal.
Extract Deadbolt Mechanism
Extracting the deadbolt mechanism is a key step in removing a door deadbolt. This part controls the locking and unlocking of the door. Removing it carefully prevents damage and allows for easy replacement or repair.
Follow clear steps to take out the deadbolt mechanism safely. Prepare the tools and work slowly for best results.
Remove The Interior Thumb Turn
Start by unscrewing the interior thumb turn. Use a screwdriver to take out the screws holding it. Pull the thumb turn straight off the spindle. This clears the way to access the deadbolt mechanism.
Unscrew The Deadbolt Faceplate
Locate the faceplate on the door edge. Remove the screws securing it with a screwdriver. Pull the faceplate away from the door. This exposes the deadbolt mechanism inside the door cavity.
Slide Out The Deadbolt Mechanism
Hold the deadbolt mechanism firmly. Slide it straight out of the door edge cavity. It may need some gentle wiggling to release. Avoid forcing it to prevent damage.
Inspect The Mechanism For Damage
Check the removed deadbolt for wear or broken parts. This helps decide if you need a replacement. Clean the mechanism if you plan to reuse it.
Remove Strike Plate
Start by unscrewing the strike plate on the door frame. This helps free the deadbolt for easy removal. Keep screws safe for reinstallation.
The strike plate is the metal piece on the door frame. It holds the deadbolt latch in place when locked. Removing it helps free the deadbolt and allows full door removal.
Start by locating the screws on the strike plate. These screws attach it firmly to the door frame. Unscrewing them is the key step to take it off safely.
Tools Needed For Removing The Strike Plate
Use a screwdriver that fits the screw heads well. Most strike plates use Phillips or flathead screws. Having the right tool prevents damage to the screws or plate.
Sometimes, a drill with a screwdriver bit speeds up the process. But be careful to avoid stripping the screws. Keep the screws safe for reinstallation or replacement.
Steps To Remove The Strike Plate
First, open the door fully for easy access. Hold the strike plate firmly to stop it from moving. Turn the screwdriver counterclockwise to loosen the screws.
Remove each screw completely and set them aside. Gently pull the strike plate off the door frame. If it sticks, use a flat tool to pry it gently.
Check The Door Frame After Removal
Look at the door frame where the strike plate was attached. Check for any damage or wood splinters. Smooth rough areas with sandpaper if needed.
This keeps the door frame ready for a new strike plate or repairs. A clean frame ensures the deadbolt works smoothly later.
Troubleshooting Tips
Removing a door deadbolt can sometimes be tricky. Problems may arise that slow down the process. These troubleshooting tips help you fix common issues fast. Keep your tools ready and follow these simple steps. Clear guidance can save time and avoid frustration.
Check For Hidden Screws
Deadbolts often have screws hidden under covers. Look closely at the faceplate or knob. Use a flathead screwdriver to pry off any covers. You may find screws holding the lock in place. Removing these screws is key to taking off the deadbolt.
Use The Correct Screwdriver
Using the wrong screwdriver can strip screws. Match the screwdriver head to the screw type. Phillips and flathead are common types. A good fit helps you turn screws easily. This prevents damage and makes removal smoother.
Apply Lubricant To Stuck Parts
Locks can get stuck from dirt or rust. Spray a small amount of lubricant inside the keyhole. Work the key gently back and forth. This loosens parts and helps the deadbolt slide out. Avoid using too much oil to keep things clean.
Align The Deadbolt Properly
Sometimes the deadbolt won’t come out because it is misaligned. Turn the key slightly while pulling the lock. This can line up the bolt and free it from the door. Patience and gentle movements work best here.
Remove The Thumb Turn
The thumb turn on the inside may block removal. Look for a small pin or set screw. Use a thin tool to push or unscrew it. Taking off the thumb turn allows access to the mounting screws.
Safety Precautions
Removing a door deadbolt requires care and attention. Safety is the top priority to avoid injury and damage. Follow these simple safety steps before starting the task.
Wear Protective Gear
Always wear safety glasses to protect your eyes from dust and debris. Use gloves to keep your hands safe from sharp edges. This gear reduces the chance of cuts and scrapes.
Use The Right Tools
Choose tools made for lock removal. Screwdrivers, drills, and pliers should be in good condition. Using the wrong tools can cause slips and damage the door or lock.
Turn Off Power Nearby
Check for electrical wires near the door frame. Turn off power to prevent shocks while drilling or screwing. Safety first to avoid accidents.
Work In A Well-lit Area
Good lighting helps you see screws and small parts clearly. It lowers the risk of mistakes and injury. Use a flashlight if the room is dark.
Keep Children And Pets Away
Make sure kids and pets stay out of the work area. Tools and small parts can be dangerous. A clear space helps you focus and work safely.
Credit: www.reddit.com
Frequently Asked Questions
How Do You Remove A Door Deadbolt Lock?
To remove a door deadbolt, start by unscrewing the interior lock plate. Next, remove the exterior lock cylinder. Finally, pull the deadbolt mechanism out from the door edge. Use a screwdriver and keep screws safe for reinstalling or replacement.
What Tools Are Needed To Remove A Deadbolt?
You need a Phillips screwdriver, flathead screwdriver, and possibly an Allen wrench. These tools help remove screws and separate lock components safely. Using the right tools prevents damage to the door or lock during removal.
Can I Remove A Deadbolt Without Damaging The Door?
Yes, you can remove a deadbolt without damage by carefully unscrewing all fasteners. Avoid forcing parts or using excessive tools. Follow manufacturer instructions if available to ensure a smooth removal process.
How Long Does It Take To Remove A Deadbolt Lock?
Removing a deadbolt usually takes about 10 to 20 minutes. Time varies based on lock type and your experience. Proper tools and careful steps help speed up the removal.
Conclusion
Removing a door deadbolt can be simple with the right steps. Take your time and follow each part carefully. Use the proper tools to avoid damage. Checking the lock type helps choose the best method. Safety comes first, so be cautious.
Practice makes the task easier and faster. Now, you can confidently remove a deadbolt on your own. Try it yourself and save on repair costs. Keep your door secure by handling locks properly.


