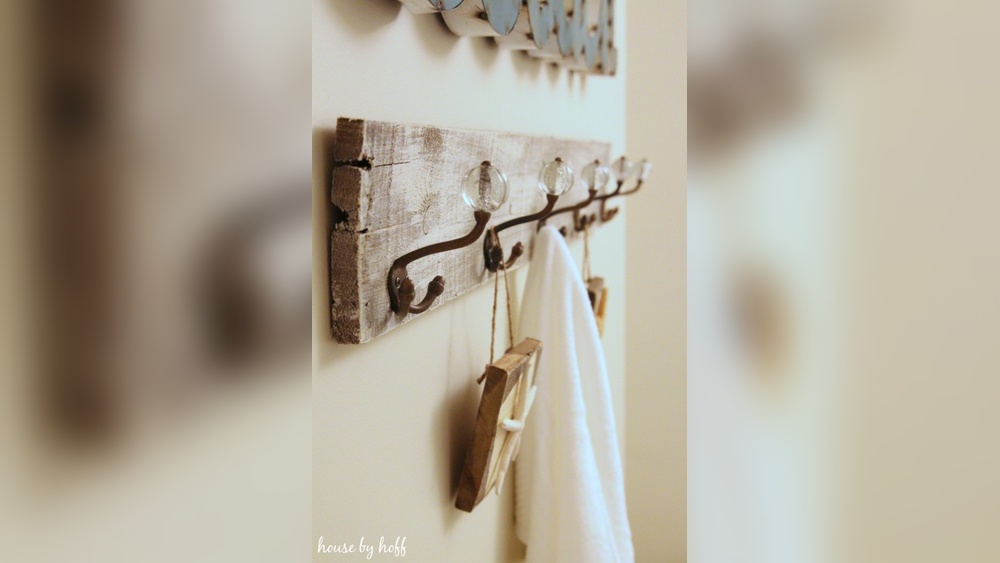
Looking for a simple way to add style and function to your space? You’re about to discover how to make a pallet wall hook rack that’s both practical and charming.
Imagine having a unique spot to hang your keys, bags, or coats—right where you need them most. This easy project lets you transform ordinary pallets into a useful piece that fits your home perfectly. Keep reading, and you’ll learn step-by-step how to create this handy rack, even if you’ve never worked with wood before.
Your walls will thank you!
Credit: www.i-monon.com.sa
Materials Needed
Gathering the right materials is the first step to create a pallet wall hook rack. Having all items ready makes the work smooth and fast. This section lists everything needed for the project.
Wooden Pallet Planks
Choose sturdy wooden pallet planks. They form the base of the rack. Look for smooth, clean wood without cracks or splinters. Sand the surface for a better finish.
Wall Hooks
Select hooks that fit your style and needs. Metal hooks are strong and durable. Wooden or plastic hooks can add a unique look. Make sure hooks can hold the weight of your items.
Measuring Tape
A measuring tape ensures accurate placement of hooks. Measure spaces carefully for even spacing. This helps keep the rack balanced and functional.
Drill And Screws
Use a drill to attach hooks and mount the rack. Screws should fit the hooks and pallet thickness. This ensures a tight and secure hold.
Sandpaper
Sandpaper smooths the wood edges and surface. It removes rough spots that could cause splinters. Choose medium to fine grit for best results.
Wood Stain Or Paint (optional)
Wood stain or paint protects the wood and adds color. Pick a finish that matches your room decor. Apply evenly and let it dry before hanging the rack.
Tools Required
Building a pallet wall hook rack requires some basic tools. These tools help you cut, assemble, and finish the rack easily. Having the right tools saves time and makes the work safer.
Most of these tools are common in home workshops. You do not need expensive or complex equipment. Simple tools will do the job well.
Measuring Tape
Measuring tape helps you get exact dimensions of the pallet wood. Accurate measurements ensure the rack fits your space perfectly.
Hand Saw Or Circular Saw
A hand saw or circular saw cuts the pallet wood to size. Choose the saw you feel comfortable using. A circular saw cuts faster but a hand saw is easier for beginners.
Hammer
Use a hammer to drive nails into the wood. It helps hold pieces together firmly. A lightweight hammer is good for control.
Screwdriver Or Drill
A screwdriver or drill attaches hooks and secures parts with screws. A drill makes the process quicker. Manual screwdrivers work fine too.
Sandpaper Or Electric Sander
Sandpaper smooths rough edges on the pallet wood. An electric sander speeds up sanding. Smooth surfaces prevent splinters and improve the look.
Wood Glue
Wood glue strengthens joints between wood pieces. It helps the rack last longer. Use it along with nails or screws for best results.
Hooks
Hooks hold your items on the rack. Choose sturdy hooks that match your style. Screw them firmly into the wood for safety.
Choosing The Right Pallet Wood
Choosing the right pallet wood is key for a strong, attractive wall hook rack. The wood must hold hooks and weight without breaking. It should look good and fit your room style. Picking the best wood saves time and effort later.
Not all pallet wood is safe or good for indoor projects. Some pallets carry chemicals or damage. Knowing what to check makes the project easier and safer.
Check For Wood Type And Quality
Choose hardwood pallets for durability. Oak, maple, or birch work well. Softwoods like pine may dent or scratch easily. Avoid pallets with cracked or splintered boards. Smooth, solid wood lasts longer and looks better.
Look For Chemical-free Pallets
Some pallets are treated with chemicals for shipping. These can be harmful indoors. Find pallets stamped with “HT” for heat-treated wood. Avoid pallets marked “MB,” which means they have methyl bromide. Always clean wood well before use.
Inspect For Cleanliness And Damage
Pick pallets without stains or dirt. Stains may hide mold or chemicals. Check for nails, screws, or broken parts. Remove old nails carefully. Clean wood helps your rack last and look nice.
Size And Thickness Matter
Choose boards thick enough to hold hooks firmly. Thin wood may bend or break under weight. Longer boards give more space for hooks. Measure the wall space before choosing pallet size.

Credit: www.gtek.cv
Preparing The Pallet Wood
Preparing the pallet wood is the first step to build a sturdy wall hook rack. Clean and smooth wood looks better and lasts longer. Proper preparation makes the project easier and safer.
Cleaning The Wood
Start by removing dirt and dust from the pallet wood. Use a stiff brush to scrub the surface well. Wash the wood with water and mild soap. Let the wood dry completely before the next step. Check for nails or staples and pull them out carefully.
Sanding For Smoothness
Sanding smooths rough surfaces and removes splinters. Use medium-grit sandpaper to start, then finish with fine-grit. Sand along the grain of the wood, not across it. This step makes the wood safe to touch and ready for painting or staining.
Cutting To Size
Measure the wood pieces according to your design. Mark the cuts clearly with a pencil. Use a saw to cut the wood to the correct size. Keep cuts straight and clean for a neat finish. Wear safety gear while cutting to protect yourself.
Designing The Hook Rack
Designing the hook rack is an important step in making a pallet wall hook rack. It sets the look and function of your piece. Careful planning ensures the rack fits your space and meets your needs.
Think about what items you want to hang. This helps decide where to place the hooks. The size and style of hooks also affect the rack’s usefulness and appearance.
Determining Hook Placement
Start by measuring the pallet surface. Mark spots where hooks will go. Space hooks evenly to keep the rack balanced.
Consider the size of your items. Bigger items need more space between hooks. Smaller items can be closer together.
Place hooks at different heights for variety. This adds interest and helps hang items of different sizes.
Selecting Hook Types
Choose hooks based on what you will hang. Strong hooks are best for heavy items like bags or coats.
Simple metal hooks work well for most uses. Wooden or decorative hooks add style.
Pick hooks that match the look of the pallet. This creates a clean and unified design.
Assembling The Rack
Assembling the pallet wall hook rack is simple and fun. This part turns your prepared wood into a useful rack. Follow the steps carefully for a strong, neat rack.
Attaching The Hooks
Choose sturdy hooks for your rack. Place them evenly along the pallet wood. Mark the spots with a pencil. Use screws to attach each hook firmly. Make sure hooks face outward for easy hanging. Tighten screws with a screwdriver to avoid wobbling.
Reinforcing The Structure
Check if the rack feels stable. Add extra wooden braces behind the pallet. Screw the braces tightly to the main board. This prevents the rack from bending or breaking. Use corner brackets for more support. Reinforcement keeps your rack safe for heavy items.
Finishing Touches
Finishing touches bring your pallet wall hook rack to life. They protect the wood and give it a polished look. These steps make your rack last longer and look great in any space.
Painting Or Staining
Choose paint or stain that matches your room’s style. Paint adds color and hides wood flaws. Stain shows the wood’s natural beauty and grain.
Apply thin, even coats with a brush or cloth. Let each coat dry completely before adding the next. Light sanding between coats can make the finish smoother.
Sealing For Durability
Seal the rack to protect it from moisture and wear. Use a clear sealant like polyurethane or varnish. This layer keeps the wood safe from scratches and dirt.
Apply the sealant evenly and allow it to dry well. You may need two or three coats for full protection. This step ensures your rack stays strong and beautiful for years.
Mounting The Rack
Mounting the pallet wall hook rack properly is key to its strength and durability. The rack needs to hold weight without falling off. Follow the right steps to secure it safely on your wall. This section guides you through choosing the best spot and installing wall anchors for a solid hold.
Choosing The Mounting Location
Select a wall space that fits your needs and has enough room. Pick a spot near the door or where you often need hooks. Check the wall material—drywall, brick, or wood. Each needs different mounting methods. Avoid places with electrical wires or pipes inside the wall. Use a stud finder to locate wooden studs behind drywall. Mounting on studs gives strong support. Mark the points where you will attach the rack. Make sure the rack will hang level and straight.
Installing Wall Anchors
Wall anchors help hold screws in drywall or plaster. Choose anchors that match your wall type and the rack’s weight. Drill pilot holes slightly smaller than the anchors. Push or tap anchors gently into the holes until flush with the wall. Insert screws into the anchors, leaving enough of the screw head out to hang the rack. Tighten screws firmly but avoid over-tightening to prevent wall damage. Double-check the anchors before hanging the rack. This ensures your pallet rack stays secure and stable.
Creative Customizations
Creative customizations bring life to your pallet wall hook rack. They make your rack unique and fit your style perfectly. Small changes can create big effects. You can add simple decorations or personal touches. This way, your rack will stand out and feel special.
Adding Decorative Elements
Decorative elements give your rack a fresh look. Paint the wood in soft colors or bold shades. Use stencils to create patterns or shapes. Attach small items like shells, buttons, or fabric pieces. These little details add charm and character. Choose decorations that match your room’s theme. This turns a plain rack into a piece of art.
Personalizing With Labels
Labels help organize and add personality to your rack. Write names or categories for each hook. Use chalkboard paint or small wooden tags. This makes it easy to find your things fast. Labels also add a fun, custom touch. Try different fonts or colors for a lively look. Personalizing your rack makes it practical and unique.

Credit: www.liftingitalia.com
Maintenance Tips
Keeping your pallet wall hook rack in good shape helps it last longer. Regular care stops damage from dirt, moisture, and wear. Simple steps keep the wood strong and the hooks secure.
Cleaning The Pallet Wall Hook Rack
Use a soft cloth to wipe dust from the wood. Avoid harsh chemicals that can damage the finish. A mild soap solution works well for deeper cleaning. Dry the rack completely after wiping.
Protecting The Wood Surface
Apply wood oil or a clear sealant to protect against moisture. Do this every few months or after cleaning. This keeps the wood from cracking or warping. Make sure the rack is dry before applying.
Checking And Tightening Hooks
Regularly check the hooks for looseness or rust. Tighten screws with a screwdriver as needed. Replace rusty hooks to keep the rack safe and sturdy. Test hooks by gently pulling on them.
Avoiding Excess Weight
Do not hang items heavier than the rack can hold. Heavy weight can bend the wood or pull out hooks. Use the rack for light coats, hats, or bags. Spread items evenly across the hooks.
Preventing Damage From Moisture
Place the rack away from humid areas like bathrooms. Moisture causes wood to swell and weaken. Use a dehumidifier in damp rooms to protect wood. Quickly wipe off any water spills on the rack.
Frequently Asked Questions
What Materials Are Needed For A Pallet Wall Hook Rack?
You need a wooden pallet, hooks, sandpaper, screws, a drill, and paint or stain. These basics help create a sturdy, stylish rack.
How Do You Prepare A Pallet For A Hook Rack?
Remove nails, sand the wood smooth, and cut to size. Proper prep ensures safety and a polished final look.
What Types Of Hooks Work Best For Pallet Racks?
Metal hooks or sturdy wooden pegs work well. Choose hooks that fit your storage needs and complement the rack’s style.
How Do You Securely Mount A Pallet Hook Rack On The Wall?
Use wall anchors and screws suitable for your wall type. Secure mounting prevents accidents and supports heavy items safely.
Conclusion
Creating a pallet wall hook rack is simple and fun. It saves money and adds style to your space. You only need a few tools and some patience. Each step helps you build something useful and unique. This project fits well in any room of your home.
Try it yourself and enjoy the feeling of making something by hand. A pallet rack keeps your things organized and easy to find. Give it a try and see how handy it becomes!