Are you looking to brighten up a room or add convenience with a new light and switch? You might think it’s a job only an electrician can do, but with the right steps, you can handle it yourself.
Imagine turning on a brand-new light you installed, feeling proud and saving money at the same time. This guide will walk you through the process clearly and safely, so you can get it done without confusion or hassle. Keep reading, and you’ll learn exactly how to add a new light and switch to your home with confidence.

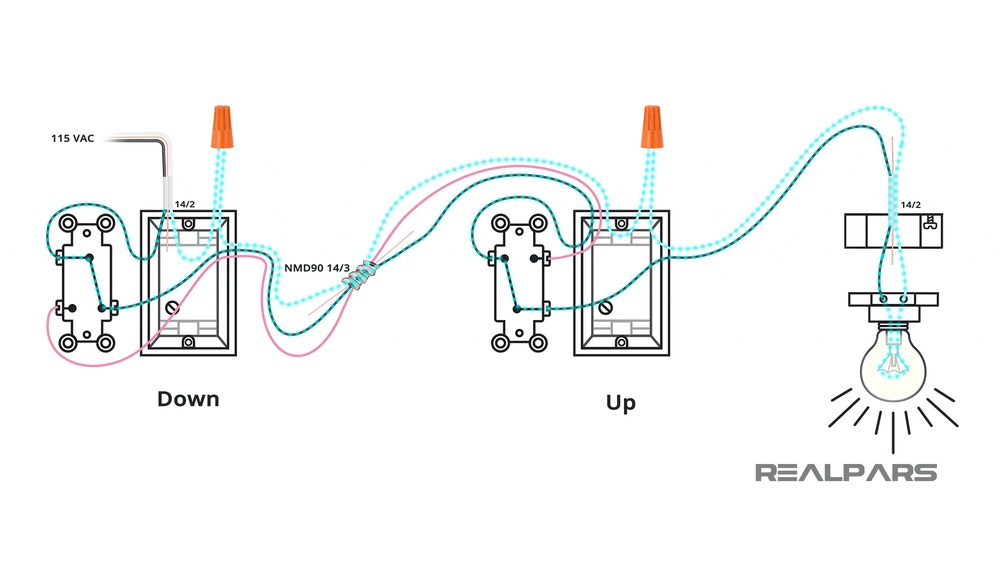
Credit: www.do-it-yourself-help.com
Tools And Materials Needed
Adding a new light and switch requires the right tools and materials. Having these ready makes the job safer and easier. This section lists everything needed to start your project.
Essential Tools
- Screwdrivers (flathead and Phillips)
- Wire stripper and cutter
- Voltage tester
- Drill with bits
- Measuring tape
- Level
- Fish tape or wire puller
- Flashlight or headlamp
Required Materials
- Light fixture
- Light switch
- Electrical box (for switch and light)
- Electrical wire (type depends on local codes)
- Wire nuts or connectors
- Electrical tape
- Mounting screws
Safety Gear
- Insulated gloves
- Safety glasses
- Dust mask (for drilling)
- Rubber-soled shoes
Planning Your Installation
Planning your installation is the first step to add a new light and switch safely. Good planning helps avoid mistakes and saves time. It ensures the new light fits well in your space and works properly with your home’s electrical system.
Choosing The Location
Pick a spot where the light will be useful. Think about the room’s layout and where you need more light. Avoid places near water or heat sources. Make sure the switch is easy to reach from the door or main area.
Checking Electrical Load
Know how much power your current circuit uses. Adding a light and switch adds more load to the circuit. Use a circuit tester or check your home’s electrical panel. Ensure the circuit can handle the extra load safely.
Creating A Wiring Diagram
Draw a simple plan showing wires, light, and switch positions. Mark the power source and connections clearly. This diagram guides you during installation. It helps avoid confusion and wiring errors.
Turning Off Power Safely
Turning off power safely is the first step in adding a new light and switch. It keeps you safe from electric shocks. Always double-check to avoid accidents. Safety is key before starting any electrical work.
Locating The Circuit Breaker
Find the main circuit breaker box in your home. It is usually in the basement, garage, or utility room. Open the box carefully. Look for the switch that controls the power to the area where you will work. Turn this switch off to cut the power.
Testing For Power
Use a voltage tester to check if the power is off. Touch the tester to the wires or outlets in the work area. If the tester shows no power, it is safe to proceed. Always test more than once to be sure. Do not skip this step.

Credit: diy.stackexchange.com
Running Electrical Wiring
Running electrical wiring is a key step in adding a new light and switch. It connects the power source to your new fixture. Proper wiring ensures safety and good function. This process involves measuring, routing, and securing cables inside walls. Careful work prevents future problems and keeps wires hidden.
Measuring And Cutting Cable
Start by measuring the distance from the power source to the new light and switch. Add extra length for easy handling and connections. Use a tape measure for accuracy. Cut the cable with wire cutters cleanly. Avoid cutting too short. A little extra cable helps during installation.
Routing Wires Through Walls
Plan the path for the wires inside the walls. Look for studs and obstacles before drilling holes. Use a drill with a long bit to make holes through studs. Push the cable gently through the holes. Keep the cable tight but not stretched. Avoid sharp bends that can damage wires.
Securing The Wiring
Secure the cable to wall studs with wire staples or clips. Place staples every 12 inches to keep wires from moving. Do not pinch or crush the cable with staples. Leave some slack near boxes to allow for connections. Proper securing prevents damage and keeps wiring safe over time.
Installing The Light Fixture
Installing a new light fixture is an important step in adding light to any room. It requires careful handling and following safety rules. This section explains how to install the light fixture in easy steps. It covers mounting the fixture box, connecting wires, and securing the fixture firmly.
Mounting The Fixture Box
Start by placing the fixture box where the light will go. Use a stud finder to locate a wall stud or ceiling joist. Attach the box securely with screws. Make sure it is level and tight. The box must hold the weight of the light fixture safely.
Connecting Wires To The Light
Turn off the power at the circuit breaker. Match the wires from the fixture to the wires in the box. Usually, black wires connect to black, white to white, and green or bare copper to ground. Use wire nuts to twist wires together tightly. Wrap electrical tape around the nuts for extra safety.
Securing The Fixture
Lift the light fixture and align it with the mounted box. Attach it with screws provided in the kit. Check that it is flush against the ceiling or wall. Tighten all screws firmly but do not over-tighten. Restore power and test the light to ensure it works correctly.
Setting Up The Switch
Setting up the switch is a key step in adding a new light and switch. This part controls the power flow to your light. Proper setup ensures safety and functionality. Follow simple steps to install the switch box, wire the switch, and attach the switch plate.
Installing The Switch Box
Start by choosing the right spot on the wall for the switch box. Use a stud finder to avoid hitting wood or pipes. Cut a hole that fits the box snugly. Push the box into the hole and secure it with screws. Make sure it sits flush with the wall surface.
Wiring The Switch
Turn off power at the circuit breaker before touching wires. Strip the insulation from the wires carefully. Connect the black (hot) wire to the switch’s brass terminal. Attach the white (neutral) wires together with a wire nut. Connect the green or bare copper wire to the switch’s ground screw. Tighten all connections firmly but avoid over-tightening.
Attaching The Switch Plate
Once wiring is complete, gently push the switch back into the box. Align the switch with the screw holes on the box. Secure it with the screws provided. Finally, place the switch plate over the switch. Screw the plate in place without forcing it. The switch setup is now ready for testing.
Testing And Troubleshooting
Testing and troubleshooting are important steps after installing a new light and switch. These steps ensure everything works safely and correctly. Skipping testing can cause problems or hazards later.
Careful checking helps catch any wiring mistakes or faulty parts. It also confirms the switch controls the light as expected. Follow these simple steps to test and fix common issues.
Restoring Power
Turn the main power back on at the circuit breaker. Make sure the breaker switch is fully in the ON position. Check that the power is restored to the room.
Use a voltage tester on the wires to confirm electricity flows. Never touch wires with bare hands during this step. Safety first.
Checking For Proper Function
Flip the new switch on and off several times. Watch if the light turns on and off smoothly each time.
Listen for any buzzing sounds from the switch or light fixture. Buzzing can signal loose wiring or a bad connection.
Test other switches on the same circuit to ensure no interruptions happened during installation.
Fixing Common Issues
If the light does not turn on, double-check all wire connections. Look for loose or disconnected wires behind the switch and light fixture.
Replace the bulb with a new one to rule out a bad bulb. Use the correct wattage bulb for the fixture.
Reset the circuit breaker if it trips. A tripped breaker may mean a short circuit or overload.
Contact a licensed electrician if problems continue or you feel unsure about any step.

Credit: diy.stackexchange.com
Safety Tips And Best Practices
Adding a new light and switch can improve any room. Safety must come first during this task. Following safety tips and best practices helps avoid accidents. This section covers key safety advice to keep you safe.
Avoiding Electrical Hazards
Turn off the power at the circuit breaker before starting work. Use a voltage tester to confirm the power is off. Wear insulated gloves to protect your hands. Avoid working in wet or damp areas. Do not touch wires with bare hands. Use tools with insulated handles. Keep your workspace clean and free from clutter. Check wires for damage before connecting them. Secure all wire connections with wire nuts. Never overload circuits with too many devices.
When To Call A Professional
Call a professional if you feel unsure at any point. Complex wiring or old electrical systems need expert help. Professionals handle permits and ensure code compliance. Unsafe wiring can cause fires or shocks. Professionals have the right tools and experience. It is better to pay for safety than risk injury. If the project requires changing the circuit breaker, hire a pro. Do not attempt work beyond your skill level.
Frequently Asked Questions
How Do I Safely Add A New Light Fixture?
Turn off power at the breaker before starting. Use a voltage tester to confirm no power. Follow wiring instructions carefully. Secure connections with wire nuts. Mount the fixture firmly to avoid hazards. Always follow local electrical codes and consider consulting a professional.
What Tools Are Needed To Install A Light And Switch?
You need a voltage tester, wire strippers, screwdrivers, pliers, and wire nuts. A drill may be required for mounting. Electrical tape is useful for securing connections. Having a ladder helps reach ceiling fixtures safely. Always use insulated tools for electrical work.
Can I Add A Switch To Control An Existing Light?
Yes, you can add a switch by running a new wire from the light fixture. Turn off power before starting. Install the switch in an accessible location. Connect the wires correctly following electrical codes. Test the switch operation before finishing.
How Do I Choose The Right Switch For My Light?
Choose a switch compatible with your light type and electrical load. Single-pole switches work for simple on/off control. Dimmer switches allow brightness adjustment but must match the bulb type. Ensure the switch rating fits your circuit to avoid overload.
Conclusion
Adding a new light and switch can brighten any room quickly. Follow each step carefully for safety and success. Use the right tools and check your work twice. Don’t rush the process; take your time. With patience, you can do this yourself.
A well-lit space feels warm and inviting. Keep your home safe by turning off power first. Enjoy the satisfaction of a job well done. Now, your room has extra light and control. Simple changes make a big difference in your home.