Have you ever tried to remove a drywall anchor and ended up with a bigger hole or damaged wall? If you’re facing this frustrating problem, you’re not alone.
Getting drywall anchors out can be tricky, but it doesn’t have to be a headache. In this guide, you’ll discover simple, effective methods to remove those stubborn anchors without ruining your wall. Keep reading, and you’ll learn how to fix your wall quickly and easily, saving you time and stress.
Tools Needed
Removing drywall anchors needs the right tools. Using proper tools makes the job easier. It also prevents damage to your wall. Gather these items before starting.
Flathead Screwdriver
A flathead screwdriver helps pry out anchors. It fits under the anchor’s edge. Use it to lift the anchor carefully. This tool offers control and precision.
Pliers
Pliers grip anchors firmly. They pull out anchors that screwdrivers can’t. Needle-nose pliers work best for tight spots. They provide a strong hold for removal.
Drill With A Screwdriver Bit
A drill with a screwdriver bit can unscrew anchors. It saves time and effort. Use a slow speed to avoid wall damage. This tool works well for threaded anchors.
Utility Knife
A utility knife cuts around stubborn anchors. It helps remove wall texture or paint near the anchor. This tool aids in loosening the anchor’s grip.
Credit: theturquoisehome.com
Identify Anchor Type
Identifying the type of drywall anchor is the first step to remove it safely. Different anchors need different removal methods. Knowing the type helps avoid damage to your wall.
Plastic Expansion Anchors
These anchors are common and easy to spot. They are small and made of plastic. They expand inside the wall when a screw goes in. Usually white or beige in color.
Threaded Drywall Anchors
Threaded anchors look like screws with wide threads. They screw directly into drywall without a pre-drilled hole. Made of plastic or metal. They hold heavy objects well.
Toggle Bolts
Toggle bolts have metal wings that open inside the wall. They need a bigger hole to fit through. Strong for heavy loads but tricky to remove. The wings stay behind the drywall.
Molly Bolts
Molly bolts are metal anchors with expandable sleeves. They open up behind the wall when tightened. Good for medium-weight items. They often leave a larger hole after removal.
Check the anchor’s material and shape closely. This helps pick the right tool and method. Proper identification saves time and prevents wall damage.
Remove Plastic Expansion Anchors
Removing threaded drywall anchors can be simple with the right steps. These anchors have a spiral shape that grips the drywall. They hold heavy items firmly. Removing them carefully prevents wall damage. This section explains easy ways to take them out.
Gather The Right Tools
Use pliers or a screwdriver for this task. Needle-nose pliers work best for gripping the anchor. A flathead screwdriver helps to turn the anchor. Prepare a utility knife to score the wall if needed.
Loosen The Anchor
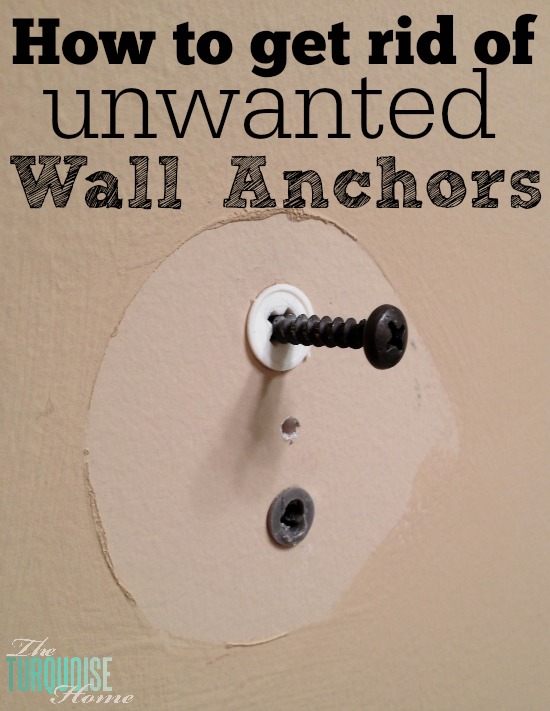
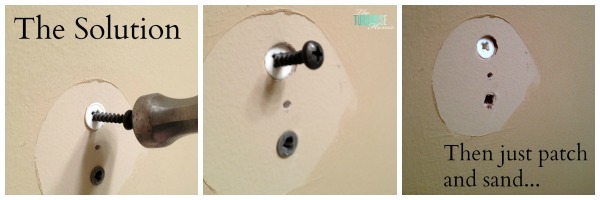
Turn the anchor counterclockwise to loosen it. Use pliers to grip the anchor’s edge. Twist gently to avoid tearing the drywall. If the anchor spins freely, use a screwdriver to back it out.
Pull Out The Anchor
Once loose, pull the anchor straight out. Use pliers for a firm grip. Pull slowly and steadily to reduce wall damage. If it resists, twist again to loosen more.
Repair The Hole
Fill the hole with spackling paste or wall filler. Smooth the surface with a putty knife. Let it dry fully before sanding. Paint over the repair to match the wall color.

Credit: www.hgtv.com
Remove Threaded Drywall Anchors
Removing toggle bolts from drywall can seem tricky. These anchors have wings that open behind the wall. This design makes them strong but hard to pull out. You need a clear plan to get them out without damaging your wall.
Locate The Toggle Bolt Screw Head
First, find the screw head sticking out of the wall. The screw holds the toggle wings in place. Use a flashlight if the area is dark. Check if the screw is loose or tight before starting.
Unscrew The Bolt Slowly
Turn the screw counterclockwise to unscrew it. Do this gently to avoid tearing the drywall. The toggle wings will stay inside the wall. Keep unscrewing until the screw is fully out.
Push The Toggle Wings Inside The Wall
After removing the screw, push the toggle wings into the wall cavity. Use a thin tool like a screwdriver or stick. This clears the hole for patching later. The wings will fall behind the drywall safely.
Patch The Hole Left By The Toggle Bolt
Fill the hole with spackle or wall filler. Smooth it with a putty knife. Let it dry and sand it flat. Paint over the patched area to match the wall color.
Remove Toggle Bolts
After removing drywall anchors, the wall often looks damaged. Fixing it is important to keep your walls smooth and clean. This section explains simple steps to repair the wall and make it look new again.
Fill Holes
Start by filling the holes left by the anchors. Use spackling paste or wall filler for the best results. Apply the filler with a putty knife, pressing it into the hole. Make sure to cover the entire hole fully. Let the filler dry completely before moving on.
Sand Smooth
Once the filler is dry, sand the area gently. Use fine-grit sandpaper for a smooth finish. Sand until the surface is even with the rest of the wall. Remove dust with a dry cloth to prepare for painting.
Paint Touch-up
Match the paint color of your wall for the best look. Use a small brush to apply paint over the repaired spot. Apply thin layers and let each dry before adding more. This hides the repair and blends it with the wall.
Fixing The Wall After Removal
Removing drywall anchors can be tricky. Damaging the wall makes repairs harder and more expensive. Use smart methods to keep walls smooth and clean. These tips help you avoid cracks, holes, and crumbling drywall.
Use The Right Tools
Choose tools made for drywall work. A screwdriver, pliers, or a drill can work well. Using the wrong tool can tear the wall paper or paint.
Work Slowly And Gently
Pull anchors out with care. Quick or rough moves can break the drywall. Take time to loosen the anchor bit by bit.
Protect The Wall Surface
Place painter’s tape around the anchor. This stops paint from peeling or chipping. Tape also helps guide your removal efforts.
Fill Holes Promptly
After removing anchors, fill holes right away. Use spackle or wall filler for a smooth finish. Sand the area gently after drying.
Check For Hidden Damage
Look closely for cracks or dents near the anchor spot. Fix these small issues early. Small problems can grow bigger over time.
Credit: theturquoisehome.com
Frequently Asked Questions
How Do I Remove Drywall Anchors Without Damage?
To remove drywall anchors, first try pulling them out gently with pliers. If stuck, push the anchor inside the wall and patch the hole afterward. Using the right tools minimizes wall damage during removal.
What Tools Are Best For Drywall Anchor Removal?
Pliers, a screwdriver, and a utility knife work best to remove drywall anchors. Pliers help grip the anchor, while a screwdriver can pry it out. A utility knife cleans the edges of the hole for patching.
Can I Reuse Drywall Anchors After Removal?
Generally, drywall anchors should not be reused. Removing them often damages their structure, reducing holding strength. It’s safer to use new anchors for a secure and stable fix.
How To Patch Holes After Drywall Anchor Removal?
After removal, fill holes with spackling compound or drywall patch. Smooth the surface with a putty knife and sand once dry. Finally, repaint to match the wall color for a seamless finish.
Conclusion
Removing drywall anchors does not have to be hard. Use the right tools and take your time. Gently pull, twist, or pry the anchor out. Fill any holes with spackle or putty. Sand the area smooth once dry. Paint to match your wall color.
This simple process keeps walls neat and ready. You can fix the wall yourself with ease. Small repairs make a big difference in any room. Try these steps for a clean, anchor-free wall.