Have you ever wished you could control two lights with just one switch? It sounds simple, but knowing how to connect 2 lights on one switch can save you time, space, and even money.
Imagine walking into a room and turning on both lights with a single flick—no more fumbling with multiple switches. In this guide, you’ll discover easy steps to make it happen safely and effectively. Whether you’re a beginner or just looking to improve your home setup, this article will give you the confidence to take control of your lighting.
Ready to make your lighting smarter and simpler? Let’s get started!
Tools And Materials Needed
Connecting two lights to one switch requires specific tools and materials. Using the right items makes the job safer and easier. Gather everything before starting to avoid interruptions.
Safety is crucial when working with electricity. Proper tools help you handle wires without damage. Quality materials ensure your connection lasts long and works well.
Essential Tools
- Screwdriver set – to remove and attach switch plates
- Wire stripper – to strip insulation from wires
- Voltage tester – to check if wires are live
- Needle-nose pliers – to bend and twist wires
- Electric drill (optional) – for making new holes if needed
- Flashlight – to see clearly in dark spaces
Required Materials
- Light switch – single-pole type works for most setups
- Electrical wire – usually 14/2 or 12/2 gauge wire
- Wire nuts – to connect wires safely
- Electrical tape – for extra insulation and securing wires
- Light fixtures – two lights you want to connect
- Electrical box – to house the switch and wiring
Safety Gear
- Insulated gloves – protect against electric shocks
- Safety glasses – shield eyes from debris
- Dust mask – useful if drilling or working in dusty areas
Safety Precautions
Safety is the top priority when connecting two lights on one switch. Taking the right steps protects you from shocks and damage. Even simple tasks can be risky without care.
Follow these safety rules closely. They help keep the work safe and smooth.
Turn Off The Power
Always switch off the main power before starting. Use the circuit breaker to cut electricity. Test the switch with a voltage tester. This confirms no current is flowing.
Use Proper Tools
Choose tools made for electrical work. Insulated screwdrivers and pliers reduce shock risk. Avoid using old or damaged equipment. Good tools make the job easier and safer.
Wear Safety Gear
Put on rubber-soled shoes to prevent slipping. Use safety glasses to protect your eyes. Gloves provide extra protection against electric shocks. Dress appropriately for the task.
Check Wire Ratings
Use wires that match your lights’ power needs. Incorrect wire sizes can cause overheating. Look for labels on wires to find ratings. Proper wiring supports long-term safety.
Follow Local Electrical Codes
Study local rules about electrical work. Codes ensure installations are safe and legal. Ignoring codes can cause hazards and fines. Consult a professional if unsure about rules.
Identify Your Wiring Setup
Before connecting two lights to one switch, know your wiring setup. This step helps you work safely and correctly. Every home may have different wiring types and layouts.
Understanding your setup saves time and avoids mistakes. It also helps to find the right tools and parts needed for the job.
Check The Power Source
First, locate where the power comes into your switch box. Look for the black (hot) wire that carries electricity. Identify if the power comes from the breaker or light fixture.
Identify The Wires In The Switch Box
Look inside the switch box for wires. Common wires are black, white, and green or bare copper. Black wires carry power, white wires are neutral, and green or bare wires are ground.
Test The Wires Safely
Use a voltage tester to check which wire is live. Turn off the breaker before touching wires. Test wires again after turning the power back on. This step ensures you only work with the right wires.
Note Wire Connections And Colors
Write down or take a photo of how wires connect. Note their colors and positions. This helps during reconnection and avoids confusion later.

Credit: diy.stackexchange.com
Turn Off Power Supply
Turning off the power supply is the first and most important step. It keeps you safe from electric shock. Never start any wiring work without cutting the power. It protects both you and your electrical system.
Find your home’s main electrical panel. This is where you can switch off the power to the lights. Usually, it is a metal box located in a basement, garage, or utility room.
Locate The Correct Circuit Breaker
Look for the breaker that controls the lighting circuit. It might be labeled as “Lights” or “Living Room.” If not, turn off the main breaker to cut power to the whole house.
Switch Off The Circuit Breaker
Flip the breaker switch to the “Off” position. This stops electricity flow to the light switch and fixtures. Double-check that the lights are off before starting work.
Test The Power Is Off
Use a voltage tester or a simple light bulb tester. Touch the tester to the wires or light socket. If there is no power, it is safe to proceed.
Safety Tips While Working
Wear insulated gloves and use tools with insulated handles. Avoid working in wet areas to prevent accidents. Always keep your workspace clear and well-lit.
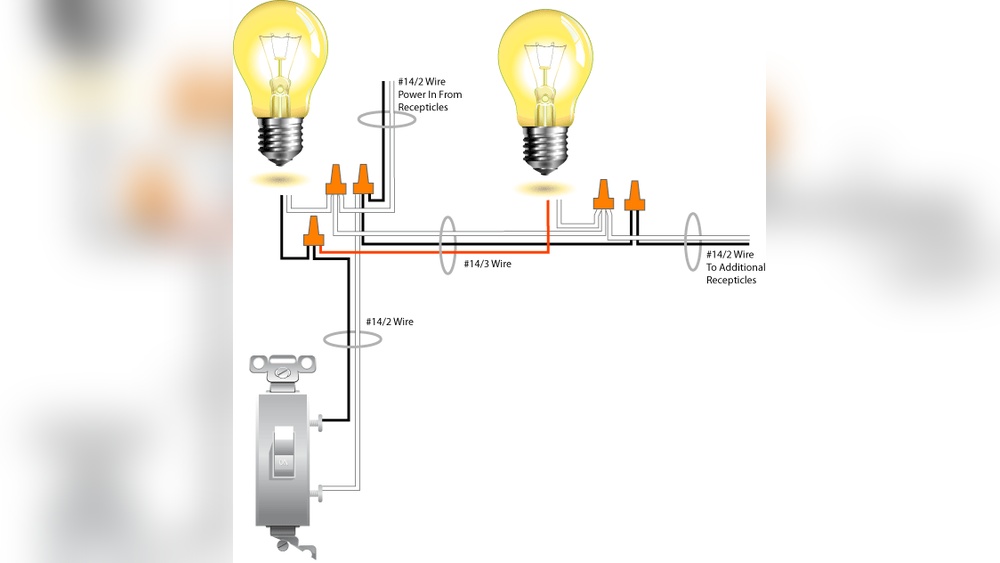
Connect Wires To The Switch
Connecting wires to the switch is a key step in wiring two lights to one switch. This process controls the flow of electricity to both lights. Proper connections ensure safety and smooth operation. Follow the steps carefully and check each wire before connecting.
Connect Live Wire
The live wire carries power from the electrical panel. Identify the live wire by its color, usually black or red. Turn off the power before handling any wires. Strip the wire’s end to expose about half an inch of copper. Attach the live wire to the switch terminal marked “L” or “Line”. Tighten the screw securely to hold the wire. Make sure no copper is exposed outside the terminal. This connection allows electricity to reach the switch.
Connect Load Wires
Load wires send power from the switch to the lights. These wires are usually black or red as well. Strip the ends of both load wires carefully. Connect each load wire to the switch terminals labeled “Load” or numbers like 1 and 2. Tighten the screws firmly to avoid loose connections. Check that wires do not touch each other or metal parts. Proper load wire connection controls both lights from one switch.

Credit: www.youtube.com
Wire The Lights In Parallel
After wiring two lights to one switch, restoring power is the next step. This allows you to check if everything works correctly. Safety is key. Make sure all connections are secure before turning the power back on.
Testing the lights confirms proper installation. It also helps spot any wiring issues early. This step ensures the switch controls both lights as planned.
Turn On The Circuit Breaker
Locate the main electrical panel. Find the breaker you switched off earlier. Flip it back to the ON position. This restores electricity to the switch and lights.
Check Both Lights
Go to the switch and flip it on. Both lights should illuminate together. If one or both lights do not turn on, double-check the wiring.
Test The Switch Operation
Turn the switch on and off several times. The lights should respond immediately each time. Flickering or delayed response may indicate a loose connection.
Use A Voltage Tester
For extra safety, use a voltage tester on the switch terminals. This confirms power is flowing correctly. It also helps find any wiring faults.
Secure All Connections
Troubleshooting is an important part of connecting two lights on one switch. Problems can happen even with simple wiring tasks. Finding the cause helps fix the issue fast and safely.
Check each step carefully. Small mistakes in wiring can stop the lights from working. Use these tips to solve common problems and get your lights on.
Check The Power Source
Make sure the power is off before starting any work. Use a voltage tester to confirm no electricity flows. This step protects you from electric shock.
Verify Wire Connections
Loose or wrong connections cause lights not to work. Double-check each wire is connected to the right terminal. Tighten any loose screws on the switch and light fixtures.
Inspect The Switch
Test the switch with a multimeter to see if it works. Replace the switch if it is faulty. A broken switch stops current from passing to the lights.
Use Correct Wire Types
Use wires that match the electrical code and the lights’ needs. Using the wrong wire can cause shorts or fire hazards. Copper wires are the most common for home lighting.
Test The Light Bulbs
Try each bulb in a working socket to check if they are good. Replace any bulbs that do not light up. Faulty bulbs often cause confusion during troubleshooting.
Look For Short Circuits
Short circuits happen when wires touch incorrectly. Check for exposed wires or damaged insulation. Fix any damage before turning the power back on.

Credit: diy.stackexchange.com
Frequently Asked Questions
How Do I Wire Two Lights To One Switch Safely?
To wire two lights to one switch, connect the switch’s power source to both lights’ live wires. Ensure all connections are secure and insulated. Turn off power at the breaker before starting. Follow local electrical codes and consider consulting a professional for safety.
Can I Control Two Lights With One Switch Separately?
No, one switch controls both lights simultaneously. To control lights separately, install a double switch or smart switches. This setup allows individual operation but requires additional wiring or devices.
What Type Of Wire Is Needed For Two Lights On One Switch?
Use 14/2 or 12/2 electrical wire, depending on your circuit’s amperage. The wire should have a live (hot), neutral, and ground conductor. Always match wire size to circuit requirements and local electrical codes.
Is It Difficult To Connect Two Lights On One Switch?
Connecting two lights on one switch is relatively simple for those with basic electrical knowledge. It involves wiring in parallel and following safety steps. However, beginners should seek professional help to avoid hazards.
Conclusion
Connecting two lights on one switch is simple with the right steps. Always turn off power before starting to stay safe. Use proper wires and tools for a secure setup. Test the connection once finished to ensure both lights work.
This project can brighten rooms easily and save space on switches. Practice patience and follow instructions carefully for best results. Now, you can control two lights with just one switch. A small change that makes a big difference in your home lighting.