Have you ever wanted an easy way to control your light fixture without fumbling for a wall switch? Adding a pull switch to your light can give you just that—convenience at your fingertips.
Whether your fixture doesn’t have a switch or you want a simple upgrade, this quick change can make a big difference in your daily routine. In this guide, you’ll learn exactly how to add a pull switch safely and quickly, even if you don’t have much experience with electrical work.
Keep reading, and by the end, you’ll have the confidence to brighten your space with a simple pull.
Tools And Materials Needed
Before adding a pull switch to a light fixture, gather all tools and materials. This makes the process smooth and safe. Having the right items saves time and avoids frustration.
Tools Needed
- Screwdriver (flathead and Phillips)
- Wire stripper
- Voltage tester
- Drill with small drill bits
- Pliers
- Wire nuts
- Electrical tape
Materials Needed
- Pull switch
- Electrical wire (usually 18-20 gauge)
- Mounting bracket or box (if required)
- Light fixture compatible with pull switches
Using a voltage tester ensures power is off before starting. Wire strippers make clean wire cuts. Pliers help twist wires safely. A drill creates holes for the pull switch if needed.
Choose a pull switch that fits your fixture. Use correct wire size for safety. Wire nuts and tape secure connections. Having all tools ready helps complete the job quickly.

Credit: www.youtube.com
Safety Precautions
Always turn off the power before starting electrical work to avoid shocks. Use a voltage tester to ensure no electricity flows to the fixture. Wear gloves and follow instructions carefully for a safe installation.
Turn Off Power At The Circuit Breaker
Always switch off the power before starting any electrical work. Do not rely on the light switch alone. Locate the correct circuit breaker and turn it off. Use a voltage tester to confirm the power is off. This step prevents electrical shocks and injuries.
Use Insulated Tools
Work only with tools that have insulated handles. Insulated tools protect you from accidental electric shocks. Avoid using metal tools without insulation. Keep your tools dry and clean to maintain their safety features.
Wear Safety Gear
Wear rubber-soled shoes to reduce the risk of electric shock. Use safety goggles to protect your eyes from dust and debris. Gloves designed for electrical work add an extra layer of protection. Safety gear helps keep you safe during installation.
Follow Manufacturer Instructions
Read and follow the instructions that come with the pull switch. Every model has specific steps and warnings. Proper installation ensures the switch works correctly and safely. Ignoring instructions can cause damage or hazards.
Check Local Electrical Codes
Know your local electrical codes before starting the project. Codes ensure safe and legal electrical work. Some areas require permits or professional installation. Following codes protects your home and your family.
Test The Installation Carefully
After installation, turn the power back on and test the switch. Make sure the light turns on and off smoothly. Watch for sparks or unusual sounds. If anything seems wrong, turn off the power and check your work.
Choosing The Right Pull Switch
Choosing the right pull switch is important for your light fixture. It affects how easy and safe it is to use. A good pull switch fits well and works smoothly. Consider the size, style, and durability before buying one.
Picking the correct switch also helps avoid electrical problems. It should match the power rating of your light fixture. This keeps everything safe and running well.
Understanding Different Pull Switch Types
Pull switches come in many styles. Some are simple on/off switches. Others have a built-in dimmer to control light brightness. Choose a type that fits your needs and the fixture design.
Checking The Switch’s Voltage And Current Rating
Look at the voltage and current ratings on the pull switch. These numbers show how much power the switch can handle. Pick a switch that matches or exceeds your light fixture’s power needs to prevent damage.
Considering The Length And Material Of The Pull Cord
The pull cord must be long enough to reach comfortably. It should also be strong and easy to grip. Common materials are nylon or cotton. Choose a cord that feels good and lasts long.
Matching The Switch Style With Your Room Decor
The switch’s look matters too. Some switches are plain and simple. Others have decorative finishes like brass or chrome. Select one that fits your room’s style and color scheme.
Ensuring Easy Installation And Maintenance
Pick a pull switch that is easy to install. Look for clear instructions and simple wiring. Also, choose a switch that is easy to clean and maintain over time.

Credit: www.dohiy.com
Turning Off Power
Turning off power is the first and most important step before working on a light fixture. It keeps you safe from electrical shocks. Always treat electricity with care. Never skip this step, even if the job seems small.
Make sure the power is completely off. Double-check to avoid accidents. Safety should be your top priority when adding a pull switch.
Locate The Circuit Breaker
Find the main electrical panel in your home. It usually holds all the circuit breakers. Look for the breaker that controls the light fixture you want to work on. It might be labeled or you may need to test a few.
Switch Off The Correct Breaker
Flip the right circuit breaker to the OFF position. This stops electricity from reaching the fixture. Confirm the power is off by checking the light fixture or using a voltage tester.
Use A Voltage Tester
A voltage tester helps ensure no electricity flows to the fixture. Touch the tester’s probes to the wires. If the tester shows no power, the circuit is safe to work on. Never skip this check.
Removing The Existing Fixture
Removing the existing light fixture is the first step in adding a pull switch. This process requires care and attention to safety. Turn off the power at the circuit breaker. This prevents any electrical shocks while working.
Once the power is off, gather tools like a screwdriver and a voltage tester. These tools help in safely detaching the fixture.
Turn Off The Power
Locate the circuit breaker panel. Switch off the breaker that controls the light fixture. Double-check by trying to turn the light on. The light should not respond.
Remove The Light Cover
Most fixtures have a glass or plastic cover. This cover protects the bulbs and wiring. Carefully unscrew or unclip the cover. Set it aside safely to avoid damage.
Unscrew The Fixture Base
Look for screws holding the fixture base to the ceiling or wall. Use a screwdriver to remove these screws. Support the fixture with one hand while unscrewing to prevent falling.
Check For Live Wires
Use a voltage tester on the wires connected to the fixture. Ensure no current is flowing before touching wires. This step confirms the power is off.
Disconnect The Wiring
Note how wires connect to the fixture. Usually, there are black (hot), white (neutral), and green or bare (ground) wires. Unscrew wire nuts and gently separate wires. Keep wires from touching each other.

Credit: www.wikihow.com
Wiring The Pull Switch
Wiring the pull switch is a key step in adding a switch to a light fixture. It controls the flow of electricity to the light, making it easy to turn on and off. This process involves identifying the wires and connecting them correctly. Safety is important, so always turn off the power before starting.
Identifying Wires
First, look at the wires coming from the fixture. Usually, you find three types: live, neutral, and ground. The live wire carries electricity to the light. The neutral wire completes the circuit and carries electricity back. The ground wire is for safety and prevents shocks. Use a voltage tester to confirm the live wire. Label each wire with tape for easy identification.
Connecting Wires To Switch
Next, connect the wires to the pull switch. The live wire goes to one terminal of the switch. The other terminal connects to the wire leading to the light bulb. Twist the wires together tightly for a secure connection. Use wire nuts to cover exposed wire ends. Attach the ground wire to the switch’s grounding screw, if available. Finally, tuck the wires neatly into the fixture box and secure the switch in place.
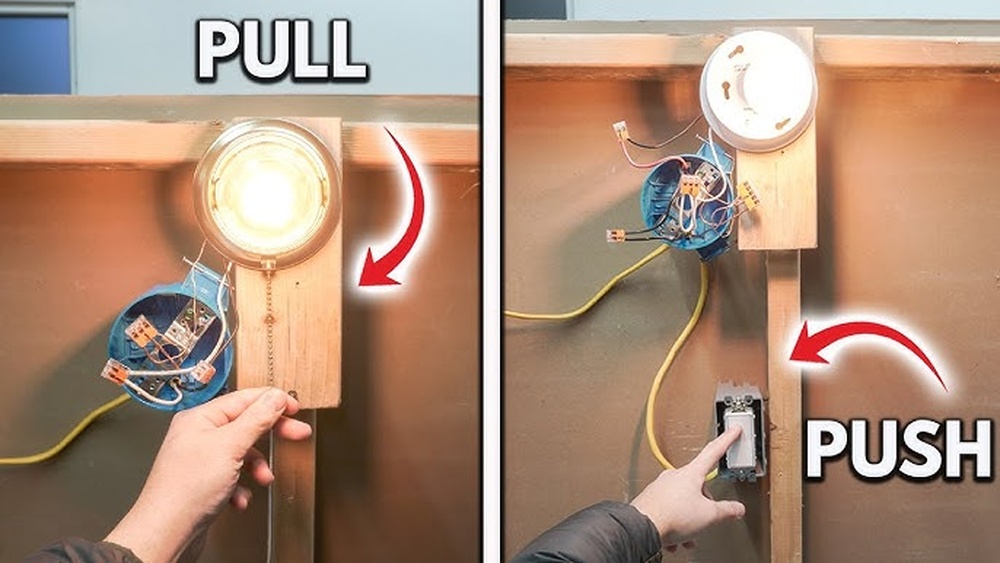
Installing The Pull Switch
Installing the pull switch is a key step to control your light fixture easily. This process lets you turn the light on and off by simply pulling a cord. The installation is straightforward and does not need complex tools. Follow each step carefully to ensure safety and proper function.
Turn Off The Power
First, switch off the power at the circuit breaker. This prevents any electric shock while working. Double-check by trying to turn on the light. It should stay off before you start.
Remove The Light Fixture Cover
Next, take off the light fixture cover. Use a screwdriver if needed. This gives access to the wires inside the fixture. Keep screws safe for reassembly later.
Disconnect The Existing Switch
Locate the current switch and disconnect the wires. Note which wire goes where. Use a marker or take a photo for reference. This helps when attaching the pull switch.
Attach The Pull Switch Wires
Connect the pull switch wires to the fixture wires. Match the colors carefully: black to black, white to white. Use wire nuts to secure connections tightly. Tug gently to confirm they are firm.
Mount The Pull Switch
Place the pull switch in the fixture housing. Ensure the switch is stable and the cord hangs freely. Tighten any screws or clips to hold it in place.
Reattach The Fixture Cover
Put the cover back on the light fixture. Screw it firmly to avoid any gaps. The pull cord should extend outside the cover for easy reach.
Restore Power And Test
Turn the power back on at the breaker. Pull the cord to test the switch function. The light should turn on and off smoothly with each pull.
Reattaching The Light Fixture
Reattaching the light fixture is a key step after installing the pull switch. This step ensures the fixture is secure and ready for use. Take your time to follow each part carefully. Safety matters most.
Align The Fixture With The Ceiling Box
Start by holding the fixture near the ceiling box. Check that all wires are tucked inside carefully. Match the fixture’s mounting holes with the box’s screw holes. This makes the fixture stable and easy to fasten.
Secure The Fixture With Screws
Use the screws you removed earlier or new ones if needed. Screw them in slowly and evenly. Tighten each screw just enough to hold the fixture firmly. Avoid over-tightening to prevent damage.
Attach The Pull Switch Handle
Locate the pull switch handle and slide it onto the switch rod. Push gently until it clicks or fits snugly. This allows you to turn the light on and off easily.
Test The Light Fixture
Turn on the power at the breaker box. Pull the switch to check if the light works. If it doesn’t, turn off the power and check connections again. A working fixture means your pull switch installation was successful.
Testing The Pull Switch
Testing the pull switch is a key step after installing it. This ensures the switch works correctly and safely. A proper test helps avoid electrical problems later.
Simple tests confirm the switch turns the light on and off. Checking the wiring and switch function gives peace of mind. Follow clear steps to test the pull switch efficiently.
Checking Power Supply
Start by turning on the main power. Make sure the light fixture receives electricity. Use a voltage tester to confirm power is present. This step prevents false test results.
Pulling The Switch
Gently pull the switch cord once. The light should turn off if it was on. Pull the cord again to turn the light back on. Repeat this a few times to check consistency.
Inspecting Switch Operation
Listen for a clicking sound when pulling the switch. This sound shows the internal mechanism works. Check the cord for smooth movement. Avoid any jerks or resistance in the pull.
Verifying Connections
Turn off the power before checking wiring. Open the switch housing carefully. Look for loose wires or poor connections. Tighten screws and secure wires if needed.
Final Safety Check
Ensure no exposed wires or damaged parts remain. Replace any worn components before turning power back on. A safe fixture protects your home and family.
Troubleshooting Common Issues
Troubleshooting common issues helps ensure your pull switch works correctly. Problems may arise from wiring errors, faulty parts, or installation mistakes. Identifying the cause saves time and prevents damage. Follow these tips to fix typical problems with ease.
Check The Wiring Connections
Loose or incorrect wiring causes the pull switch to fail. Turn off power before checking wires. Make sure all wires are connected tightly and to the right terminals. Use a voltage tester to confirm power is off. Reconnect any loose wires carefully.
Test The Pull Switch Mechanism
The switch may be defective or stuck. Pull the switch several times to check for smooth movement. If it feels stiff or doesn’t click, replace the switch. Test with a multimeter to ensure it opens and closes the circuit properly.
Inspect The Light Fixture
The problem might be in the light bulb or fixture itself. Replace the bulb with a new one. Check if the fixture’s socket is clean and not damaged. A faulty fixture can cause the light not to turn on even if the switch works.
Verify Power Supply To The Fixture
Power issues stop the light from working. Confirm the circuit breaker is on and not tripped. Use a tester to check if electricity reaches the fixture wires. If no power is present, inspect the electrical panel or wiring upstream.
Frequently Asked Questions
How Do I Install A Pull Switch On A Light Fixture?
To install a pull switch, first turn off the power. Remove the fixture cover, connect the switch wires to the light wires, secure the switch, and reassemble the fixture. Test the switch by pulling the cord to ensure it turns the light on and off.
Can I Add A Pull Switch To Any Light Fixture?
Most light fixtures can accommodate a pull switch, but check your fixture type first. Fixtures with built-in switches or certain LED models may not support pull switches. Always verify compatibility to avoid electrical issues or damage.
What Tools Are Needed To Add A Pull Switch?
You’ll need a screwdriver, wire strippers, electrical tape, and a voltage tester. A wire cutter and a drill may also be helpful. Ensure you have all tools ready before starting the installation for a smooth process.
Is It Safe To Add A Pull Switch Myself?
Yes, if you follow safety steps like turning off power at the breaker. Use a voltage tester to confirm no electricity flows. If unsure, consult a professional electrician to avoid hazards and ensure proper installation.
Conclusion
Adding a pull switch to a light fixture is simple and useful. It lets you control your lights easily without extra wiring. Always turn off power before starting the work. Follow the steps carefully and use the right tools. A pull switch adds convenience and style to any room.
You can do this project yourself with patience and care. Enjoy the easy light control every day. This small change makes a big difference in your home.

