Are you tired of struggling with loose screws and damaged walls? Installing wall anchor drywall might be the simple solution you need.
Whether you want to hang a heavy mirror, a shelf, or your favorite artwork, using the right wall anchor can make all the difference. In this guide, you’ll learn easy, step-by-step instructions to install wall anchors like a pro. By the end, you’ll have the confidence to secure anything firmly and keep your walls looking great.
Keep reading to discover how to do it right the first time!
Choosing The Right Wall Anchor
Choosing the right wall anchor is key for a strong and safe installation. The wrong anchor can lead to damage or failure. Understanding types and how they fit your wall and load needs helps you pick the best option. This guide breaks down what to know before you buy.
Types Of Wall Anchors
There are several wall anchor types. Plastic expansion anchors work well for light loads. They expand inside the drywall to hold tight. Metal anchors, like toggle bolts, grip stronger and hold heavier items. Self-drilling anchors screw directly into drywall without pre-drilling. Each type fits different situations and weight needs.
Selecting Based On Wall Material
Drywall is soft, so some anchors work better than others. For thin drywall, use toggle bolts or molly bolts. Thicker drywall can handle plastic or metal anchors. If you have plaster or concrete behind drywall, choose anchors made for those materials. Matching anchor type with wall material prevents damage and ensures a secure hold.
Weight Capacity Considerations
Check the weight your anchor can hold. Light anchors support 10-25 pounds. Heavy anchors handle 50 pounds or more. Always pick an anchor rated above your item’s weight. Heavy shelves, TVs, or mirrors need strong anchors. Using a weak anchor risks falling and damage. Safety depends on matching anchor strength with load.

Credit: www.homedepot.com
Tools And Materials Needed
Installing wall anchor drywall requires specific tools and materials. These help ensure a secure and stable hold. Using the right items makes the job easier and safer.
Essential Tools
- Drill with various drill bits
- Screwdriver or power driver
- Measuring tape
- Level
- Hammer
- Utility knife
- Stud finder
Recommended Materials
- Wall anchors suitable for drywall
- Screws matching the anchors
- Drywall patch or spackle (for repairs)
- Sandpaper
- Painter’s tape (optional for neat work)
Preparing The Drywall
Preparing the drywall is the first step to install wall anchors properly. It helps the anchors hold tight and keeps your items safe on the wall. Careful preparation makes the whole process easier and more secure.
Locating Studs
Find the wall studs before placing anchors. Studs are the wooden beams behind drywall. Use a stud finder or tap the wall softly. A solid sound means no stud; a hollow sound means a stud. Mark these spots with a pencil for easy reference.
Marking Anchor Points
Decide where you want to install the anchors. Use a pencil to mark the exact points on the drywall. Keep marks clear but light to erase later. Make sure the spots are away from studs for drywall anchors.
Drilling Pilot Holes
Choose a drill bit slightly smaller than the anchor size. Drill pilot holes at the marked points slowly. Keep the drill steady and straight. Pilot holes help anchors go in smoothly and prevent drywall damage.
Installing Different Wall Anchors
Different wall anchors suit different needs and wall types. Choosing the right anchor helps secure items safely. This guide covers common types of wall anchors and how to install them properly.
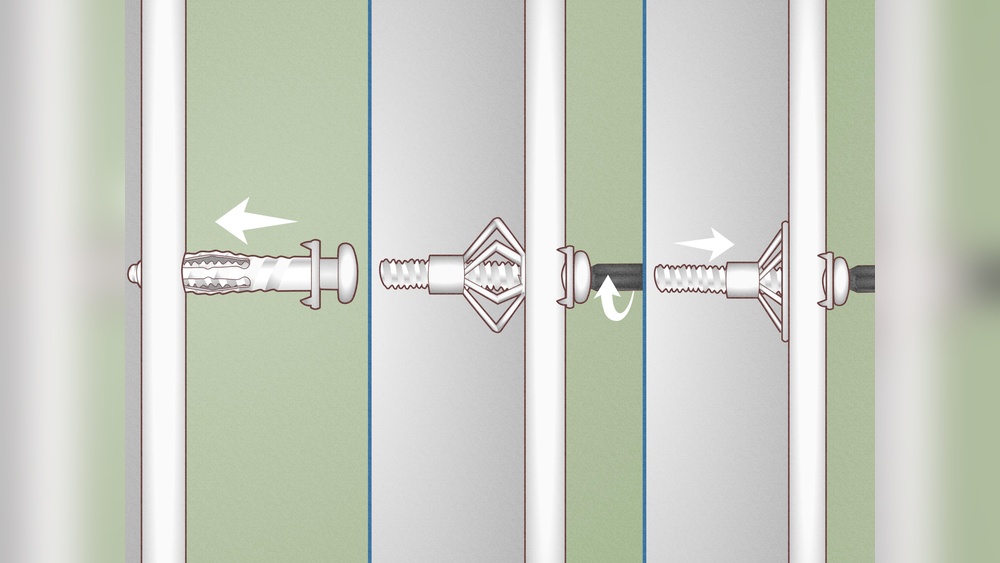
Plastic Expansion Anchors
Plastic expansion anchors are easy to use and affordable. Start by drilling a hole slightly smaller than the anchor. Push the anchor into the hole until flush with the wall. Insert the screw and tighten it slowly. The anchor expands inside the drywall, holding the screw firmly.
Toggle Bolts
Toggle bolts work well for heavy objects on drywall. Drill a hole large enough for the folded toggle wings. Insert the bolt with wings folded against the bolt. Push the toggle through the hole until it opens inside the wall. Tighten the bolt carefully to secure the object.
Molly Bolts
Molly bolts provide strong support in drywall. Drill a hole matching the bolt size. Insert the molly bolt and tap it flush with the wall. Tighten the screw to expand the anchor behind the wall. This locks the anchor firmly in place for hanging heavier items.
Self-drilling Anchors
Self-drilling anchors save time and tools. No need to pre-drill a hole. Screw the anchor directly into the drywall using a screwdriver. Once secure, insert the screw into the anchor. These anchors hold medium-weight items with ease and speed.
Securing The Anchor
Securing the wall anchor is a critical step in drywall installation. It ensures the anchor holds tight and supports weight without slipping. Properly securing anchors prevents damage and keeps objects stable on your walls.
Proper Insertion Techniques
Start by drilling a hole that matches the anchor size exactly. Insert the anchor straight into the hole without forcing it. Use a screwdriver to gently push the anchor until it sits flush with the wall surface. Avoid twisting the anchor too hard to prevent breaking the drywall.
Ensuring Firm Grip
After insertion, tighten the screw slowly to expand the anchor inside the wall. Stop when you feel resistance, which means the anchor is gripping well. Avoid over-tightening as it can strip the anchor or damage drywall. Check the anchor’s stability by giving it a slight wiggle before hanging anything heavy.

Credit: www.picturehangsolutions.com
Mounting Items On Anchors
Mounting items on drywall anchors makes walls stronger for heavy objects. It stops screws from pulling out or damaging the wall. Proper use of anchors keeps your fixtures safe and steady.
Each step matters when placing items on anchors. Correct alignment and careful tightening are key for a secure hold. This guide helps you mount fixtures with confidence and ease.
Aligning Fixtures
Place your fixture over the anchor holes carefully. Make sure the holes in the fixture line up with the anchors. This helps screws go in straight and hold tight. Check the position before you start tightening. A small shift can affect stability.
Tightening Screws Safely
Use a screwdriver or drill with low speed. Turn screws slowly to avoid stripping the anchor. Stop when the fixture feels firm but not too tight. Over-tightening can damage the drywall or the anchor. Tighten evenly if there are multiple screws.
Troubleshooting Common Issues
Troubleshooting wall anchor drywall issues helps keep your projects strong and safe. Problems may occur during or after installation. Knowing how to fix these issues saves time and effort. Below are common problems and simple solutions.
Anchor Pull-out
Anchor pull-out happens when the anchor slips from the drywall. This occurs if the hole is too big or the anchor is weak. To fix this, remove the anchor and choose a larger size. Use a heavier-duty anchor for more weight. Drill a new hole carefully and install the anchor firmly.
Wall Damage
Wall damage appears as cracks or holes near the anchor. This results from using too much force or a wrong anchor type. Stop and remove the damaged anchor. Patch the hole with drywall compound and let it dry. Sand it smooth, then reinstall using the right anchor size and type.
Loose Fixtures
Loose fixtures wobble or fall even after installing anchors. This means the anchor is not gripping tightly. Tighten the screw slowly to avoid stripping the anchor. If loose, remove the anchor and pick one designed for heavier loads. Follow instructions to secure the fixture firmly to the wall.

Credit: www.youtube.com
Tips For Long-lasting Support
Ensuring wall anchors hold strong over time requires simple care and attention. Small habits can keep anchors stable and safe. Follow these tips for long-lasting support to maintain secure fixtures on drywall.
Regular Inspections
Check wall anchors often for signs of wear or loosening. Look for cracks, movement, or gaps around the anchor. Tighten any loose screws or replace damaged anchors quickly. Early fixes prevent bigger problems and keep walls safe.
Avoiding Overloading
Know the weight limit of each wall anchor. Do not hang items heavier than the anchor’s capacity. Spread heavy loads across multiple anchors if needed. Overloading can pull anchors out, damaging drywall and causing accidents.
Frequently Asked Questions
What Tools Do I Need To Install Drywall Wall Anchors?
You need a drill, screwdriver, drywall anchors, and screws. A tape measure and pencil help with precise placement. Safety goggles are recommended for eye protection during drilling.
How Do I Choose The Right Drywall Anchor Type?
Select anchors based on weight capacity and wall material. Plastic anchors suit light loads; metal anchors hold heavier items. Toggle bolts are best for very heavy objects on drywall.
Can I Install Wall Anchors Without A Stud?
Yes, drywall anchors work without hitting studs. They spread the load inside the drywall for secure mounting. This allows hanging items where studs are unavailable.
How Do I Prevent Drywall Damage When Installing Anchors?
Drill a pilot hole slightly smaller than the anchor. Insert anchors gently without forcing. Avoid overtightening screws to prevent drywall cracking or crumbling.
Conclusion
Installing wall anchor drywall is simple with the right steps. Choose the correct anchor type for your wall. Drill a hole carefully and insert the anchor firmly. Tighten screws slowly to avoid damage. This method holds items securely and prevents wall damage.
Practice patience and follow each step closely. Small efforts bring strong, lasting results. Now, you can hang shelves, pictures, or mirrors with confidence. Try these tips to improve your DIY skills today.


