If you’ve just bought a new dryer or need to fix your laundry setup, knowing how to hook up your dryer vent to the wall is crucial. A proper connection keeps your dryer running safely and efficiently, preventing heat buildup and reducing fire risks.
But don’t worry—this task is simpler than it sounds, and you can do it yourself with the right steps. In this guide, you’ll learn exactly what you need and how to get the vent installed quickly and securely. Ready to make your laundry space safer and more efficient?
Let’s dive in!
:max_bytes(150000):strip_icc()/dryer-vent-installation-2718616-hero-6d6fccc705634bfd96355e50a75ecc59.jpg)
Credit: www.thespruce.com
Tools And Materials Needed
Preparing the right tools and materials is key for a smooth dryer vent hookup. Having everything ready saves time and avoids frustration. This section lists all essentials for the job.
Dryer Vent Hose
Choose a flexible metal vent hose. It resists heat well and fits dryer outlets. Avoid plastic or foil hoses as they are fire hazards.
Vent Wall Cap
The wall cap covers the vent opening outside. It prevents pests and weather from entering. Pick one with a flap to block wind and rain.
Clamps And Connectors
Use metal clamps to secure the vent hose. Connectors help join hose sections if needed. Tight clamps keep the vent air tight.
Screwdriver And Drill
A screwdriver tightens clamps and fastens the vent cap. A drill makes holes for screws in walls or studs. Both tools are essential for installation.
Measuring Tape
Measure the distance from the dryer to the wall vent. Proper length helps avoid sharp bends in the hose. This keeps airflow smooth.
Utility Knife Or Tin Snips
Cut the vent hose to the right length. Use a utility knife for flexible hoses. Tin snips work well for metal ducts.
Foil Tape
Seal joints and seams with foil tape. It prevents air leaks and improves safety. Avoid regular duct tape as it melts from heat.
Locate The Dryer Vent Opening
Start by finding the dryer vent opening on the wall behind your dryer. It is usually a round or square hole where the vent hose connects. Make sure the area is clear and easy to access before attaching the vent.
Understanding The Location Of The Dryer Vent Opening
Finding the dryer vent opening is the first step in connecting your dryer vent to the wall. This opening allows hot air and moisture to leave the dryer safely. Without locating it properly, the vent connection will not work well.
The vent opening is usually on an outside wall. It looks like a small metal or plastic flap. This flap opens when the dryer blows air out and closes when the dryer is off. This design stops pests and cold air from entering your home.
Checking Behind The Dryer
Move your dryer away from the wall carefully. Look behind it to see the vent pipe. This pipe connects your dryer to the vent opening on the wall. The pipe is often made of metal or flexible foil.
Follow the pipe from the dryer to the wall. The point where it meets the wall is the vent opening. Take note of its height and size. This helps in choosing the right vent pipe for connection.
Inspecting The Exterior Wall
Go outside to check the vent opening on the wall. It usually has a cover or flap. This cover keeps dirt and animals out. Make sure it is not blocked by plants or debris.
Cleaning around the vent opening improves airflow. Clear any leaves, dust, or spider webs. Good airflow helps the dryer work better and prevents fires.
Prepare The Vent Hose
Preparing the vent hose is a key step before attaching your dryer vent to the wall. This step ensures the hose fits well and works safely. A well-prepared hose helps the dryer release hot air and moisture outside. Poor preparation can cause leaks, clogs, or even fire risks.
Measure And Cut Hose
First, measure the distance from your dryer to the wall vent. Use a tape measure for accuracy. Add a few extra inches to allow for bends. Cut the hose with scissors or a utility knife. Make sure the cut is straight and clean. Avoid sharp edges that can catch lint or damage the hose.
Check For Damage
Look closely at the hose for holes, tears, or crushed sections. Damage can block airflow or cause leaks. Replace the hose if you find any problems. Also, check the ends to ensure they fit snugly on the dryer and wall vent. A tight fit prevents air leaks and improves dryer efficiency.
Attach Hose To Dryer
Attaching the dryer vent hose to the dryer is a key step in vent installation. It ensures that hot air and moisture leave the dryer properly. This helps your dryer work safely and efficiently.
Start by positioning the hose over the dryer’s vent outlet. Make sure the hose fits snugly without gaps. A loose connection can cause leaks and reduce dryer performance.
Secure With Clamp
Use a metal clamp to hold the hose in place. Slide the clamp over the hose end before attaching it to the dryer vent. Tighten the clamp with a screwdriver until the hose stays firm. This prevents the hose from slipping off during use.
Ensure Tight Fit
Check that the hose fits tightly around the dryer vent. Wiggle the hose slightly to confirm it does not move. A tight fit stops air leaks and keeps lint from escaping. Adjust the hose or clamp if you notice any gaps.
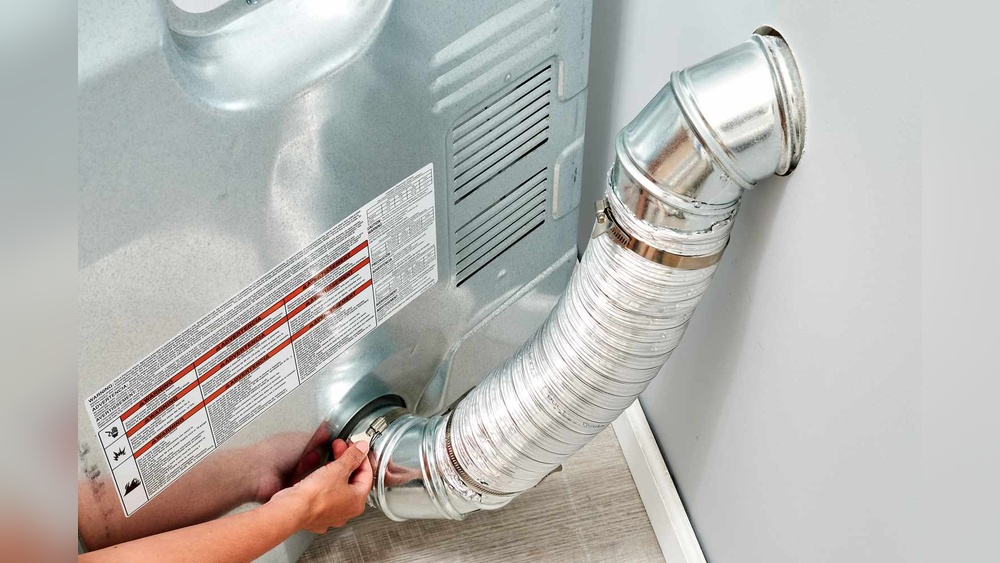
Connect Hose To Wall Vent
Connecting the dryer vent hose to the wall vent is a key step in dryer installation. This connection allows hot air and moisture to escape safely outside. A secure fit prevents leaks and improves dryer efficiency.
Take your time to ensure the hose fits well and seals tightly. This helps avoid lint buildup and reduces fire risk. Follow the steps below for a safe and effective connection.
Fit Hose Into Wall Vent
First, slide the dryer vent hose onto the wall vent pipe. Push it firmly until it covers the vent completely. The hose should fit snugly without gaps. If the hose is too long, trim it to the right size.
Use a flexible aluminum or metal hose for best airflow. Avoid plastic hoses, as they can trap lint and cause fires. Make sure the hose is not bent or crushed after fitting it.
Seal Connection
Next, secure the hose to the wall vent with a metal clamp. Tighten the clamp to hold the hose in place. This prevents the hose from coming loose during dryer use.
Apply foil tape around the joint for extra sealing. Do not use duct tape, since it can melt from heat. Proper sealing stops air leaks and keeps your home safe.

Credit: www.youtube.com
Secure The Vent Hose
Securing the dryer vent hose is an important step. It keeps the vent in place and prevents leaks. A well-secured hose helps the dryer work efficiently. It also reduces fire risks by keeping the vent clear.
Use Support Brackets
Support brackets hold the vent hose firmly against the wall. They stop the hose from sagging or pulling away. Attach brackets every few feet along the hose. This gives even support and keeps the hose straight. Use screws to fix brackets tightly. Choose brackets that fit the hose size well.
Avoid Kinks And Bends
Kinks and sharp bends block airflow in the vent hose. This lowers dryer performance and can cause overheating. Keep the hose as straight as possible. Use gentle curves if the hose must turn. Check the hose route before securing it. Clear airflow means the dryer runs better and safer.
Test The Vent System
Testing the dryer vent system is a key step after installation. It ensures the vent works properly and safely. Without testing, you may face poor drying performance or fire risks. Follow these steps to check your dryer vent connection to the wall.
Run Dryer And Check Airflow
Turn on the dryer and set it to a drying cycle. Stand near the vent outlet outside your house. Feel the airflow coming from the vent. Strong, steady airflow means the vent is clear and working well. Weak airflow may indicate a blockage or poor connection.
Inspect For Leaks
Look along the vent pipe from the dryer to the wall. Check every joint and connection point. Use your hand to feel for air escaping. Small leaks reduce vent efficiency and can cause lint buildup. Seal leaks with foil tape or replace damaged sections immediately.

Credit: www.reddit.com
Safety Tips For Vent Installation
Installing a dryer vent safely is very important. It helps stop fires and keeps your dryer working well. Follow these safety tips to make sure your vent is set up right. A safe vent protects your home and family.
Use Proper Vent Materials
Choose vent materials made for dryers only. Metal vents work best because they do not catch fire easily. Avoid plastic or vinyl vents. These materials can melt or cause blockages. Use smooth, rigid metal pipes for the best airflow. Secure connections tightly with metal clamps, not tape.
Regular Maintenance
Clean the vent often to prevent lint buildup. Lint can block air and cause fires. Check the vent at least once a year. Remove lint from both inside and outside vents. Replace any damaged or crushed pipes right away. Keep the vent path clear and straight for good airflow.
Frequently Asked Questions
How Do I Connect A Dryer Vent To A Wall?
To connect a dryer vent to a wall, measure the vent pipe length and cut it to size. Attach the vent pipe to the dryer outlet and secure it to the wall vent using clamps. Seal the connections with foil tape to prevent leaks.
What Materials Are Needed For Dryer Vent Installation?
You need a flexible or rigid metal vent pipe, foil tape, clamps, a vent hood, a screwdriver, and a drill. Avoid plastic vents, as they are fire hazards. Proper tools ensure a secure, safe, and efficient dryer vent installation.
How Do I Ensure A Secure Dryer Vent Connection?
Use metal clamps to tightly fasten the vent pipe at both ends. Apply foil tape around the joints to seal gaps. Avoid over-tightening clamps, which can damage the pipe. A secure connection prevents leaks and enhances dryer efficiency.
Can I Install A Dryer Vent Without Professional Help?
Yes, if you have basic tools and follow safety guidelines. Measure and cut pipes carefully, use proper clamps, and seal all joints. Always check local codes to ensure compliance. When in doubt, consult a professional for safety.
Conclusion
Connecting your dryer vent to the wall is simple and safe. Use the right tools and follow each step carefully. Make sure the vent fits snugly and seals well to avoid leaks. Check for bends or kinks that can block airflow.
Clean the vent regularly to keep your dryer working well. Taking these small steps helps prevent fires and saves energy. Your clothes will dry faster and your home stays safer. A well-installed vent makes a big difference in your laundry routine.