Are you ready to power up your Tesla at home without hassle? Hooking up a Tesla Wall Charger might seem tricky, but with the right steps, you can have it running smoothly in no time.
Imagine the convenience of charging your car overnight, waking up to a full battery every day. In this guide, you’ll discover simple, clear instructions to get your charger installed safely and efficiently. Keep reading, and you’ll be charging like a pro before you know it.
Credit: www.youtube.com
Choosing The Right Location
Choosing the right location for your Tesla wall charger is important for convenience and safety. The location affects how easy it is to charge your car and how well the charger fits into your space. Think about where you park your Tesla and the best spot for the charger that suits your daily needs.
Assessing Garage Or Outdoor Options
Decide if you want the charger inside your garage or outside. A garage protects the charger from weather. It also keeps the charger safe from damage or theft. Outdoor locations need a charger that can handle rain and sun. Choose a spot where the charger will not block doors or walkways.
Considering Power Source Proximity
Find a wall near your main power source. The closer the charger is to the power panel, the easier and cheaper the installation. Long wiring can increase costs and reduce power efficiency. Check if your electrical panel can handle the charger’s power needs. Consult an electrician for the best setup.
Ensuring Accessibility And Safety
Place the charger where you can reach it easily from your car. Avoid spots that make it hard to plug or unplug the charger. Make sure the charger does not create tripping hazards. Keep it away from water sources and flammable materials. Clear access improves safety for you and others.

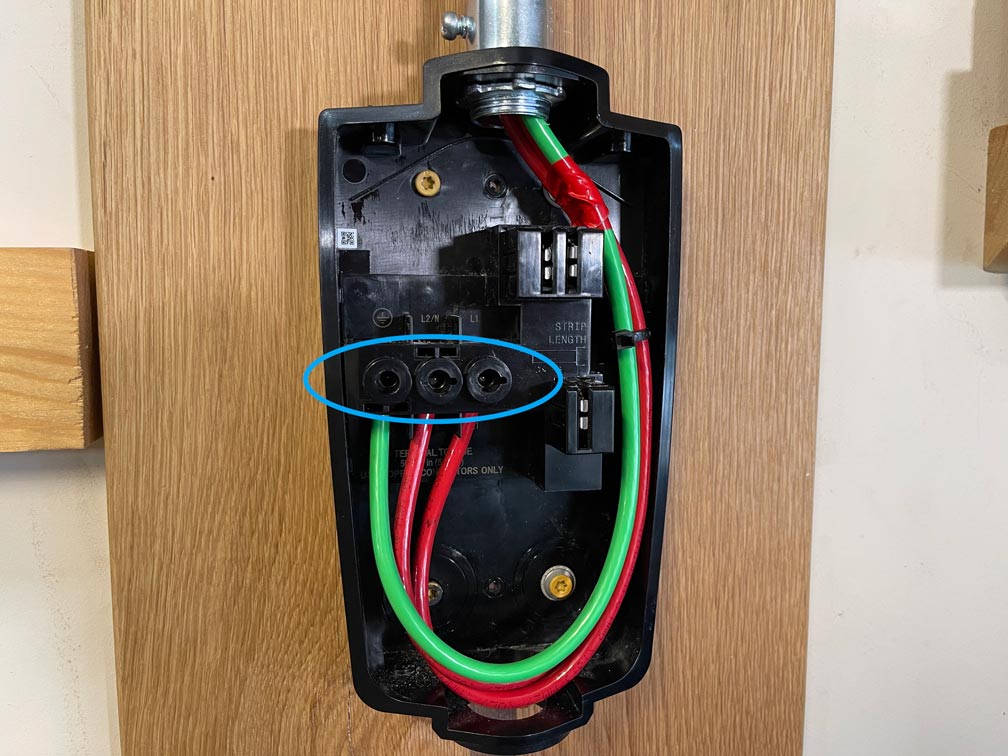
Credit: www.reddit.com
Gathering Required Tools And Materials
Gathering the right tools and materials is the first step to install a Tesla Wall Charger safely. Having everything ready helps the process go smoothly. It also saves time and avoids last-minute trips to the store. This section covers essential tools, charger parts, and safety gear you will need.
Essential Electrical Tools
Start with a good set of electrical tools. You need a voltage tester to check power. Wire strippers help remove insulation without damage. A drill with bits is useful for mounting the charger on the wall. Screwdrivers, both flathead and Phillips, are necessary for screws and wiring. A wrench or pliers will help tighten bolts. Keep a tape measure nearby for accurate placement. These tools ensure a clean and safe installation.
Wall Charger Components
The Tesla Wall Charger comes with several parts. The main unit houses the charger electronics. A mounting bracket secures the charger to the wall. You will find screws and anchors to fix the bracket. A power cable connects the charger to your home’s electrical system. Sometimes, extra wire or conduit is needed depending on your setup. Check the package carefully to confirm you have all parts before starting.
Safety Gear Checklist
Safety is critical during installation. Wear insulated gloves to protect from electric shock. Safety glasses keep debris out of your eyes. Use a dust mask if drilling into walls. Non-slip shoes help prevent falls. Make sure your work area is dry and free from hazards. Always turn off power at the breaker box before starting. Following these safety steps reduces risks and keeps you safe.
Preparing The Electrical Circuit
Preparing the electrical circuit is a key step for installing a Tesla Wall Charger. It ensures safety and proper charging performance. This step involves checking your home’s electrical capacity, installing a circuit breaker, and running wiring to the charger spot.
Checking Existing Electrical Capacity
Start by reviewing your home’s main electrical panel. Find out the total amperage your system supports. Tesla chargers need a high power supply, usually 60 amps or more. Check if your panel can handle this load. Avoid overloading your system to prevent outages or hazards.
Installing A Dedicated Circuit Breaker
A dedicated circuit breaker is essential for safety. It protects the Tesla charger and your home wiring from electrical faults. Choose a breaker that matches the charger’s amperage needs. Install it in your electrical panel, separate from other circuits. This setup helps isolate the charger in case of problems.
Running Wiring To The Charger Location
Plan the wiring route from the panel to the charger site. Use thick, high-quality wires rated for the charger’s power. Keep wires neat and secure to avoid damage. Follow local electrical codes for wiring installation. Proper wiring ensures efficient and safe charging.
Mounting The Tesla Wall Charger
Mounting the Tesla Wall Charger is the first step to a smooth installation. A strong and secure mount keeps the charger safe and easy to use. Follow these steps to put your charger in the right place.
Marking And Drilling Mounting Points
Start by choosing a good spot on the wall near your car’s parking space. Use the mounting bracket as a guide. Hold it against the wall and mark the holes with a pencil. Check the marks twice to make sure they are level. Use a drill to make holes where you marked. Use the right drill bit for the wall type, such as concrete or drywall.
Securing The Charger To The Wall
Place the mounting bracket on the drilled holes. Use strong screws or bolts to fasten it tightly. Make sure the bracket does not move. Hang the Tesla Wall Charger on the bracket. Press it firmly so it locks in place. Double-check that the charger is stable and straight.
Organizing Cable Management
Keep the charging cable neat and tidy. Use the built-in holder on the charger to wrap the cable. Avoid letting the cable hang on the ground. This prevents damage and tripping hazards. Use cable clips or ties if needed to secure the cable along the wall.
Connecting The Wiring
Connecting the wiring for a Tesla Wall Charger is a vital step. Proper wiring ensures safe and efficient charging. This part requires care and attention to detail. Follow the steps carefully to avoid issues later.
Wiring The Charger To The Circuit
Start by turning off the main power supply. Use a circuit breaker rated for the charger’s power. Run the wires from the breaker to the charger location. Use wires with the right gauge for safety. Connect the wires to the charger terminals as shown in the manual. Double-check each wire to match the correct terminal. Secure all connections tightly to avoid loose wires.
Ensuring Proper Grounding
Grounding protects you from electric shock. Attach the ground wire to the charger’s grounding terminal. Connect the other end of the ground wire to the home’s grounding system. Use a grounding rod if needed. Make sure the ground wire is the right size. Check that the ground connection is solid and free of rust. Proper grounding is essential for safety.
Verifying Connections And Safety
After wiring, inspect every connection again. Look for loose wires or wrong placements. Use a voltage tester to check for power. Turn on the breaker and test the charger. Make sure there are no sparks or unusual sounds. Confirm the charger powers up correctly. Safety checks prevent hazards and ensure the charger works well.
Testing And Activating The Charger
Testing and activating your Tesla Wall Charger is a key step after installation. This process ensures the charger works safely and efficiently. Follow these steps carefully to confirm the charger is ready for daily use.
Powering On The Circuit Breaker
Start by switching on the circuit breaker connected to the charger. This action supplies power to the unit. Watch for any signs of electrical issues, such as sparks or unusual sounds. If all looks normal, the charger is ready for the next step.
Running Initial Charger Diagnostics
The Tesla Wall Charger runs self-checks to verify its systems. These diagnostics check wiring, voltage, and communication with your vehicle. Allow the charger a few minutes to complete these tests. Lights or display indicators show the status of the diagnostics.
Confirming Proper Operation
Connect your Tesla to the charger to confirm it works correctly. The charger should start charging automatically. Monitor the charging process on your Tesla’s screen. If charging begins without errors, the installation is successful and the charger is active.
Tips For Maintenance And Troubleshooting
Maintaining your Tesla Wall Charger ensures it works safely and lasts longer. Regular care helps avoid common problems. Simple checks and quick fixes keep your charger ready to use. Knowing when to get expert help prevents damage and costly repairs.
Regular Inspection Practices
Check the charger and cable for any visible damage. Look for cracks, frayed wires, or loose connections. Clean the charging port and cable with a dry cloth. Avoid water or harsh cleaners. Make sure the charger is firmly mounted on the wall. Inspect the circuit breaker for any tripped switches.
Common Issues And Solutions
The charger may not start charging. Check if the power supply is on. Reset the circuit breaker if tripped. The cable might be damaged or dirty. Clean the connectors and try again. Sometimes the charger shows error lights. Refer to the user manual for specific codes. A software update may fix some problems. Restart the charger by unplugging it for a few seconds.
When To Call A Professional
Contact an electrician if the charger has exposed wires. If the circuit breaker keeps tripping, get help. Do not try to repair internal parts yourself. Call Tesla support for software or hardware faults. If the charger overheats or smells burnt, stop using it immediately. Professionals ensure the charger remains safe and efficient.
Credit: brianmfischer.com
Frequently Asked Questions
How Do I Install A Tesla Wall Charger At Home?
To install a Tesla Wall Charger, hire a certified electrician. They ensure proper electrical wiring, circuit breaker setup, and charger mounting for safety and efficiency.
What Power Supply Is Needed For Tesla Wall Charger?
Tesla Wall Chargers typically require a 240-volt power supply. Confirm your home’s electrical panel supports the charger’s amperage before installation to avoid overloads.
Can I Install Tesla Wall Charger Outdoors?
Yes, Tesla Wall Chargers are weather-resistant and suitable for outdoor installation. Ensure it’s mounted under some shelter for extra protection and longevity.
How Long Does Tesla Wall Charger Installation Take?
Installation usually takes 2 to 4 hours depending on existing electrical infrastructure and complexity. A professional electrician will provide a more accurate time estimate.
Conclusion
Hooking up a Tesla Wall Charger is simple with the right steps. Always turn off the power before starting the installation. Follow the instructions carefully to ensure safety and proper function. Use quality materials and check local electrical codes. Testing the charger after installation is important to confirm it works well.
Taking time during setup helps avoid future problems. Enjoy faster charging at home with your Tesla Wall Charger. Safe and correct installation keeps your car ready to go.