Have you ever wished for an extra power outlet right where your light switch is? Maybe you want to plug in a lamp, charge your phone, or power a small appliance without running long extension cords.
Adding a power outlet from a light switch might sound tricky, but with the right steps, you can do it yourself safely and efficiently. In this guide, you’ll discover exactly how to make this smart upgrade, saving you time and money while boosting your home’s convenience.
Ready to learn how? Keep reading, and you’ll be powering up in no time.

Credit: diy.stackexchange.com
Tools And Materials Needed
Adding a power outlet from a light switch requires some basic tools and materials. Having the right tools helps you work safely and efficiently. The materials ensure the new outlet works well with your home’s wiring.
Prepare all tools and materials before starting the project. This saves time and prevents mistakes. Below are the essential items you will need.
Tools Needed
- Screwdriver (flathead and Phillips)
- Wire stripper
- Voltage tester
- Drill with bits
- Needle-nose pliers
- Fish tape or wire puller
- Electrical tape
- Level
Materials Required
- Electrical outlet (receptacle)
- Outlet cover plate
- Electrical wire (14/2 or 12/2 cable)
- Wire nuts
- Electrical box (new or old work type)
- Circuit breaker (if needed)
Safety Gear
- Insulated gloves
- Safety glasses
- Dust mask

Credit: www.youtube.com
Safety First
Safety is the top priority when adding a power outlet from a light switch. Working with electricity can be dangerous. Taking the right steps protects you and your home.
Before starting, understand the risks. Electricity can cause shocks, burns, or fires. Simple mistakes can lead to serious injury. Follow safety rules carefully.
Always switch off the circuit breaker that controls the light switch. Use a voltage tester to check if the power is off. Never trust the switch position alone.
Use Proper Tools And Equipment
Use insulated tools designed for electrical work. Wear rubber-soled shoes and safety glasses. Keep your hands dry and avoid working in wet areas.
Understand Wiring Basics
Know the difference between live, neutral, and ground wires. Label wires before disconnecting them. Incorrect connections can cause shorts or shocks.
Follow Local Electrical Codes
Check local rules for adding outlets. Codes ensure safe and reliable wiring. Using the correct materials and methods prevents hazards.
When To Call A Professional
If unsure about any step, hire a licensed electrician. Professionals handle complex wiring safely. It is better to be safe than sorry.
Turn Off The Power
Turning off the power is the first and most important step before starting any electrical work. It keeps you safe from electric shocks. Always treat electricity with respect.
Shutting off the power stops current flow to the light switch and wires. This helps prevent accidents or damage to your home wiring. Never skip this step.
Locate The Circuit Breaker
Find the circuit breaker box in your home. It is usually in the basement, garage, or utility room. Look for labels that show which breaker controls the light switch.
Switch Off The Correct Breaker
Flip the breaker switch that matches the light switch off. Turn it fully to the off position. This cuts power to the switch and outlet area.
Test The Power Is Off
Use a voltage tester or a non-contact tester on the light switch wires. The tester should show no power. Double-check to be sure the power is off.
Wear Safety Gear
Put on insulated gloves and safety glasses before handling wires. These protect you from accidental shocks or sparks. Safety gear is a must.
Remove The Light Switch Cover
Start by turning off the power at the circuit breaker. Then, use a screwdriver to carefully remove the light switch cover. This step gives you access to the wiring behind the switch.
Start by turning off the power at the circuit breaker. This step is very important for safety.
Next, find the screws holding the light switch cover. They are usually small and located at the top and bottom.
Use a screwdriver to carefully remove these screws. Keep them safe for later use.
Gently pull the cover away from the wall. It should come off easily without force.
Check for any paint or debris that might hold the cover tight. Clean if needed.
Now, the light switch and wires are visible and ready for the next step.
Inspect The Existing Wiring
Before adding a power outlet from a light switch, inspect the existing wiring carefully. This step ensures safety and prevents electrical problems. Understanding the current wiring layout helps you plan the new outlet connection properly.
Turn off the power at the circuit breaker. Use a voltage tester to confirm no electricity flows to the switch. Safety first.
Identify The Wires In The Switch Box
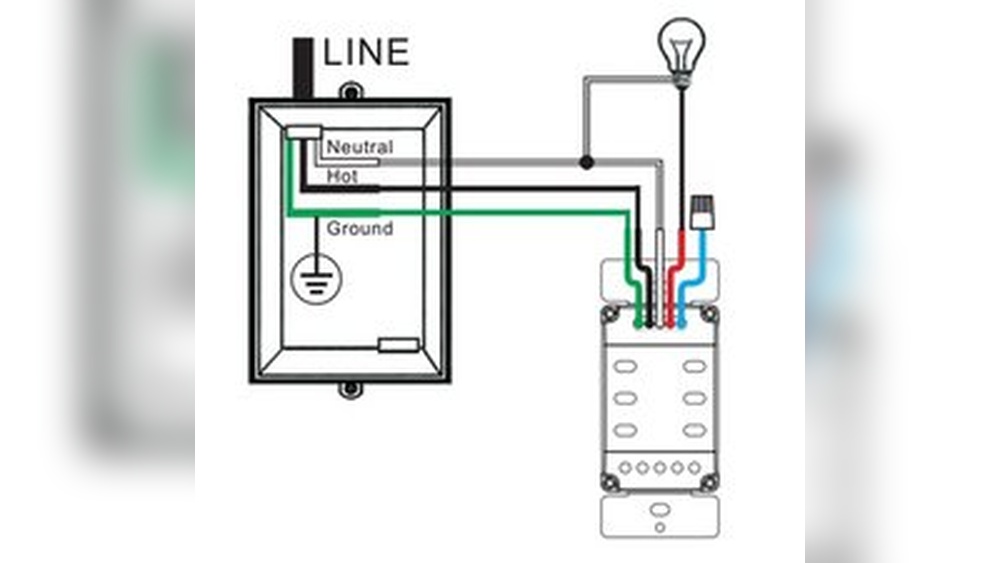
Open the light switch cover plate to see the wires inside. Most switches have three wires: a hot wire, a neutral wire, and a ground wire. The hot wire supplies power, the neutral wire completes the circuit, and the ground wire protects against shocks.
Check For A Neutral Wire
Not all switch boxes have a neutral wire. The neutral wire is essential for adding an outlet. If you don’t find one, you might need to run a new wire from the electrical panel or another outlet.
Examine Wire Condition
Look for damaged or frayed wires. Old or worn wires can cause shorts or fires. Replace any wires that look unsafe before proceeding with the installation.
Understand The Circuit Load
Know the total load on the circuit. Adding an outlet can increase the electrical load. Use a circuit tester to check if the circuit can handle extra devices safely.
Choose The Right Outlet Location
Choosing the right spot for your new power outlet is key. The location affects how easy it is to use and how safe it is. Think about where you need power most. Plan carefully before you start any wiring work.
Consider The Purpose Of The Outlet
Decide what you will plug in. Small appliances need close access. Larger devices may need more space. Match the outlet location to your needs.
Check Wall Space And Obstacles
Look for clear wall areas without pipes or studs. Avoid placing outlets behind furniture or appliances. Make sure the spot is easy to reach.
Follow Electrical Codes And Safety Rules
Know local rules for outlet placement. Keep outlets away from water sources like sinks. Use proper height and spacing as required by code.
Think About Future Use
Choose a spot that works for now and later. Consider adding extra outlets for convenience. Plan for changes in room layout or technology.
Run The New Wiring
Running new wiring from a light switch to add a power outlet is a key step. It delivers electricity safely to the new outlet. This process needs careful planning and correct tools. Follow clear steps for a smooth wiring job.
Safety comes first. Switch off the power at the breaker box. Test the light switch with a voltage tester. Confirm no electricity flows before handling wires.
Choose The Right Cable
Select cable that fits your circuit needs. Usually, 14/2 or 12/2 NM cable works for outlets. Match the cable gauge with your breaker size for safety.
Measure And Cut The Wire
Measure the distance from the light switch box to the new outlet location. Add extra length for slack. Cut the cable carefully with wire cutters.
Route The Cable
Feed the cable through walls or ceilings using a fish tape. Avoid sharp bends that could damage the wire. Keep the cable away from heat and moisture.
Strip And Prepare The Wires
Strip about 3/4 inch of insulation from each wire end. Use wire strippers for a clean cut. Twist the wire strands to prevent fraying.
Connect To The Light Switch Box
Attach the new cable’s wires to the switch box wires. Match colors: black to black, white to white, and ground to ground. Use wire nuts to secure connections tightly.
Connect The Outlet To The Switch Box
Connecting the outlet to the switch box is a key step in this project. This part makes sure the outlet gets power safely from the switch wiring. It needs careful work to avoid mistakes.
Follow each step clearly. Pay attention to wire colors and connections. Use the right tools and parts for the job.
Start by turning off the power at the circuit breaker. This stops any electric shock risk. Use a voltage tester to confirm power is off in the switch box.
Remove The Switch Cover And Inspect Wires
Unscrew the switch cover plate. Pull out the switch carefully. Check how wires connect to the switch. Note which wire is hot, neutral, and ground.
Run Cable From Switch Box To Outlet Location
Use a cable rated for your home wiring. Run it from the switch box to where the outlet will go. Leave extra wire length for easy connection.
Connect Wires To The Outlet
Strip the cable ends. Connect black (hot) wire to the brass terminal. Connect white (neutral) wire to the silver terminal. Attach the bare or green wire to the ground screw.
Connect Wires In The Switch Box
Connect the new cable’s black wire to the switch’s load terminal. Tie the white wires together with a wire nut. Attach all ground wires together and to the box if metal.
Secure The Outlet And Switch
Push wires neatly inside their boxes. Screw the outlet and switch back in place. Attach cover plates to finish.
Install The New Power Outlet
Installing a new power outlet from a light switch is a useful skill. It gives you extra power points where you need them. The process is straightforward but requires care and attention to detail. Follow these steps to install your new outlet safely and correctly.
Safety first. Switch off the power at the circuit breaker. Use a voltage tester to check the wires. Ensure there is no electricity flowing before you start working.
Prepare The Outlet Box
Remove the light switch cover plate. Unscrew the switch and pull it out gently. Check the electrical box for enough space for the new outlet. Use a box extender if needed.
Connect The Wires To The Outlet
Identify the hot, neutral, and ground wires. Connect the hot wire to the brass terminal. Attach the neutral wire to the silver terminal. Connect the ground wire to the green screw. Tighten all screws firmly but do not over-tighten.
Secure The Outlet In The Box
Push the wires carefully back into the box. Align the outlet with the screw holes. Screw the outlet into place. Make sure it sits flush with the wall surface.
Attach The Outlet Cover Plate
Place the cover plate over the outlet. Screw it in securely. Check that the outlet and plate fit well without gaps or loose parts.
Turn On The Power And Test
Switch the power back on at the breaker. Use a tester or plug in a device to check the outlet. Ensure it works properly and safely before use.

Credit: www.do-it-yourself-help.com
Test The Outlet
Testing the outlet is a crucial step after installation. It ensures the outlet works safely and correctly. This step helps avoid electrical hazards and confirms proper wiring.
Follow these simple steps to test the outlet effectively. Use the right tools and take safety precautions. Testing gives peace of mind before regular use.
Use A Voltage Tester
Start by using a voltage tester. This tool checks if electricity flows to the outlet. Place the tester’s probes inside the outlet slots. A light or sound from the tester means power is present.
Check The Outlet With A Plug-in Device
Next, plug in a device like a lamp or phone charger. Turn the device on to see if it works. If the device powers up, the outlet is functioning well.
Inspect For Loose Connections
Look closely at the outlet for any loose wires or parts. Loose connections can cause sparks or shocks. Tighten screws and secure wires if needed before testing again.
Test The Ground Connection
Use a three-prong tester to check the ground wire. Proper grounding prevents electrical shocks. If the tester shows a problem, fix the ground wire immediately.
Restore Power And Final Checks
Restoring power and performing final checks is the last step after adding a power outlet from a light switch. This step ensures everything works safely and correctly. Careful checks prevent damage and keep your home safe.
Restore Power To The Circuit
Turn the main breaker back on slowly. This restores electricity to the switch and outlet. Watch for any sparks or unusual sounds. If you notice anything strange, turn the breaker off immediately.
Test The New Power Outlet
Use a small appliance or a voltage tester to check the outlet. Plug in a lamp or phone charger to confirm power. The outlet should work without flickering or cutting out. This proves the wiring is correct.
Check The Light Switch Operation
Toggle the light switch on and off. The connected light should respond normally. The new outlet must not affect the switch’s function. If the light flickers or fails, review your wiring.
Inspect For Loose Connections
Turn off the power again before opening the switch box. Tighten any loose wires or screws. Loose connections can cause sparks or outages later. Make sure all wires fit snugly in their terminals.
Secure The Outlet And Switch Covers
Replace the outlet and switch covers carefully. Secure them with screws to avoid gaps. Covers protect wires and prevent accidental shocks. Check that covers fit flush against the wall.
Common Mistakes To Avoid
Adding a power outlet from a light switch can be a useful upgrade. It gives you more places to plug in devices. But many people make mistakes that cause problems or unsafe wiring. Avoid these common errors to keep your project safe and working well.
Incorrect Wiring Connections
Mixing up wires is a frequent issue. The hot, neutral, and ground wires must connect correctly. Wrong connections can cause short circuits or shocks. Always double-check each wire before securing it.
Not Turning Off Power
Working with live wires is dangerous. Always switch off the circuit breaker before starting. Test the wires with a voltage tester to be sure power is off. This step protects you from electric shocks.
Using The Wrong Outlet Type
Not all outlets are suitable for every space. Choose an outlet rated for the room’s voltage and usage. For kitchens and bathrooms, use GFCI outlets to prevent shocks. Pick the right type to meet safety rules.
Ignoring Local Electrical Codes
Each area has rules for electrical work. Check your local codes before starting. Following these rules ensures your wiring is legal and safe. Ignoring codes can lead to fines or failed inspections.
Overloading The Circuit
Adding too many outlets on one circuit can cause overloads. This can trip breakers or damage wiring. Calculate the total load and avoid exceeding the circuit’s limit. Spread outlets across different circuits if needed.
Poor Outlet Placement
Placing outlets in hard-to-reach spots is a common mistake. Think about convenience and safety. Avoid locations near water or heat sources. Plan outlet spots where you need power most.
Frequently Asked Questions
Can I Add A Power Outlet To An Existing Light Switch?
Yes, you can add a power outlet to a light switch by wiring it correctly. Turn off power before starting. Ensure you follow electrical codes and use proper tools for safety.
What Tools Are Needed To Add An Outlet From A Light Switch?
You need a screwdriver, wire stripper, voltage tester, electrical box, outlet, wire nuts, and electrical tape. These tools help you work safely and efficiently on the installation.
Is It Safe To Install An Outlet From A Light Switch?
Yes, if you follow safety guidelines and local electrical codes. Always turn off the circuit breaker before working. If unsure, consult a licensed electrician to avoid hazards.
How Do I Find The Right Wires For The New Outlet?
Identify the hot, neutral, and ground wires in the switch box using a voltage tester. Connect the new outlet wires accordingly to ensure proper function and safety.
Conclusion
Adding a power outlet from a light switch is a useful skill. It gives you more places to plug in devices. Always turn off the power before you start working. Use the right tools and follow safety rules carefully. Take your time and double-check each step.
This simple upgrade can make your room more functional. With patience and care, you can do it yourself. Electrical work is easier than many think. Try it and enjoy the convenience of extra outlets.