Have you ever tried to remove a drywall anchor and ended up frustrated, unsure of what to do next? You’re not alone.
These little anchors can be stubborn, and pulling them out wrong can damage your wall. But don’t worry—getting that drywall anchor out doesn’t have to be a headache. In this guide, you’ll discover simple, effective ways to remove drywall anchors without causing harm.
Whether you want to fix a hole or replace the anchor, you’ll find easy tips to make the job quick and stress-free. Keep reading to learn how to take control and get your walls looking perfect again.
Tools Needed
Removing a drywall anchor requires the right tools. Having the correct tools makes the task easier and safer. This section lists the essential tools for the job. Each tool has a specific role to help remove the anchor without damage.
Flathead Screwdriver
A flathead screwdriver helps pry out the anchor gently. It fits under the anchor’s lip to lift it out. Choose a size that matches the anchor for better grip.
Pliers
Pliers provide strong grip to pull the anchor. Needle-nose pliers work well for small or deep anchors. Use steady force to avoid breaking the drywall.
Drill With Screwdriver Bit
A drill with a screwdriver bit removes anchors that screw in. It spins the anchor out smoothly. Use low speed to control the process carefully.
Utility Knife
A utility knife cuts around the anchor to loosen it. This helps if the anchor is stuck tight. Score gently to protect the surrounding wall.
Spackle And Sandpaper
After removing the anchor, repair the wall with spackle. Sandpaper smooths the surface for a clean finish. These tools prepare the wall for painting or new anchors.
Types Of Drywall Anchors
Drywall anchors come in different types. Each type works best for certain wall weights and materials. Knowing the types helps you remove them safely. Here are the common types of drywall anchors you may find in your home.
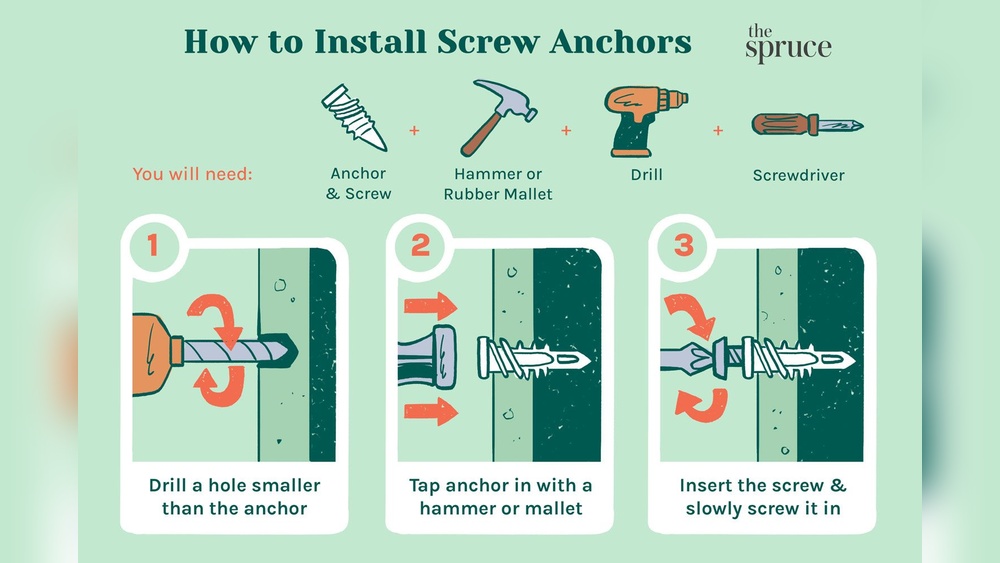
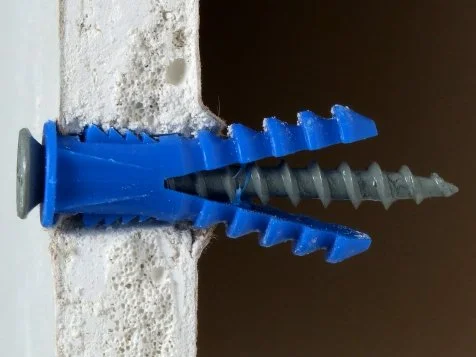
Plastic Expansion Anchors
Plastic expansion anchors are the most common type. They are small and made of plastic. You push them into a drilled hole. When you insert a screw, the anchor expands and holds tight. They work well for light objects like picture frames.
Threaded Anchors
Threaded anchors look like screws with wide threads. You twist them into the drywall without a drill. The threads grip the wall firmly. They hold medium-weight items like shelves or mirrors. Removing them may need unscrewing or pulling gently.
Toggle Bolts
Toggle bolts have metal wings that open inside the wall. You push the folded wings through a hole. Once inside, the wings spread to hold strong. These anchors support heavy items like cabinets. Removing them can be tricky because wings stay inside.
Molly Bolts
Molly bolts are metal anchors that expand behind the wall. You insert them into a drilled hole and tighten the screw. The sleeve expands, locking the anchor in place. They hold medium to heavy objects securely. To remove, you may need to unscrew and pull carefully.
Preparation Steps
Preparation is the key to removing a drywall anchor safely and easily. Taking a few simple steps before you start will save time and prevent damage. You need the right tools and a clear plan.
Getting ready helps you work smoothly and avoid mistakes. Follow these preparation steps to get started.
Gather Necessary Tools
Collect basic tools like a screwdriver, pliers, and a utility knife. A drill may also help for stubborn anchors. Having everything ready makes the process faster.
Clear The Work Area
Remove any items near the anchor. This keeps the area safe and prevents damage to your belongings. A clean space helps you focus on the task.
Protect The Wall Surface
Use painter’s tape around the anchor. This protects the wall from scratches or dents. It also marks the spot clearly for easy work.
Turn Off Power If Needed
Check for electrical wires behind the wall. Switch off power to the area if unsure. Safety first to avoid accidents while removing the anchor.
Credit: www.hgtv.com
Removing Plastic Expansion Anchors
Plastic expansion anchors hold screws firmly in drywall. Removing them can be tricky but not impossible. These anchors expand behind the wall to create a strong grip. This makes pulling them out a bit challenging.
Removing plastic anchors carefully avoids wall damage. Patience and the right tools help a lot. Two common methods work well for most situations. Either pull the anchor out or push it through the wall.
Using Pliers
Grab the anchor’s edge with needle-nose pliers. Pull it straight out slowly. Wiggle gently if it feels stuck. Avoid twisting hard to protect the drywall.
Some anchors come out easily with steady force. Others may break but still come free. Clean the hole after removal before patching or reusing.
Pushing Through The Wall
Use a screwdriver or similar tool to push the anchor. Apply steady pressure to move it inside the wall cavity. This hides the anchor and leaves a small hole.
Push anchors work best if pulling fails. Patch the hole with spackle or drywall compound afterward. Smooth the surface for a clean finish.
Removing Threaded Anchors
Removing threaded drywall anchors can be simple with the right approach. These anchors screw into the wall and hold items firmly. Sometimes, you need to take them out without damaging the drywall. Two common ways help with this task.
One method involves unscrewing the anchor by hand or with a tool. Another method uses a drill to remove stubborn anchors. Both techniques work well depending on the anchor’s condition and your tools.
Unscrewing Method
Start by grabbing the anchor’s head with pliers or a screwdriver. Turn the anchor counterclockwise to unscrew it from the wall. If it turns easily, continue until it comes out completely. If it resists, avoid forcing it to prevent wall damage.
Sometimes, the anchor may spin without moving out. In that case, try pushing it in slightly while turning. This can help loosen the anchor’s grip inside the drywall. Patience is key for a clean removal.
Drilling Out Anchors
Drilling works well for anchors stuck too tight to unscrew. Use a drill bit slightly smaller than the anchor’s diameter. Drill slowly into the center of the anchor. This breaks the anchor apart inside the wall.
Once drilled, the anchor pieces can be pulled out with pliers. Take care not to drill too deep and damage the drywall. Drilling is a quick solution for anchors that won’t budge.
Removing Toggle Bolts
Removing toggle bolts from drywall can be tricky. These anchors have spring-loaded wings that open behind the wall to hold heavy items. Pulling them out is not like removing simple screws or plastic anchors. It needs a careful approach to avoid wall damage. Follow these easy steps to remove toggle bolts safely and cleanly.
Accessing The Toggle
First, locate the toggle bolt head on the wall surface. Use a screwdriver to turn and loosen the bolt. Unscrew it slowly until the bolt comes out. The toggle wings stay inside the wall cavity. You cannot pull them out by the bolt alone. You need to access the toggle wings from behind the drywall.
Cutting And Pushing Toggle
Use a utility knife to cut around the hole gently. Make the hole bigger enough to reach inside. Insert a long, thin tool like needle-nose pliers or a wire hanger. Grab the toggle wings with the tool. Push the wings into the wall cavity. The wings will fall inside the wall. Patch the hole afterward for a clean finish.
Removing Molly Bolts
Removing molly bolts can seem tricky at first. These anchors hold tight in drywall for a strong grip. They have two main parts: the bolt and the sleeve. Knowing how to remove each part helps avoid wall damage. Follow these simple steps to get molly bolts out safely.
Unscrewing The Bolt
Start by turning the bolt counterclockwise. Use a screwdriver that fits the bolt head well. Keep turning until the bolt is loose or comes out. Sometimes, the bolt may spin but not come out. In that case, try pulling it gently while turning.
Pulling Out The Sleeve
After removing the bolt, the sleeve stays in the wall. The sleeve is metal and spreads inside the drywall. Use pliers to grab the sleeve firmly. Pull straight out with steady force. If it does not move, try wiggling it gently to loosen.
Repairing The Wall After Removal
After removing a drywall anchor, the wall will have holes or marks. Fixing these spots is key to keep the wall smooth and neat. Repairing the wall makes it ready for painting or hanging new items. The process is simple and takes little time.
Filling Holes
Start by cleaning the hole. Remove any loose drywall or debris. Use a putty knife to apply spackling paste or joint compound. Press it firmly into the hole. Smooth the surface to match the wall. Let it dry completely. For bigger holes, apply in layers. Each layer should dry before the next.
Sanding And Painting
Once the filler is dry, sand it gently with fine sandpaper. The goal is a flat, even surface. Wipe off dust with a damp cloth. Choose paint that matches the wall color. Use a small brush or roller to cover the repaired spot. Blend the edges with the rest of the wall. Let the paint dry fully. Repeat if needed for full coverage.
Tips For Easy Anchor Removal
Removing drywall anchors can be tricky. Some anchors are easy to pull out. Others need a bit more care. Following simple tips helps avoid wall damage. These tips save time and effort.
Use the right tools. A screwdriver, pliers, or a drill can help. Gently work the anchor loose. Patience is key.
Use Pliers For Easy Grip
Grip the anchor firmly with pliers. Twist slowly while pulling outward. This loosens the anchor. Avoid sudden force. It can damage the drywall.
Push Anchor Through The Wall
Push small anchors into the wall cavity. Use a screwdriver or similar tool. This removes the anchor cleanly. You may patch the hole afterward.
Unscrew Anchors With A Screwdriver
Insert a screwdriver into the anchor. Turn counterclockwise to unscrew. Pull the anchor out as it loosens. This works well for threaded anchors.
Use A Drill To Remove Stubborn Anchors
Drill slowly into the anchor center. The drill bit breaks the anchor inside. Remove broken pieces carefully. This method suits tough anchors.
Patch And Repair After Removal
Fill small holes with spackle or wall putty. Smooth the surface with sandpaper. Paint over once dry. Your wall looks as good as new.

Credit: theturquoisehome.com
:max_bytes(150000):strip_icc()/how-to-remove-drywall-anchors-7562285-02-c01abbfe63374ad3a7bc1e52d0c15bb2.JPG)
Credit: www.thespruce.com
Frequently Asked Questions
How Do I Remove A Drywall Anchor Without Damage?
To remove a drywall anchor without damage, gently pry it out with a flathead screwdriver. For stubborn anchors, push them through the wall carefully. Avoid excessive force to prevent wall damage.
Can I Reuse Drywall Anchors After Removal?
Most drywall anchors lose their grip once removed and are not reusable. It’s best to replace them with new anchors for secure mounting and safety.
What Tools Do I Need To Take Out Drywall Anchors?
You typically need a flathead screwdriver, needle-nose pliers, and sometimes a drill. These tools help you pry, pull, or drill out the drywall anchor safely.
How To Fix Holes After Removing Drywall Anchors?
Fill holes with spackle or joint compound using a putty knife. Once dry, sand smooth and repaint for a clean, seamless finish.
Conclusion
Removing a drywall anchor takes patience and the right method. Small tools like pliers or a screwdriver can help a lot. Gently pulling or twisting usually works well. Avoid damaging the wall by going slow. After removal, fill the hole for a smooth finish.
This keeps your wall neat and ready for new fixtures. Practice makes the task easier each time. Simple steps lead to great results every time.