Are you looking to add extra security and privacy to your interior doors? Installing a deadbolt is one of the easiest and most effective ways to do just that.
You might think deadbolts are only for exterior doors, but they can make a big difference inside your home too. In this guide, you’ll learn exactly how to install a deadbolt on your interior door, step by step. No complicated tools or skills needed—just simple instructions that anyone can follow.
Keep reading, and by the end, you’ll have a stronger, safer door that gives you peace of mind every day.
Credit: www.homedepot.com
Choosing The Right Deadbolt
Choosing the right deadbolt for an interior door is important for safety and convenience. Not all deadbolts fit every door or serve the same purpose. Picking the right one helps protect your home and makes installation easier.
Types Of Deadbolts
Single-cylinder deadbolts use a key outside and a thumb turn inside. They are common and easy to use. Double-cylinder deadbolts need a key on both sides. They add extra security but can be tricky in emergencies. There are also keyless deadbolts with a keypad or fingerprint sensor. These offer convenience without keys but need batteries.
Compatibility With Interior Doors
Check the door thickness before buying a deadbolt. Most interior doors are thinner than exterior ones. Some deadbolts fit doors 1 3/8 to 1 3/4 inches thick. Also, consider the door material. Wood, metal, and hollow-core doors need different installation techniques. Choose a deadbolt that matches your door type and size for a secure fit.

Credit: www.homedepot.com
Tools And Materials Needed
Installing a deadbolt on an interior door needs the right tools and materials. Having everything ready makes the process smooth and fast. Missing tools can cause delays and mistakes. This guide lists all essentials to prepare before starting.
Essential Tools
- Drill with drill bits for wood and metal
- Screwdriver, both flathead and Phillips
- Measuring tape for precise marks
- Chisel to create space for the lock
- Hammer for the chisel work
- Pencil to mark drilling spots
- Level to ensure the lock is straight
- Safety glasses to protect your eyes
Materials Checklist
- Deadbolt lock set, including latch and strike plate
- Wood screws matching the lock set
- Door edge reinforcement plate (optional for extra strength)
- Wood filler or putty for any touch-ups
- Painter’s tape to mark drilling points accurately
Preparing The Door
Preparing the door is the first step in installing a deadbolt on an interior door. This step ensures the lock fits perfectly and works smoothly. Taking time to prepare the door helps avoid mistakes and makes the installation easier.
Proper preparation also ensures the deadbolt will secure the door correctly. Start by examining the door and gathering the right tools. Measuring and marking the door accurately is crucial before drilling any holes.
Measuring And Marking
Use a tape measure to find the right height for the deadbolt. Most deadbolts install about 6 to 12 inches above the door handle. Mark this spot clearly on the door edge and face.
Check the deadbolt template or instructions for exact measurements. Draw a straight line across the door face at the marked height. This line guides where to drill the hole for the lock.
Mark the center point on the door edge for the bolt hole. Double-check measurements before moving to drilling. Accurate marks prevent damage and ensure a smooth fit.
Drilling Holes
Choose a drill bit size that matches the deadbolt cylinder and bolt. Start by drilling the hole in the door face at the marked spot. Drill slowly to avoid splintering the wood.
Next, drill the hole on the door edge for the bolt. Keep the drill straight to make a clean hole. Remove any wood debris after drilling.
Test fit the deadbolt in the holes before final installation. Adjust the holes slightly if the lock does not fit well. Clean holes make the deadbolt work smoothly.
Installing The Deadbolt
Installing a deadbolt on an interior door adds extra security and privacy. It is a simple process anyone can follow with basic tools. Start by preparing the door and gathering all parts of the deadbolt kit. Clear instructions help make the task easy and quick.
Focus on fitting the deadbolt mechanism first. Then, secure the strike plate to complete the installation. Each step ensures the lock works smoothly and stays strong over time.
Fitting The Deadbolt Mechanism
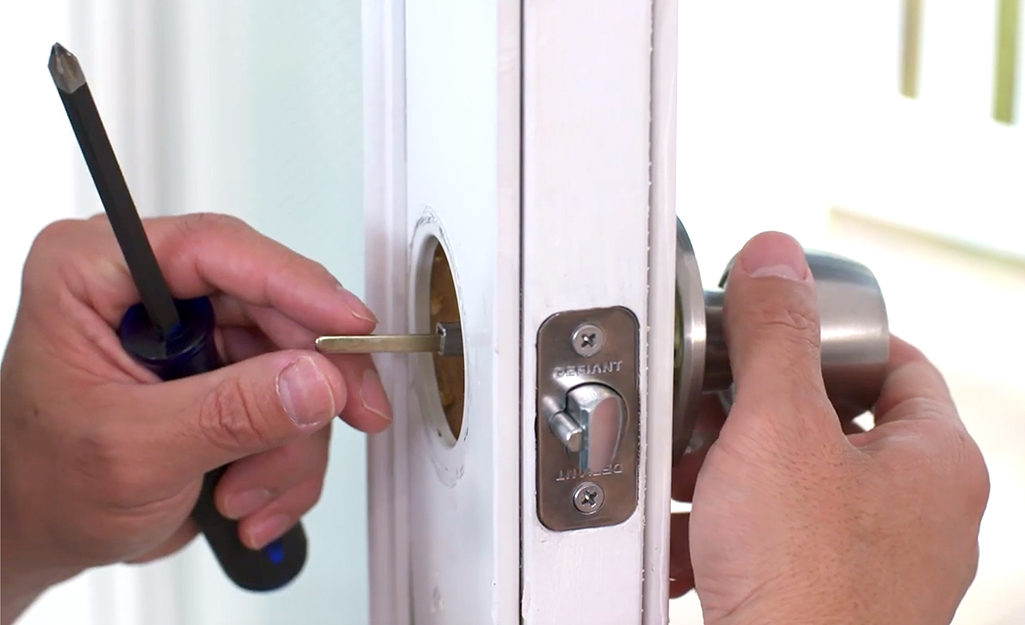
Begin by marking the correct height for the deadbolt on the door edge. Use a drill to create a hole for the bolt and a larger hole for the lock cylinder on the door face. Insert the deadbolt mechanism into the edge hole. Make sure the bolt moves freely when you turn the thumb turn or key. Attach the lock cylinder on the door face, aligning it with the bolt. Secure both parts with screws provided. Check for smooth operation before moving on.
Securing The Strike Plate
Close the door and mark where the bolt touches the door frame. Drill a hole in the frame to fit the bolt. Place the strike plate over the hole. Use a chisel to create a shallow recess so the plate sits flush with the frame. Screw the plate firmly into place. Test the deadbolt to confirm it locks and unlocks without resistance. A well-secured strike plate holds the bolt firmly, improving security and stability.
Testing And Adjustments
Testing and adjusting your deadbolt ensures the lock works smoothly. This step helps avoid problems later. It also improves security and convenience. Take your time to test and adjust carefully. Small changes make a big difference in performance.
Checking Lock Functionality
Start by locking and unlocking the deadbolt several times. Check if the key turns without resistance. The bolt should move in and out easily. Test the door from both sides. Make sure the lock holds the door firmly closed.
Check the bolt alignment with the strike plate. The bolt must slide into the hole smoothly. If it sticks or jams, note where it happens. Also, listen for any unusual sounds during operation.
Making Necessary Adjustments
Adjust the strike plate if the bolt does not fit well. Loosen screws and move the plate slightly. Tighten screws after finding the right position. If the bolt rubs against the door frame, sand or chisel the frame.
Check the lock mechanism inside the door. Tighten any loose screws on the lock and handle. Lubricate the lock with graphite or a similar lubricant. Avoid oil-based lubricants as they attract dust.
Test the lock again after each adjustment. Repeat until the lock works smoothly and securely. Proper testing and adjustments ensure your deadbolt protects well.
Maintenance Tips
Maintaining your deadbolt on an interior door helps it work smoothly for years. Regular care stops problems before they start. It keeps your door secure and easy to lock or unlock. Here are simple maintenance tips to follow.
Regular Cleaning
Dust and dirt can build up in the deadbolt. Use a soft cloth to wipe the lock every few weeks. Avoid using water or harsh cleaners. These can damage the metal and finish. Clean both the outside and inside parts carefully. Keep the keyhole free from dust to prevent jamming.
Lubrication And Repairs
Lubricate the deadbolt with a graphite or silicone-based lubricant. Spray a small amount into the keyhole and on moving parts. Do this twice a year to keep the lock working smoothly. Avoid using oil-based lubricants as they attract dirt. Check for loose screws or parts regularly. Tighten any loose screws to avoid damage. Replace worn or broken parts immediately to maintain security.

Credit: support.shopyalehome.com
Frequently Asked Questions
How Do I Install A Deadbolt On An Interior Door?
To install a deadbolt on an interior door, first measure and mark the door. Drill holes for the lock and strike plate, then secure the deadbolt with screws. Test the lock to ensure smooth operation before finishing.
What Tools Are Needed For Deadbolt Installation?
You need a drill, drill bits, screwdriver, measuring tape, pencil, and chisel. These tools help create precise holes and secure the deadbolt properly to the door.
Can I Install A Deadbolt On Any Interior Door?
Most interior doors can accommodate a deadbolt if they are solid or hollow core. Hollow doors may need reinforcement for secure installation and optimal lock performance.
How Long Does It Take To Install A Deadbolt?
Installing a deadbolt typically takes 30 to 60 minutes. The time depends on your experience and door type but is generally a quick DIY project.
Conclusion
Installing a deadbolt on an interior door adds extra security and peace. Follow the steps carefully to fit it right. Use the right tools and measure twice before drilling. A properly installed deadbolt keeps rooms safer and more private. Take your time and check each part as you go.
Soon, you will have a stronger, safer door at home. Simple steps make a big difference in home safety.