Are you struggling to fit a new deadbolt lock into your door frame because the hole is too small? You’re not alone, and the good news is, you don’t have to replace the entire door or frame.
Making the deadbolt hole bigger is easier than you might think—and it’s something you can do yourself with just a few tools. You’ll discover simple, step-by-step methods to safely enlarge the hole, ensuring your lock fits perfectly and your door stays secure.
Keep reading, and by the end, you’ll have the confidence to tackle this task with ease.
Tools You’ll Need
Making a deadbolt hole bigger in a door frame needs the right tools. Using the proper tools helps the job go smoothly. It also keeps the door frame safe from damage. Below are the main tools you will need for this task.
Drill And Bits
A power drill is essential for making the hole larger. You need drill bits in different sizes to match the deadbolt. Start with a smaller bit to create a guide hole. Then use a larger bit to widen the hole carefully. Choose bits made for wood or metal, depending on your door frame.
Chisel And Hammer
A sharp chisel helps clean up the edges of the hole. Use a hammer to tap the chisel gently. This removes rough spots and shapes the hole to fit the deadbolt. Take your time to avoid splitting the wood or damaging the frame.
Measuring Tools
Accurate measurements are key to a proper fit. Use a tape measure or ruler to check the hole size. A pencil helps mark where to drill or chisel. Double-check measurements before starting to avoid mistakes.
Safety Equipment
Protect yourself while working. Safety goggles keep dust and wood chips out of your eyes. Work gloves protect your hands from splinters and sharp edges. Wear a dust mask if the job creates a lot of debris. Safety first makes the project safer and easier.

Credit: www.reddit.com
Measuring The Existing Hole
Measuring the existing hole in your door frame is the first step. Accurate measurements help you avoid mistakes. You need the right size to fit the deadbolt securely. Take your time and measure carefully. This ensures the new hole will be perfect for the lock.
Check Hole Diameter
Use a tape measure or caliper to find the hole diameter. Measure across the center of the hole from one edge to the other. Write down the exact number. Compare it to the deadbolt size you want to install. This tells you how much larger the hole needs to be.
Mark New Dimensions
Next, mark the new hole size on the door frame. Use a pencil and a round template matching the deadbolt diameter. Trace the outline carefully around the existing hole. This mark will guide your drilling or chiseling. Be sure the new mark is centered on the old hole.
Preparing The Door Frame
Start by marking the deadbolt hole on the door frame clearly. Use a drill or chisel to carefully widen the hole, ensuring a snug fit for the lock. Check the edges and smooth any rough spots to avoid damage.
Remove Old Hardware
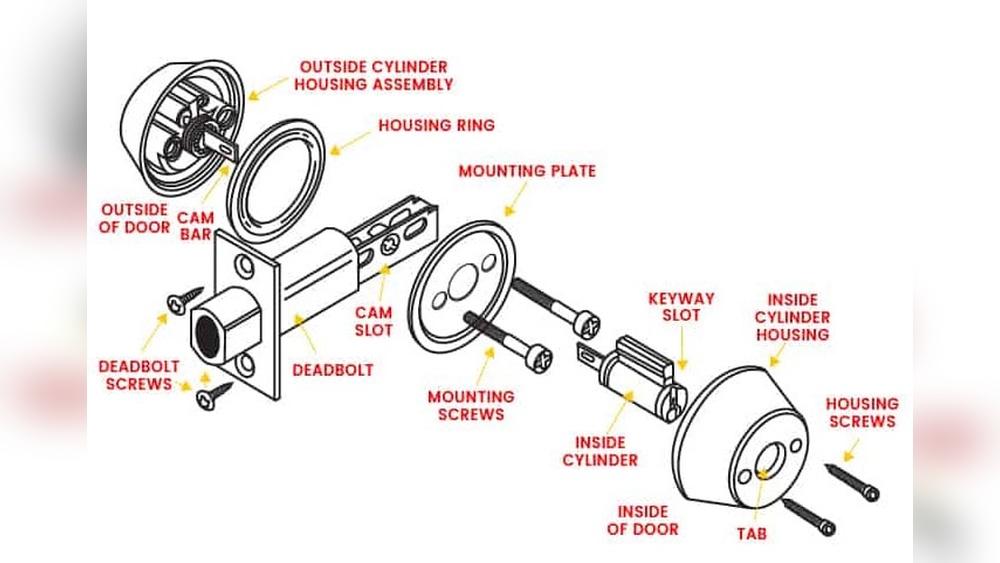
Start by taking off the old deadbolt and strike plate. Use a screwdriver to unscrew all visible screws. Keep the screws in a safe place for future use or disposal. Removing the old hardware helps you see the exact size of the existing hole. This step makes it easier to plan how much bigger the hole should be. Make sure the door frame is free from nails or other small items.
Clear The Work Area
Clear the space around the door to work safely and comfortably. Move furniture, rugs, and other objects away from the door frame. Lay down a drop cloth to catch wood dust and debris. Good lighting is important to see what you are doing clearly. Keep tools nearby but out of the way to avoid accidents. A clean and organized area helps the task go smoothly.

Credit: www.youtube.com
Drilling Techniques
Drilling a bigger hole for a deadbolt in your door frame needs care and the right method. Using proper drilling techniques can prevent damage and make the job easier. This section explains key steps to drill safely and accurately.
Choose The Right Drill Bit
Select a drill bit that fits the new hole size you need. For deadbolt holes, a spade bit or hole saw works well. Make sure the bit is sharp and strong. A dull bit can cause rough edges and slow your progress.
Drill Slowly And Steadily
Start drilling at a low speed to keep control. Press gently and keep the drill straight. Moving too fast can crack the wood or make the hole uneven. Take breaks if the drill feels hot to avoid damage.
Avoid Splitting The Wood
Prevent wood from splitting by placing a scrap piece behind the drilling spot. This supports the wood fibers as the drill breaks through. Also, stop drilling just before the end and finish from the other side for a clean hole.
Using A Chisel For Precision
Using a chisel for precision is a smart way to make the deadbolt hole bigger in your door frame. It allows careful control over the wood, helping you avoid damage. A chisel helps remove small amounts of wood bit by bit. This method works best for fine adjustments.
Choosing the right chisel is important. A sharp chisel with a comfortable handle works well. Always hold the chisel at a slight angle for better control. Take your time and make small cuts. This keeps the edges clean and the hole neat.
Trim Edges Smoothly
Start by gently trimming the edges of the hole. Use the chisel to shave thin layers of wood. Move the tool slowly and carefully along the edges. This prevents splintering and rough surfaces. Smooth edges help the deadbolt fit perfectly.
Keep the chisel blade sharp for best results. Dull blades can tear the wood instead of cutting it. After trimming, use sandpaper to remove any rough spots. Smooth edges make the door frame look tidy and professional.
Check Fit Frequently
Test the deadbolt in the hole often during chiseling. Insert the lock and see if it fits snugly. This stops you from removing too much wood. A good fit means the lock will work properly and stay secure.
Make small adjustments based on each test. Remove tiny bits of wood around the hole as needed. Checking frequently saves time and effort later. It also prevents damage to the door frame.
Finishing Touches
After making the deadbolt hole bigger, the final steps improve the door frame’s look and strength. These finishing touches help the door last longer and work better. Taking time here ensures a neat, smooth finish that fits perfectly.
Sand Rough Edges
Use fine sandpaper to smooth the edges of the hole. Rough edges can cause the deadbolt to stick or break the door frame. Sand gently until the edges feel even and soft. This step helps the deadbolt fit cleanly and operate smoothly.
Apply Wood Filler If Needed
Check the hole for any cracks or gaps after sanding. Fill these spaces with wood filler for a solid hold. Press the filler into the gaps and let it dry fully. Once dry, sand the surface again for a smooth finish. This strengthens the door frame and keeps the deadbolt secure.
Paint Or Stain For Protection
Protect the repaired area by painting or staining the door frame. Choose a color that matches the rest of the door. Paint or stain seals the wood from moisture and damage. This step keeps your door frame looking good and lasting longer.
Tips To Avoid Common Mistakes
Making the deadbolt hole bigger in a door frame needs care and attention. Small mistakes can cause damage or poor fitting. Follow these tips to avoid common errors. They help keep your work clean and safe.
Taking your time and using the right tools makes the task easier. Safety is also very important during the process. Keep these points in mind before you start drilling.
Measure Twice, Drill Once
Always measure the hole size carefully before drilling. Check the door frame thickness and mark the spot clearly. Double-check measurements to avoid making the hole too big or small.
Use a pencil to mark the exact center for drilling. Measuring twice helps prevent costly mistakes and saves time. Make sure your drill bit matches the size needed.
Use Appropriate Safety Gear
Wear safety glasses to protect your eyes from dust and debris. Use gloves to protect your hands while handling tools. Hearing protection is important if you use power tools for a long time.
Keep your work area clean and well-lit. This reduces the risk of accidents and improves precision. Safety gear helps you work confidently and avoid injuries.

Credit: www.youtube.com
Frequently Asked Questions
How Do I Safely Enlarge A Deadbolt Hole?
Use a hole saw or spade bit slightly larger than the existing hole. Measure twice, drill carefully, and check alignment for safety.
What Tools Are Needed To Widen A Door Frame Hole?
You’ll need a drill, hole saw or spade bit, a chisel, and measuring tape for precise and safe hole enlargement.
Can I Enlarge The Deadbolt Hole Without Damaging The Door?
Yes, by using proper tools and measuring accurately, you can avoid damage while enlarging the hole in your door frame.
How Much Bigger Should The Deadbolt Hole Be?
Make the hole about 1/8 to 1/4 inch larger than the deadbolt diameter to ensure a good fit and smooth operation.
Conclusion
Making a deadbolt hole bigger in your door frame is simple with the right tools. Take your time and measure carefully before cutting. Use a drill or chisel to widen the hole gradually. Check the fit often to avoid mistakes.
Safety matters—wear protective gear while working. A properly sized hole helps your deadbolt lock work better and keep your home secure. With patience and care, you can complete this task yourself. Try these steps and improve your door’s security today.