Are you tired of struggling to hang pictures, shelves, or mirrors only to have them fall off the wall? The secret to a strong hold lies in using drywall anchors—but if you’ve never installed one before, the process can seem tricky.
Don’t worry. This guide will show you exactly how to put a drywall anchor in your wall quickly and securely. By the end, you’ll have the confidence to hang just about anything without worrying about it coming loose. Keep reading, and let’s make your walls work for you!

Credit: www.wikihow.com
Choosing The Right Anchor
Choosing the right drywall anchor is important for a strong hold. Different anchors work better for different tasks. Picking the correct type helps avoid damage to your walls. It also keeps your items safe and secure. Let’s explore what you need to know about drywall anchors.
Types Of Drywall Anchors
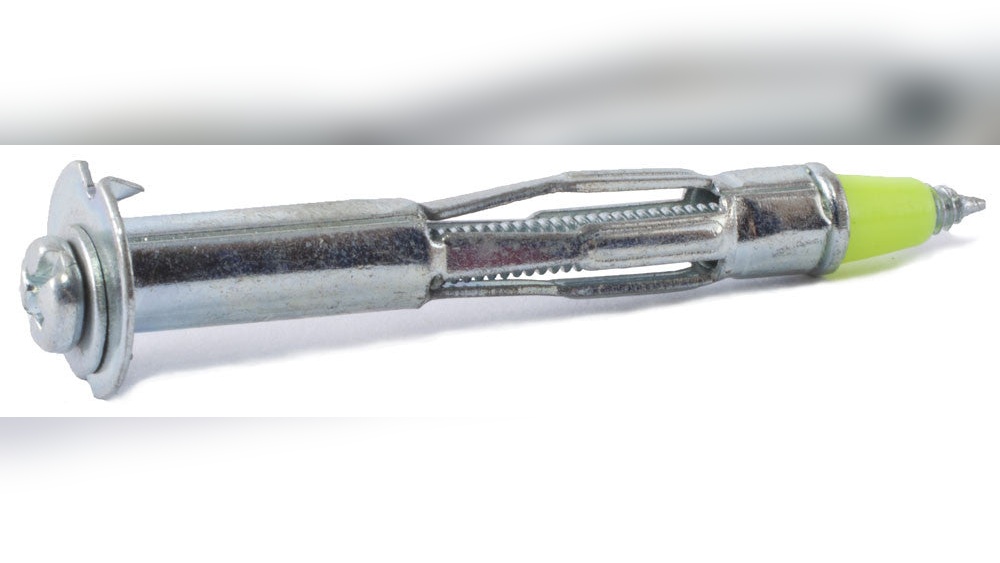
There are several types of drywall anchors. Plastic expansion anchors are common and easy to use. They work well for light loads like pictures. Toggle bolts have metal wings that open inside the wall. These hold heavier items like shelves or mirrors. Self-drilling anchors screw directly into drywall without pre-drilling. They provide medium strength and are quick to install.
Weight Capacity Considerations
Knowing the weight of your item is key. Light anchors hold up to 20 pounds. Medium anchors can support 20 to 50 pounds. Heavy-duty anchors hold over 50 pounds. Always check the anchor’s weight limit before use. Using an anchor with too low capacity risks wall damage. Choose an anchor that matches or exceeds your item’s weight.
Anchor Material Options
Anchors come in plastic, metal, and nylon. Plastic anchors are affordable and good for light objects. Metal anchors are stronger and better for heavy items. Nylon anchors offer flexibility and resist rust. Select a material that fits your wall type and load needs. Metal works well for durability, plastic for simple tasks.
Credit: www.bobvila.com
Tools You’ll Need
Putting a drywall anchor in the wall is easier with the right tools. These tools help you work quickly and safely. Having them ready makes the job smooth. Here is a list of essential tools you will need.
Drill And Drill Bits
A drill is important for making holes in the wall. You need drill bits that match the size of the anchor. Using the right drill bit size ensures a tight fit. It also prevents damage to the drywall.
Screwdriver Types
You need a screwdriver to drive the screw into the anchor. A Phillips head screwdriver works for most anchors. Some anchors require a flathead screwdriver. Choose the right type for your screws to avoid slipping.
Measuring And Marking Tools
Measure carefully where you want to place the anchor. A tape measure helps you get exact distances. Use a pencil to mark the spot on the wall. Precise marks ensure the anchor goes in the right place.
Preparing The Wall
Preparing the wall is the first step to install a drywall anchor correctly. It helps ensure the anchor stays strong and holds weight well. A well-prepared wall also makes the process easier and safer. Follow these simple steps to get the wall ready for your anchor.
Locating The Studs
Find the wooden studs behind the drywall. Studs give extra support for heavy items. Use a stud finder tool or tap the wall and listen for a solid sound. Mark the edges of each stud to know the center. Avoid placing anchors directly on studs unless needed.
Marking Anchor Positions
Decide where you want the anchor. Mark the spot lightly with a pencil. Use a level to keep marks straight if placing multiple anchors. Check the spot is free from electrical wires and pipes. Proper marking helps drill in the right place.
Cleaning The Surface
Wipe the wall with a dry cloth to remove dust and dirt. A clean surface helps the anchor stick better. Avoid using water or wet cloths on drywall. Make sure the area is dry before drilling. Clean walls make the job neater and stronger.

Credit: www.youtube.com
Drilling The Hole
Drilling the hole is the first important step to install a drywall anchor. It creates a perfect spot for the anchor to fit tightly. A well-drilled hole holds the anchor firmly and supports the weight of the item you hang. Being careful at this stage prevents wall damage and ensures a strong hold.
Choosing The Correct Drill Bit Size
Select a drill bit that matches the anchor size. The hole should be just big enough for the anchor to fit snugly. Using a bit too small makes it hard to insert the anchor. A bit too large makes the anchor loose. Check the anchor package for the recommended drill bit size.
Drilling At The Right Depth
Drill the hole as deep as the anchor length. Too shallow, and the anchor won’t hold well. Too deep, and the anchor may fall inside the wall. Mark the drill bit with tape to control depth. Stop drilling when the tape reaches the wall surface.
Avoiding Wall Damage
Drill slowly and straight into the wall. Fast drilling can crack the drywall. Keep the drill steady to avoid angled holes. Avoid pushing too hard; let the drill do the work. Check for pipes or wires behind the wall before drilling.
Inserting The Anchor
Inserting a drywall anchor is a key step for a secure hold. It prepares the wall to support screws and weight. The process involves placing the anchor carefully and making sure it fits well.
Follow simple steps to insert the anchor correctly. This will prevent damage and ensure the anchor works well.
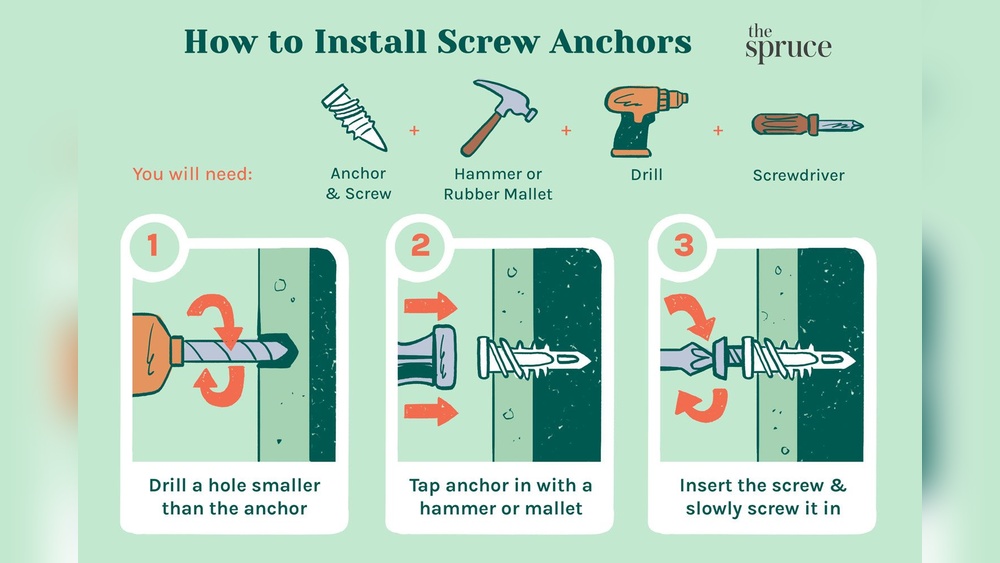
Pushing Or Tapping In The Anchor
Start by placing the anchor at the hole in the drywall. Use your finger to push it in gently. If it resists, tap it lightly with a hammer. Tap softly to avoid breaking the anchor or wall.
The anchor should sit mostly inside the hole. Avoid pushing it too deep or leaving it sticking out.
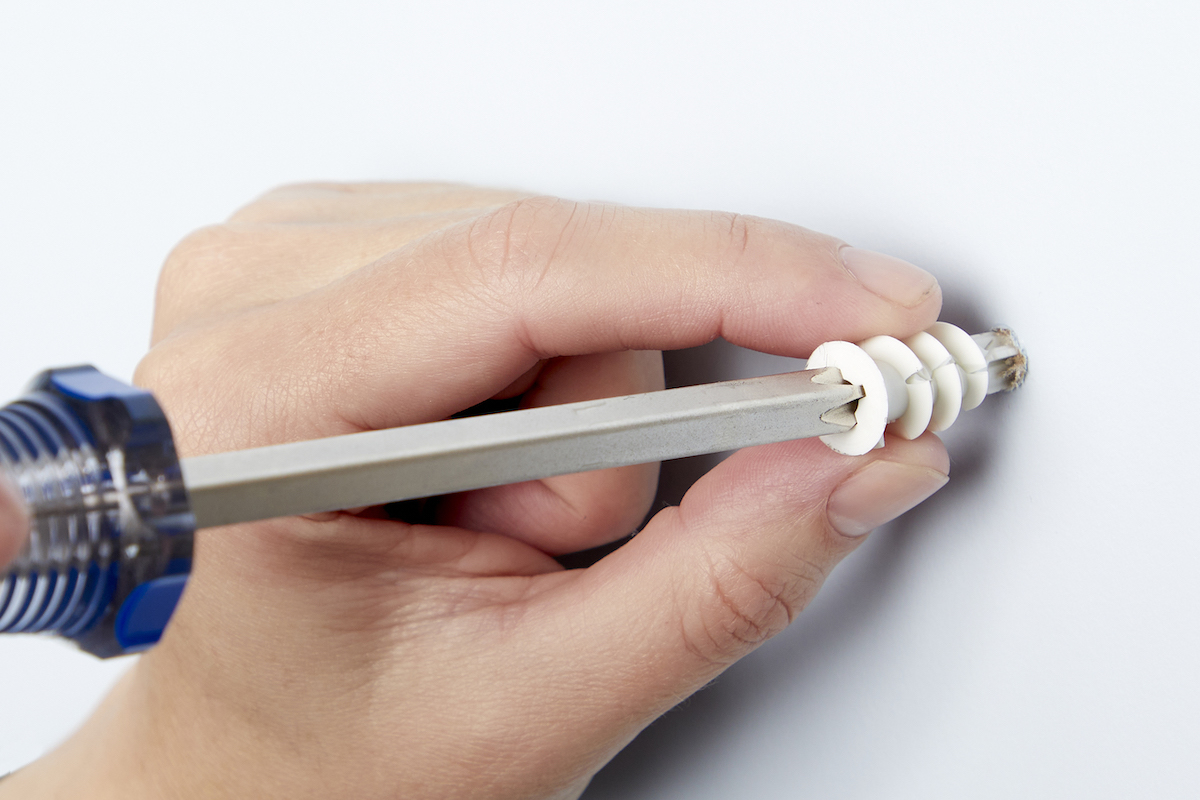
Using A Screwdriver For Expansion
Next, insert a screwdriver into the anchor’s center. Turn the screwdriver slowly clockwise. This action expands the anchor inside the wall. The expansion grips the drywall firmly.
Stop turning when the anchor feels tight. Do not over-tighten, or the drywall may crack.
Ensuring A Flush Fit
Check the anchor’s position against the wall surface. It should sit flush or slightly recessed. The anchor must not stick out or be too deep. A flush fit ensures the screw will hold strong and straight.
Adjust by tapping lightly or turning the screwdriver again if needed. A good fit is key for a stable hold.
Securing The Screw
Securing the screw is a key step after placing a drywall anchor. It holds your item firmly on the wall. A loose screw can cause damage or make the anchor fall out. Proper technique ensures the screw stays in place for a long time.
Selecting The Right Screw Length
Choose a screw that fits the anchor size. Too short screws won’t grip well. Too long screws might damage the wall behind. The screw should go deep enough to hold the weight safely.
Driving The Screw Properly
Use a screwdriver or drill with a proper bit. Turn the screw slowly and steady. Avoid over-tightening, which can strip the anchor or wall. Stop when the screw feels firm and secure.
Checking Anchor Stability
After driving the screw, gently wiggle it. The anchor should stay firmly in place. No movement means the screw is secure. If loose, remove and try again with a better fit.
Tips For A Strong Hold
Getting a strong hold with drywall anchors is important for safety and durability. Poor installation can cause anchors to loosen or walls to get damaged. Follow these simple tips to make sure your anchors stay tight and secure. Small steps make a big difference.
Careful work protects your walls and the items you hang. A strong hold means less worry about things falling down. These tips focus on common mistakes and smart moves for lasting support.
Avoiding Over-tightening
Tightening anchors too much can damage the drywall. It can cause cracks or strips around the anchor hole. Stop turning once the anchor feels snug. Use a gentle hand and check often. Let the anchor hold firm without forcing it too hard.
Spacing Multiple Anchors
Space anchors evenly when hanging heavy or wide items. This spreads the weight across the wall. Keep at least a few inches between anchors. Clustering anchors too close weakens the drywall. Proper spacing helps anchors share the load safely.
Using Additional Support If Needed
Sometimes anchors alone are not enough for heavy items. Use extra support like wall studs or brackets. Find studs with a stud finder for stronger grip. Brackets add stability and stop movement. Combining anchors with other supports gives peace of mind.
Frequently Asked Questions
What Tools Are Needed To Install Drywall Anchors?
You need a drill, screwdriver, hammer, drywall anchors, and a pencil. These tools help you mark, drill holes, and secure anchors safely and accurately.
How Do I Choose The Right Drywall Anchor?
Select anchors based on weight capacity and wall type. Plastic anchors suit light loads, while metal ones support heavier items.
Can I Put Drywall Anchors In Plaster Walls?
Yes, but use anchors designed for plaster. They provide better grip and prevent wall damage during installation.
How Deep Should I Drill For Drywall Anchors?
Drill a hole slightly smaller than the anchor length. This ensures a tight fit and strong hold in the drywall.
Conclusion
Putting a drywall anchor in the wall is simple with the right steps. Start by choosing the correct anchor for your wall type. Use a drill or screwdriver to create a hole. Then, insert the anchor carefully and tighten it securely.
This method ensures your item will hold strong. Remember to check the weight limit on the anchor package. Doing these steps right helps avoid damage and keeps things safe. Now, you can hang shelves, pictures, or decorations with confidence. Drywall anchors make wall mounting easier and more reliable.