Are you struggling with a stuck or damaged Kwikset deadbolt cylinder? Knowing how to remove it yourself can save you time, money, and frustration.
Whether you want to replace the cylinder or fix a lock issue, this simple guide will walk you through each step clearly and confidently. Keep reading, and you’ll soon master the process, making your home more secure and your lock working like new again.
Tools Needed
Removing a Kwikset deadbolt cylinder requires a few basic tools. Having the right tools makes the job easier and faster. You do not need many items, just the essentials. Gather these before starting to avoid interruptions.
Screwdriver
A screwdriver is necessary to remove screws holding the cylinder. Most Kwikset deadbolts use Phillips-head screws. A medium-sized Phillips screwdriver works best. It fits well and prevents stripping the screws.
Allen Wrench
Some Kwikset models have set screws secured with an Allen wrench. This tool helps loosen or tighten these screws. Usually, a 3/32 or 1/8 inch Allen wrench fits well. Keep it handy for smooth removal.
Pliers
Pliers help grip and pull the cylinder if it is stuck. Needle-nose pliers work best in tight spaces. Use them gently to avoid damaging the lock or door.
Flashlight
A flashlight brightens dark areas inside the door. It helps find screws or hidden parts. A small LED flashlight is enough. Good lighting prevents mistakes and speeds up work.
Replacement Cylinder (optional)
Have a replacement cylinder ready if you plan to swap the old one. Check the size and type match your lock. This saves time after removing the old cylinder.

Credit: www.youtube.com
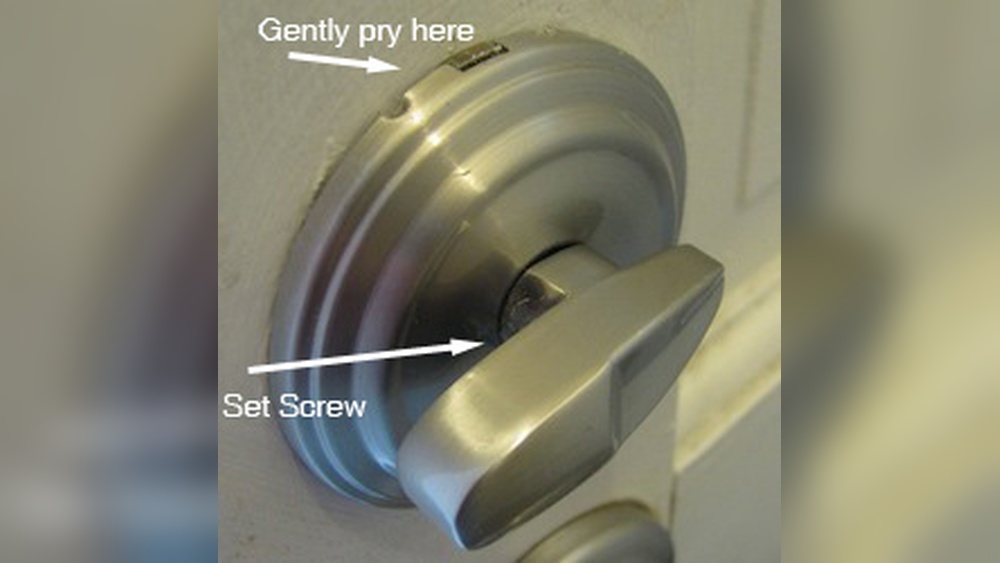
Locate The Set Screw
Locating the set screw is a key step in removing the Kwikset deadbolt cylinder. The set screw holds the cylinder in place. Without finding and loosening this screw, you cannot take out the cylinder safely.
The set screw is usually small and hidden. It sits on the side of the deadbolt assembly. Knowing exactly where to look saves time and avoids damage.
Check The Edge Of The Door
Open the door and look at its edge. The set screw is near the deadbolt latch plate. It is a small, flat-head or hex screw. You might need a flashlight to see it clearly.
Remove The Interior Thumb Turn
Sometimes the set screw is under the thumb turn. Remove the thumb turn by pulling it straight off. This exposes the set screw holding the cylinder. Use the right screwdriver or Allen wrench to loosen it.
Identify The Type Of Set Screw
Kwikset uses different screws for different models. Look for a small hex or flat-head screw. Use the matching tool to avoid stripping the screw. Gently loosen it until the cylinder can move freely.
Remove The Thumbturn
Removing the thumbturn from a Kwikset deadbolt is the first key step. This part controls the lock from inside the door. Taking it off lets you access the cylinder for removal or replacement.
The process is simple and needs only a few tools. Pay close attention to the screws and small parts. Keep them safe to avoid losing anything.
Locate The Thumbturn Screw
Look closely at the thumbturn piece on the inside of the door. Find the small screw holding it in place. Usually, it sits on the side or bottom of the thumbturn.
Use The Right Screwdriver
Grab a screwdriver that fits the screw head. A Phillips screwdriver works for most Kwikset screws. Turn the screw carefully to avoid stripping it.
Once the screw is out, gently pull the thumbturn away from the door. It should slide off easily. If it feels stuck, wiggle it slightly but do not force it.
Keep The Parts Safe
Place the thumbturn and screw in a small container. This keeps them together and prevents loss. You will need these parts if reinstalling the lock later.
Unscrew The Cylinder
Removing the Kwikset deadbolt cylinder starts with unscrewing the cylinder itself. This step is key to taking the lock apart safely and correctly. You need the right tools and a calm approach. Taking your time helps avoid damage to the lock or door. The cylinder holds the key mechanism inside, so careful handling is important.
Prepare your workspace with good lighting. Have a screwdriver ready, usually a Phillips head. Keep all screws in a small container. This prevents loss and confusion during reassembly.
Locate The Cylinder Screw
First, open the door to access the side edge. Look for a long screw that holds the cylinder in place. It is usually on the edge of the door, aligned with the cylinder. This screw must be removed to free the cylinder.
Use The Correct Screwdriver
Choose a screwdriver that fits the screw head perfectly. A Phillips screwdriver is common for Kwikset screws. Using the wrong tool can strip the screw head. Turn the screwdriver counterclockwise to loosen the screw. Keep steady pressure to avoid slipping.
Remove The Cylinder Screw
Slowly unscrew the cylinder screw. Once loose, pull it out carefully. Place it somewhere safe. This screw holds the cylinder tight, so removing it lets you pull the cylinder out easily.
Pull Out The Cylinder
After removing the screw, grip the cylinder firmly. Pull it straight out from the door. If it resists, wiggle it gently. Avoid forcing, as this can damage the lock or door. Once free, the cylinder is ready for repair or replacement.
Extract The Cylinder
Extracting the cylinder from a Kwikset deadbolt is a key step in changing or repairing the lock. The cylinder holds the key pins and allows the lock to turn. Removing it carefully prevents damage and ensures smooth reinstallation.
This process requires simple tools and patience. Follow these steps to remove the cylinder safely and correctly.
Remove The Set Screw
Locate the set screw on the side of the deadbolt faceplate. Use a screwdriver to turn the screw counterclockwise. This screw holds the cylinder in place. Remove it completely before pulling the cylinder out.
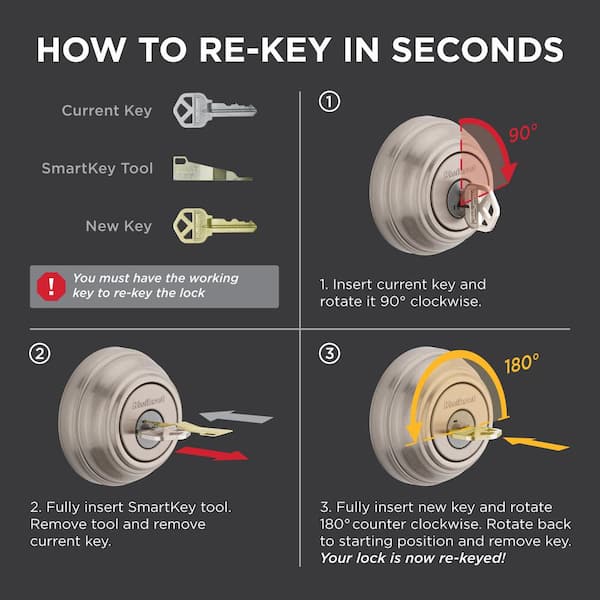
Turn The Key To Align The Cylinder
Insert the key into the lock and turn it slightly. This action aligns the pins inside the cylinder. The cylinder will slide out easily once the pins are in the correct position.
Pull Out The Cylinder
Hold the cylinder firmly and pull it straight out from the lock housing. Do not wiggle or force it. If it resists, check the key position and set screw again. The cylinder should come out smoothly.
Credit: www.homedepot.com
Tips For Reinstallation
Reinstalling the Kwikset deadbolt cylinder needs care and attention. A smooth reinstallation helps your lock work well and last longer. Follow some simple tips to avoid common problems and make the process easy.
Check The Cylinder Orientation
Make sure the cylinder is facing the right way. The keyhole should be aligned correctly with the door. Incorrect orientation can cause the lock to jam or not turn smoothly.
Align The Cylinder Properly
Fit the cylinder straight into the lock housing. Avoid forcing it in at an angle. Proper alignment ensures smooth operation and prevents damage to the lock parts.
Tighten Screws Securely But Gently
Use a screwdriver to tighten the screws firmly. Do not overtighten as this can strip the screws or damage the cylinder. Tight screws keep the cylinder stable in the door.
Test The Lock Before Final Assembly
Turn the key several times to check for smooth movement. The lock should operate without sticking or resistance. Testing early saves time and effort after full installation.
Use Proper Tools For The Job
Use the correct screwdriver and tools for your Kwikset deadbolt. Wrong tools can damage the screws or cylinder parts. A good fit helps you work efficiently and safely.
Troubleshooting Common Issues
Removing a Kwikset deadbolt cylinder can sometimes lead to issues. These problems can slow down the process or stop it completely. Knowing common problems and how to fix them helps save time and effort.
This section covers frequent issues faced during removal. It also gives clear solutions to handle these problems easily. Follow these tips for a smooth deadbolt cylinder removal.
Stuck Cylinder Due To Tight Screws
Screws often cause the cylinder to stick. Use a screwdriver that fits well. Turn screws slowly to avoid stripping. Apply a small amount of lubricant to loosen tight screws. Wait a few minutes before trying again.
Key Won’t Turn Inside Cylinder
A key that won’t turn can block removal. Check if the key is fully inserted. Try turning the key gently left and right. If the key is worn out, use a spare key. Lubricate the cylinder with graphite powder for smooth action.
Broken Or Damaged Cylinder
Damage may stop the cylinder from coming out. Look for cracks or broken parts. Use needle-nose pliers to grip and pull carefully. Avoid forcing it to prevent more damage. Consider replacing the whole lock if damage is severe.
Misaligned Deadbolt Components
Misalignment can cause difficulty in removal. Check if the deadbolt moves freely when the key turns. Tighten or loosen screws on the lock faceplate to adjust alignment. Test the cylinder after each adjustment. Repeat until the cylinder slides out smoothly.

Credit: www.youtube.com
Frequently Asked Questions
How Do I Remove A Kwikset Deadbolt Cylinder?
To remove a Kwikset deadbolt cylinder, first unscrew the interior mounting screws. Then, pull out the cylinder from the exterior side carefully. Ensure the lock is in the unlocked position for easy removal.
What Tools Are Needed To Remove Kwikset Cylinder?
You need a Phillips screwdriver to remove the mounting screws. Optionally, a flathead screwdriver helps to gently pry the cylinder out. Avoid using excessive force to prevent damage to the lock.
Can I Remove The Kwikset Cylinder Without Key?
Yes, if the lock is unlocked, you can remove the cylinder without a key. Turn the thumbturn to unlock, then unscrew and pull out the cylinder carefully.
How Do I Reassemble The Kwikset Deadbolt Cylinder?
Align the cylinder with the door hole, insert it fully, and tighten the mounting screws. Test the lock’s function before finalizing to ensure smooth operation.
Conclusion
Removing a Kwikset deadbolt cylinder is simple with the right steps. Take your time and follow each instruction carefully. Use the right tools to avoid damage. This task saves money and keeps your home secure. Practice patience and stay safe while working.
Soon, you will feel confident handling lock repairs yourself. Keep this guide handy for future needs. Small repairs like this make a big difference at home.