Are you struggling to hang pictures, shelves, or decorations securely on your walls? Knowing how to screw anchors into the wall correctly can make all the difference.
Without the right technique, your items might fall, causing damage and frustration. In this guide, you’ll learn simple, step-by-step instructions to install wall anchors like a pro. By the end, you’ll feel confident that your belongings will stay put safely and securely.
Keep reading to discover the easy tricks that will save you time and prevent common mistakes.
Types Of Wall Anchors
Wall anchors hold screws firmly in walls that cannot support screws alone. Different anchors suit different wall types and weights. Choosing the right anchor ensures strong and safe mounting.
Plastic Expansion Anchors
Plastic expansion anchors are common and easy to use. Insert them into a drilled hole. When you screw in, the anchor expands. This expansion grips the wall tightly. Best for light to medium loads on drywall or plaster.
Toggle Bolts
Toggle bolts have spring-loaded wings that open inside the wall. These wings spread the load over a large area. Great for heavy objects on hollow walls. Requires a larger hole for installation.
Molly Bolts
Molly bolts are metal anchors that expand behind the wall. They create a strong hold in drywall and plaster. Tighten the screw to make the anchor legs open wide. Ideal for medium to heavy loads.
Self-drilling Anchors
Self-drilling anchors do not need a pre-drilled hole. Their sharp tip cuts into drywall as you screw them in. Easy and quick to install. Suitable for light to medium loads on drywall.
Choosing The Right Anchor
Choosing the right anchor is the first step to a secure wall mount. Different walls need different anchors. Picking the wrong one can cause damage or weak support. This guide helps you select the best anchor for your project.
Consider Wall Material
Walls come in many types: drywall, plaster, brick, or concrete. Each material holds anchors differently. Drywall needs plastic or metal anchors. Brick and concrete require heavy-duty anchors. Knowing your wall type ensures a strong hold.
Weight Capacity Needs
Think about what the anchor will hold. Light pictures need small anchors. Heavy shelves or TVs need anchors that support more weight. Check the anchor’s weight limit before buying. Safety depends on using the right strength.
Anchor Size And Length
Anchors come in different sizes and lengths. Bigger anchors hold more weight and grip better. The length should match wall thickness. A short anchor won’t hold well in thick walls. Choose the size that fits your wall and load.
Tools Needed
Before you start screwing anchors into the wall, gather all the tools you need. Having the right tools makes the job easier and safer. Each tool plays a key role in the process.
Drill And Drill Bits
A drill is essential to make holes for anchors. Choose a drill bit that matches the anchor size. Drill bits come in many sizes for different anchors. Using the correct bit prevents wall damage and ensures a tight fit.
Screwdriver
A screwdriver drives the screws into the anchors. Use a screwdriver that fits the screw head well. This helps avoid stripping the screw or slipping. Manual or electric screwdrivers both work well.
Hammer
A hammer helps tap the anchor into the drilled hole. Gently tap to avoid breaking the anchor or wall. The hammer makes sure the anchor sits flush with the wall surface.
Level And Pencil
A level ensures your anchors are straight and even. Mark the spot with a pencil before drilling. This avoids crooked holes and keeps your project neat. Straight anchors help your items hang correctly.
:max_bytes(150000):strip_icc()/how-to-use-and-discard-anchor-screws-1822671-002-04-4963da18c2674e6bbf07e5fc07d5b4f0.jpg)
Credit: www.thespruce.com
Preparing The Wall
Preparing the wall is an important step before screwing anchors in. It helps ensure the anchors hold tight and the wall stays safe. Taking time to prepare makes the job easier and lasts longer. Follow these simple steps to get your wall ready.
Locate Studs And Mark Spots
Find the studs behind the wall using a stud finder. Studs provide strong support for heavy items. Mark the spots lightly with a pencil where you want to place anchors. This ensures you drill in the right place and avoid weak areas.
Check For Obstacles
Look for wires, pipes, or other obstacles inside the wall. Use a wire detector or check building plans if you can. Avoid drilling into these to prevent damage and danger. Clear spots keep your work safe and smooth.
Drill Pilot Holes
Use a drill with a small bit to make pilot holes at marked spots. Pilot holes guide the anchor and stop the wall from cracking. Drill straight and steady, matching the drill bit size to your anchor. This step helps anchors fit tightly.
Installing The Anchor
Installing an anchor properly keeps your items secure on the wall. The right method depends on the anchor type. Each type fits different wall materials and weights. Follow these simple steps to install anchors with ease.
Insert Plastic Anchors
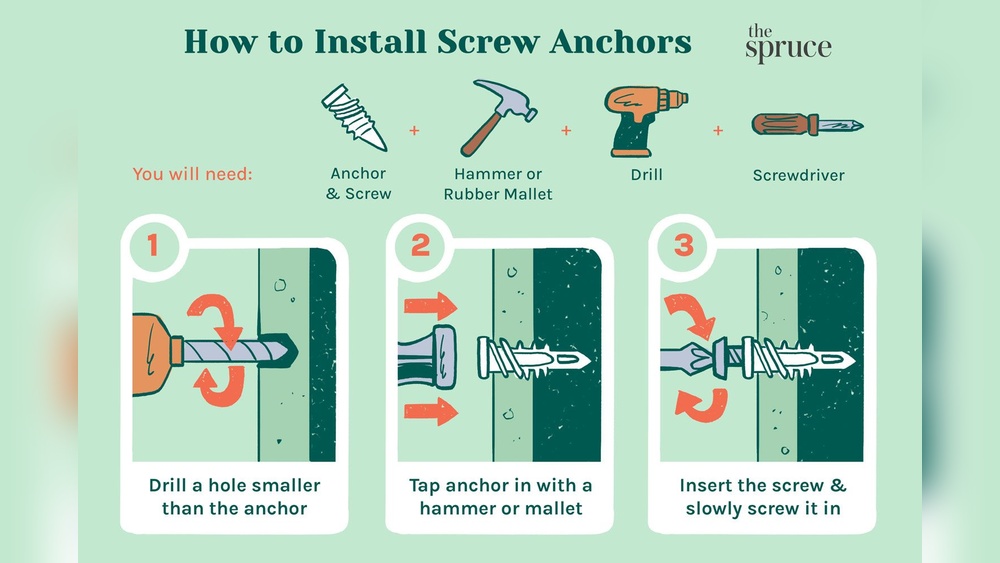
Plastic anchors work well for light loads on drywall. Start by drilling a hole that matches the anchor size. Push the plastic anchor gently into the hole. Tap it lightly with a hammer until flush with the wall. Now, screw into the anchor to hold your item.
Secure Toggle Bolts
Toggle bolts hold heavy objects on hollow walls. Drill a hole large enough for the folded toggle. Thread the bolt through your item and the toggle wings. Push the toggle through the hole until it opens inside the wall. Tighten the bolt carefully to secure the anchor.
Set Molly Bolts
Molly bolts expand inside drywall for strong support. Drill a hole slightly smaller than the bolt sleeve. Insert the molly bolt and tap it in gently. Tighten the screw to expand the sleeve behind the wall. Remove the screw, attach your item, then reinsert and tighten.
Use Self-drilling Anchors
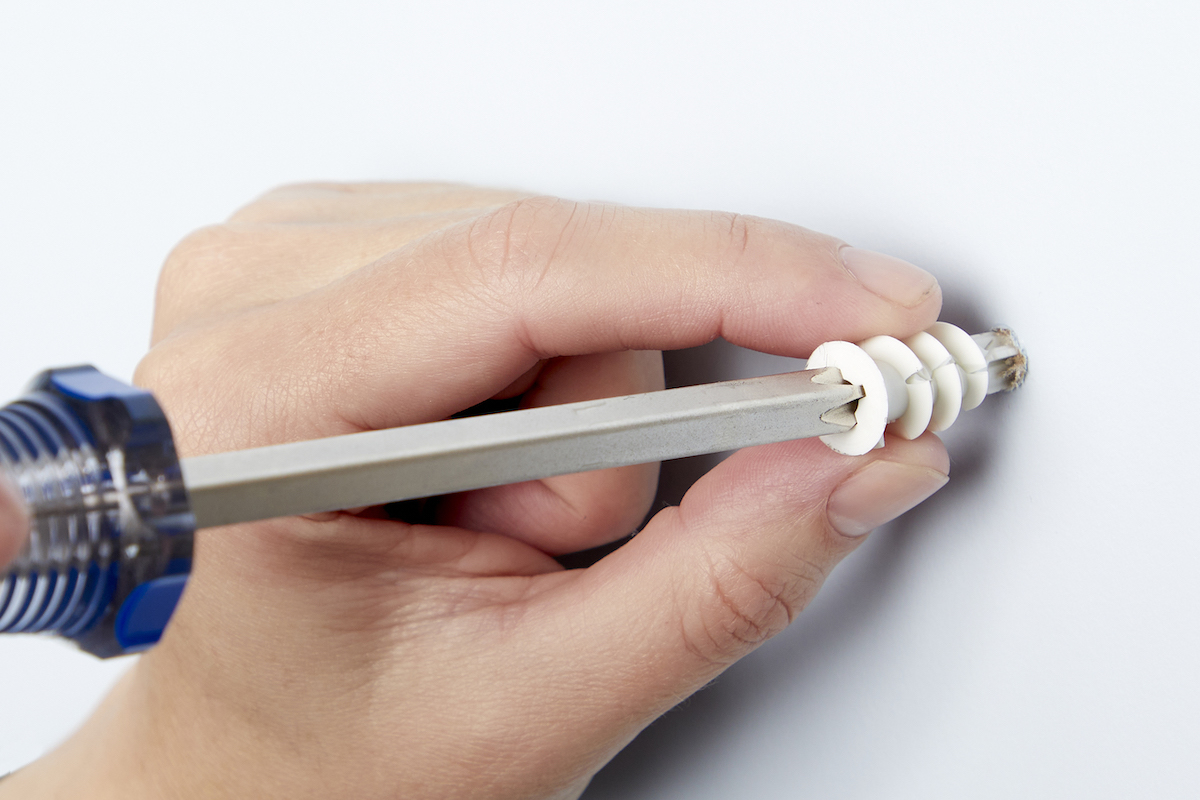
Self-drilling anchors save time on drywall installation. Align the anchor tip with the wall surface. Twist the anchor using a screwdriver until it is flush. The anchor cuts into the drywall as you turn. Insert the screw into the anchor to hold your object.

Credit: www.reddit.com
Screwing Into The Anchor
Screwing into the anchor is a key step in securing items to the wall. It ensures the anchor holds tight and supports the weight. Using the right screw and technique prevents damage to the wall and anchor. This section explains how to do it correctly and avoid common errors.
Selecting The Right Screw
Choose a screw that fits the anchor size. The screw should be long enough to go through the item and deep into the anchor. Avoid screws that are too short or too thick. The wrong screw can break the anchor or fail to hold.
Proper Screw Driving Technique
Start by placing the screw straight into the anchor. Use a screwdriver or drill at low speed. Turn the screw slowly to keep it steady. Stop once it feels snug. Do not force the screw too hard; this can damage the wall or anchor.
Avoiding Common Mistakes
Do not overtighten the screw; it can strip the anchor. Avoid driving the screw at an angle. Ensure the anchor is fully inserted before screwing. Check the screw size before starting. These tips help secure the anchor and protect the wall.
Testing The Support
Testing the support of screw anchors is key for safety and durability. It ensures the anchor holds firmly in the wall. This step prevents damage to your walls and keeps items secure.
Check Stability
Gently tug on the screw after inserting the anchor. It should not move or wiggle. A stable anchor means it grips the wall tightly. Test by applying slight pressure in different directions. No movement shows good stability.
Adjust If Needed
If the anchor feels loose, remove it carefully. Check if the hole is too large or the wrong type. Use a bigger anchor or choose a different wall spot. Reinsert the anchor and test stability again. Repeat until the anchor holds firm without movement.
Safety Tips
Safety is very important when screwing anchors into the wall. Careful steps help avoid accidents and damage. Following simple safety tips makes your work easier and safer.
Wear Protective Gear
Always wear safety glasses to protect your eyes. Dust and small debris can fly while drilling. Gloves protect your hands from sharp edges and rough surfaces. Wear a mask if dust bothers you. Proper gear keeps you safe and comfortable.
Avoid Electrical Wiring
Check the wall for electrical wires before drilling. Use a wire detector or stud finder with wire sensing. Drilling into wires can cause shocks or fires. Mark safe spots clearly to avoid mistakes. Staying clear of wires protects you and your home.
Work With Caution
Take your time and work slowly. Rushing can cause slips and mistakes. Hold the drill steady and keep a firm grip. Make sure the anchor is straight before screwing it in. Careful work leads to better results and fewer problems.
Credit: www.bobvila.com
Frequently Asked Questions
What Tools Do I Need To Screw Anchors Into The Wall?
You need a drill, screwdriver, wall anchors, screws, and a hammer. A pencil for marking also helps. These tools ensure proper installation and secure anchoring.
How Do I Choose The Right Wall Anchor Type?
Select anchors based on wall material and weight load. Plastic anchors suit light items, while metal anchors hold heavier objects securely.
Can I Reuse Wall Anchors After Removal?
Most wall anchors lose grip after removal and shouldn’t be reused. Use new anchors for safety and a strong hold.
How Deep Should I Drill For Wall Anchors?
Drill a hole slightly deeper than the anchor length. This ensures the anchor fits fully and holds firmly in the wall.
Conclusion
Screw anchors hold items safely on walls. Choose the right anchor for your wall type. Drill a hole carefully and insert the anchor firmly. Screw it in slowly to avoid damage. This method keeps your items secure and stable. Practice a few times to gain confidence.
Now, hanging shelves or pictures feels easier. Enjoy your neatly fixed decorations and tools. Simple steps bring strong results every time.