Are you struggling to get a wall anchor firmly into your wall? You’re not alone.
It can be frustrating when anchors slip, break, or just won’t go in straight. But don’t worry—once you know the right steps, it becomes quick and easy. In this guide, you’ll learn exactly how to get a wall anchor into your wall so your shelves, pictures, or hooks stay secure.
Keep reading, and you’ll save time, avoid damage, and gain the confidence to tackle any hanging project like a pro.
Credit: www.bobvila.com
Choosing The Right Wall Anchor
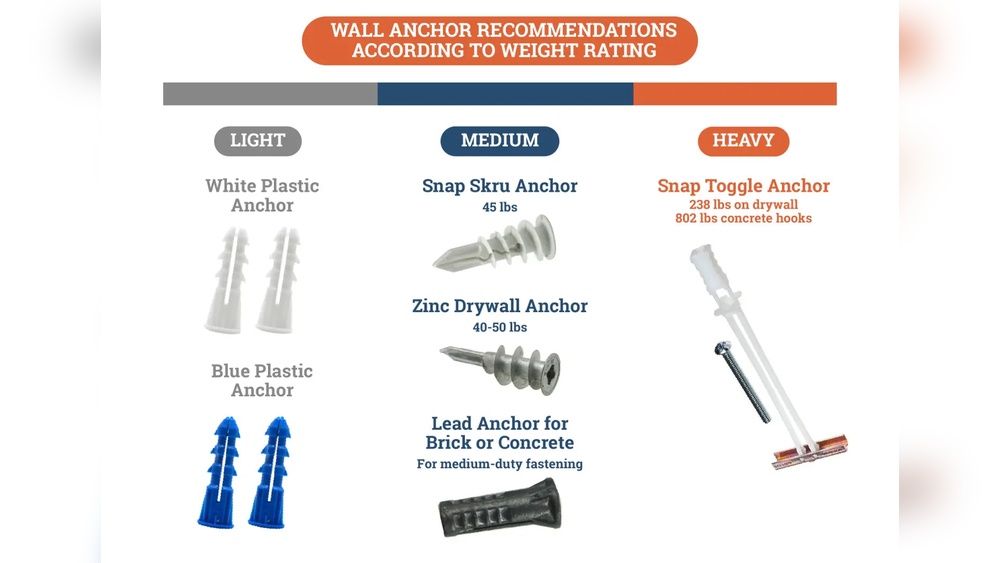
Choosing the right wall anchor is key to a strong hold. Different anchors suit different walls and weights. Using the wrong anchor can cause damage or failure. Knowing the types and matching them to your wall will save time and effort.
Types Of Wall Anchors
Plastic expansion anchors work well for light loads. They expand when a screw enters, gripping the wall. Molly bolts are metal anchors for medium loads. They spread behind the wall for firm support. Toggle bolts have wings that open inside hollow walls. They hold heavy items securely. Threaded anchors screw directly into drywall for moderate strength. Each type suits specific needs and wall types.
Matching Anchors To Wall Material
Drywall needs anchors that expand or spread inside. Plastic anchors or toggle bolts are good choices. For plaster walls, use molly bolts or toggle anchors to avoid cracks. Concrete and brick require heavy-duty anchors like sleeve anchors. Wood walls often only need screws without anchors. Always check your wall type before selecting an anchor. Correct matching ensures a safe and strong fix.
Tools Needed For Installation
Installing a wall anchor needs the right tools for success. The right tools make the job easier and safer. This section lists the tools you need and some extra ones that help.
Essential Tools List
- Drill – to make holes in the wall.
- Drill bits – choose the size that fits the anchor.
- Screwdriver – to insert the screw into the anchor.
- Hammer – sometimes needed to tap the anchor into the hole.
- Measuring tape – to mark the exact spot for drilling.
- Pencil – to mark the wall before drilling.
Optional Tools For Ease
- Level – to check the anchor is straight.
- Stud finder – to avoid drilling into studs or wires.
- Vacuum or brush – to clean out dust from the hole.
- Safety glasses – to protect your eyes during drilling.
- Gloves – for hand protection while working.
Preparing The Wall
Preparing the wall is the first step to secure a wall anchor properly. It ensures the anchor holds tight and supports the weight it needs to carry. A well-prepared wall prevents damage and makes installation easier.
Locating Studs And Marking Spots
Start by finding studs behind the wall. Studs give extra support for heavy items. Use a stud finder tool to locate them easily. Mark the spots clearly with a pencil. If no stud is available, choose a solid part of the wall. Mark the exact point where the anchor will go.
Cleaning And Drilling Pilot Holes
Clean the wall area to remove dust and dirt. This helps the anchor stay firm. Use a drill with a bit smaller than the anchor size. Drill a pilot hole at the marked spot. Drill straight to avoid wall damage. The pilot hole guides the anchor for easy insertion.
Credit: www.protoolreviews.com
Inserting The Wall Anchor
Inserting a wall anchor correctly is key to holding items securely on your wall. The anchor creates a strong grip inside the wall. This grip supports screws that hold shelves, pictures, or other items. The process varies based on the anchor type and wall material. Two common ways to insert wall anchors are manual insertion and using a drill.
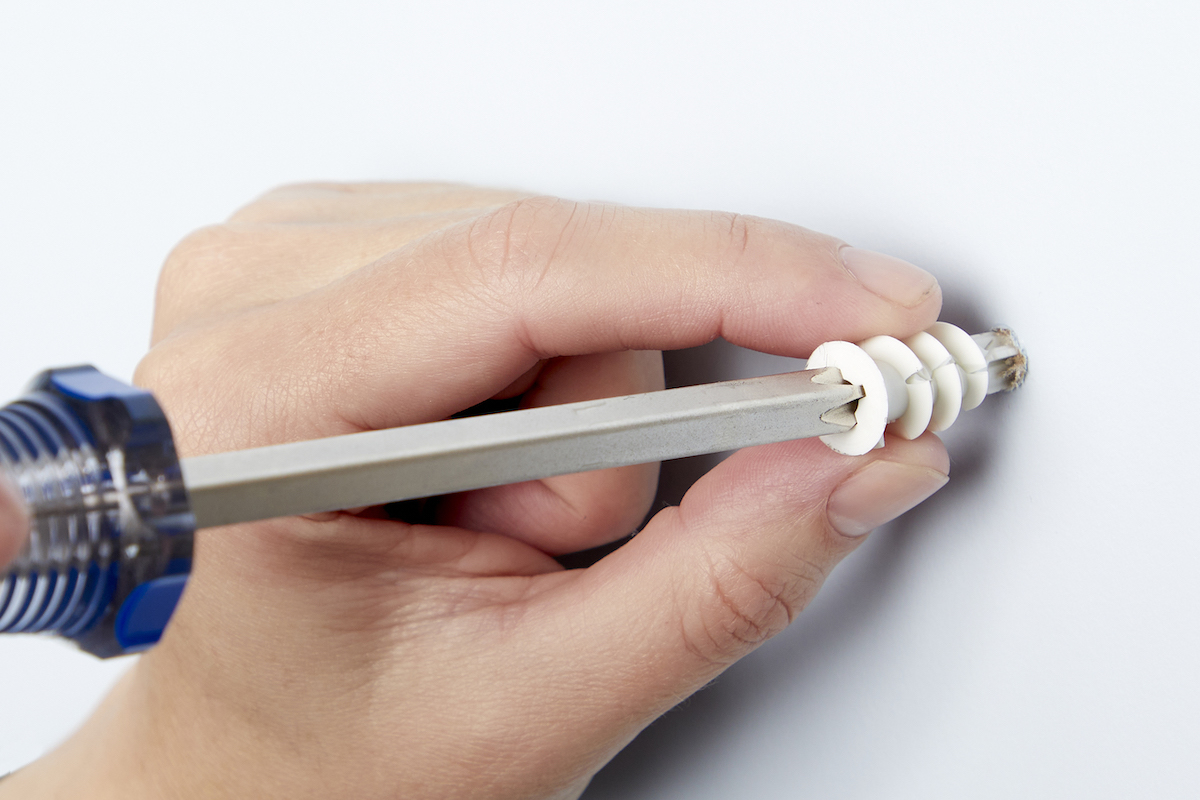
Manual Insertion Techniques
Start by marking the spot on the wall where the anchor will go. Use a pencil for accuracy. For softer walls like drywall, push the anchor gently with your thumb. Twist it slowly in a clockwise direction. This helps the anchor grip the wall tightly. If it feels hard to push, stop. Use a small nail or screwdriver to create a pilot hole first. This hole guides the anchor and makes insertion easier. Once the anchor is flush with the wall, it is ready for the screw.
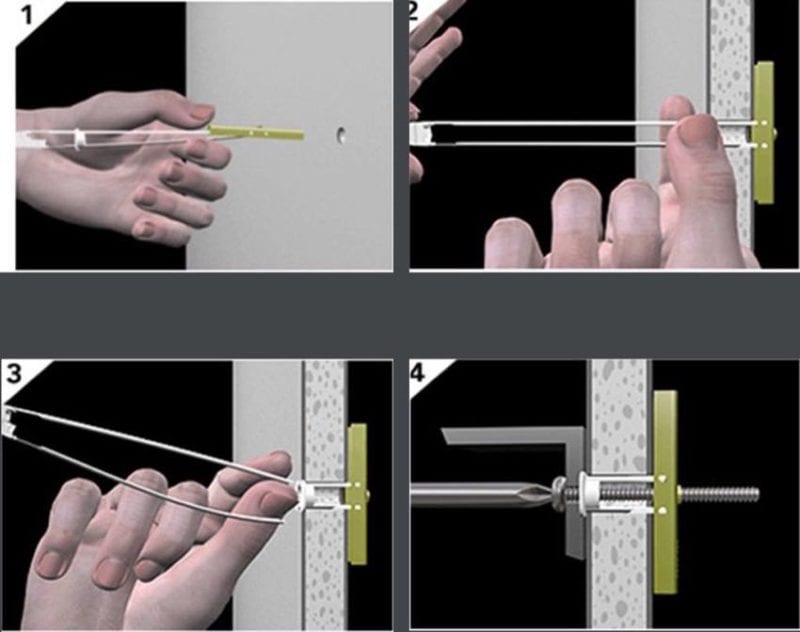
Using A Drill For Faster Installation
For harder walls like plaster or masonry, a drill is helpful. Choose a drill bit matching the anchor size. Drill a hole at the marked spot, about the same length as the anchor. Clean out dust from the hole. Insert the anchor into the hole by hand first. Then use a screwdriver or drill with a low speed to push the anchor fully inside. Avoid using high speed to prevent damage. The anchor should sit snugly in the hole. Now, you can add the screw to secure your item.
Securing The Mount
Securing the mount is a key step after placing the wall anchor. It ensures the item stays firm and safe on the wall. A loose mount can cause damage or accidents. Follow the right steps to keep the mount stable and strong.
Screwing Into The Anchor
Start by choosing the right screw for the anchor. The screw must fit tightly to hold well. Insert the screw slowly into the anchor with a screwdriver. Turn the screw clockwise until it feels tight. Avoid over-tightening, which can damage the anchor or wall.
Testing For Stability
Once the screw is in place, test the mount’s hold. Gently pull or push the item to check for movement. A secure mount should not wiggle or shift. If it moves, remove the screw and try again. Proper testing prevents future problems and keeps the wall safe.
Troubleshooting Common Issues
Installing a wall anchor can sometimes cause problems. Knowing how to fix these issues saves time and effort. Troubleshooting common problems helps keep your wall strong and your items secure.
Dealing With Loose Anchors
Loose anchors happen when the hole is too big or the anchor is weak. Remove the anchor carefully to avoid more damage. Use a larger anchor or fill the hole with wood filler. Let the filler dry, then drill a new hole for a tighter fit. Push the new anchor firmly into the hole. Test by gently pulling the anchor to check stability.
Fixing Wall Damage
Wall damage often occurs from drilling or pulling anchors out. Clean any loose debris around the hole. Apply spackling paste or wall putty to fill cracks and holes. Smooth the surface with a putty knife and let it dry completely. Sand the area lightly for an even finish. Paint over the spot to match the wall color. Wait for the paint to dry before re-installing the anchor.

Credit: www.picturehangsolutions.com
Frequently Asked Questions
What Tools Do I Need To Install A Wall Anchor?
You need a drill, drill bits, a screwdriver, and the wall anchors. A hammer may help for some anchors. Use the right size drill bit for a secure fit. Proper tools make installation easier and stronger.
How Do I Prepare The Wall For A Wall Anchor?
First, locate the spot and mark it. Drill a hole matching the anchor size. Clean out debris from the hole. This ensures the anchor fits tightly and holds weight securely.
Can I Use Wall Anchors On Any Wall Type?
Wall anchors work best on drywall, plaster, and masonry walls. Some anchors are specific for hollow or solid walls. Check the anchor type before installation to ensure a strong hold.
How Deep Should I Drill For A Wall Anchor?
Drill a hole slightly deeper than the anchor length. This allows full insertion without damage. Proper depth ensures the anchor expands correctly and grips the wall firmly.
Conclusion
Getting a wall anchor into the wall is easier than it seems. Start with the right tools and follow clear steps. Take your time to drill a proper hole and insert the anchor carefully. Check that it fits snugly before adding screws.
This will keep your items secure and prevent damage. Practice makes perfect, so don’t rush the process. With patience and care, you can hang things safely on any wall. Simple steps lead to strong results every time.