Have you ever tried to remove a wall anchor from your sheetrock, only to end up with a bigger hole or damaged wall? If so, you’re not alone.
Removing wall anchors can be tricky, but it doesn’t have to be frustrating. In this guide, you’ll discover simple, effective methods to get those anchors out cleanly—no expert tools or skills needed. By the time you finish reading, you’ll feel confident tackling this common household problem and restoring your walls like a pro.
Keep reading to learn the best tips and tricks for removing wall anchors from sheetrock without hassle.
Tools Needed
Removing wall anchors from sheetrock needs the right tools. Choosing proper tools makes the job easier and avoids damage. Some tools are common in homes, while others are made for anchor removal. Prepare these tools before starting your project.
Basic Household Tools
A flathead screwdriver is essential for prying anchors out. Pliers help grip and pull stubborn anchors. A utility knife cuts around the anchor to loosen the drywall. A hammer can tap the screwdriver or help remove anchors gently. Most homes have these tools ready for use.
Specialized Removal Tools
An anchor removal tool is designed to pull anchors smoothly. These tools reduce damage to the wall during removal. A stud finder helps locate the anchor position behind the drywall. Sometimes a drill with a small bit removes anchors by drilling them out. These tools make anchor removal faster and cleaner.
Types Of Wall Anchors
Wall anchors hold objects on sheetrock walls securely. Different types suit different weights and uses. Knowing each type helps you remove them safely and easily.
Plastic Expansion Anchors
These anchors are common and simple. Made of plastic, they expand inside the wall when a screw goes in. They hold light items like picture frames. Removing them needs gentle pulling or pushing to avoid wall damage.
Toggle Bolts
Toggle bolts have metal wings that open behind the wall. They support heavier items like shelves. The wings spread the weight over a larger area. To remove, you must unscrew and carefully pull the bolt out to avoid tearing the wall.
Molly Bolts
Molly bolts are metal anchors that expand inside the wall cavity. They provide strong support for medium-weight items. Removing molly bolts requires unscrewing and sometimes pushing the anchor through the wall. Care is needed to keep the sheetrock intact.
Preparation Steps
Preparation is key before removing wall anchors from sheetrock. Taking the right steps helps protect your wall and keeps the process smooth. Clear the area around the anchor to avoid damage and accidents. Protect the wall surface to prevent scratches and dents during removal.
Clear The Area
Remove furniture and objects near the wall anchor. This creates enough space to work comfortably. Clear dust and dirt from the wall surface. It helps you see the anchor clearly and avoid mistakes. Keep tools close by for easy access.
Protect The Wall Surface
Place painter’s tape around the anchor to shield the paint. Use a soft cloth or cardboard to protect the wall below. This prevents dents or scratches from tools. Work gently to avoid damaging the sheetrock. Taking care now saves time on repairs later.
:max_bytes(150000):strip_icc()/how-to-remove-drywall-anchors-7562285-02-c01abbfe63374ad3a7bc1e52d0c15bb2.JPG)
Credit: www.thespruce.com
Removing Plastic Expansion Anchors
Removing plastic expansion anchors from sheetrock can be tricky. These anchors spread inside the wall to hold screws firmly. Taking them out without damaging the wall is important. Two easy methods work well: pulling the anchor out or pushing it through the wall. Both ways need simple tools and some care.
Pulling Method
Start by grabbing the anchor with pliers. Grip it firmly but gently. Pull straight out slowly to avoid tearing the drywall. If the anchor resists, wiggle it a little while pulling. Use steady force. Avoid quick jerks that could cause wall damage. Once the anchor moves, keep pulling until it comes free. Fill the hole with spackle afterward for a smooth finish.
Pushing Through Method
Push the anchor into the wall cavity using a screwdriver or a punch tool. Apply steady pressure until the anchor pops inside the wall. This method works well if pulling is difficult or the anchor breaks. After pushing the anchor in, patch the hole with joint compound. Sand it smooth once dry. This leaves a clean wall surface ready for painting.
Removing Toggle Bolts
Removing toggle bolts from sheetrock requires careful steps to avoid damage. First, unscrew the bolt, then gently push the toggle through the wall cavity. Patience helps prevent holes and keeps your wall smooth.
Loosening The Bolt
Toggle bolts have a winged nut behind the wall. It grips the sheetrock from inside. First, turn the bolt counterclockwise. Use a screwdriver that fits well. This helps avoid stripping the bolt head. Turn slowly to loosen the bolt. If it feels stuck, apply gentle pressure. Do not force it hard. Keep turning until the bolt moves freely. This step is key before removing the toggle.
Extracting The Toggle
After loosening, pull the bolt out carefully. The wings will fold to fit through the hole. Sometimes, the toggle falls inside the wall cavity. To catch it, use a strong magnet or a hook tool. If the toggle stays stuck, try pushing it gently with a thin rod. Avoid making the hole bigger. Once free, remove the toggle completely. Patch the hole afterward for a smooth finish.

Credit: www.youtube.com
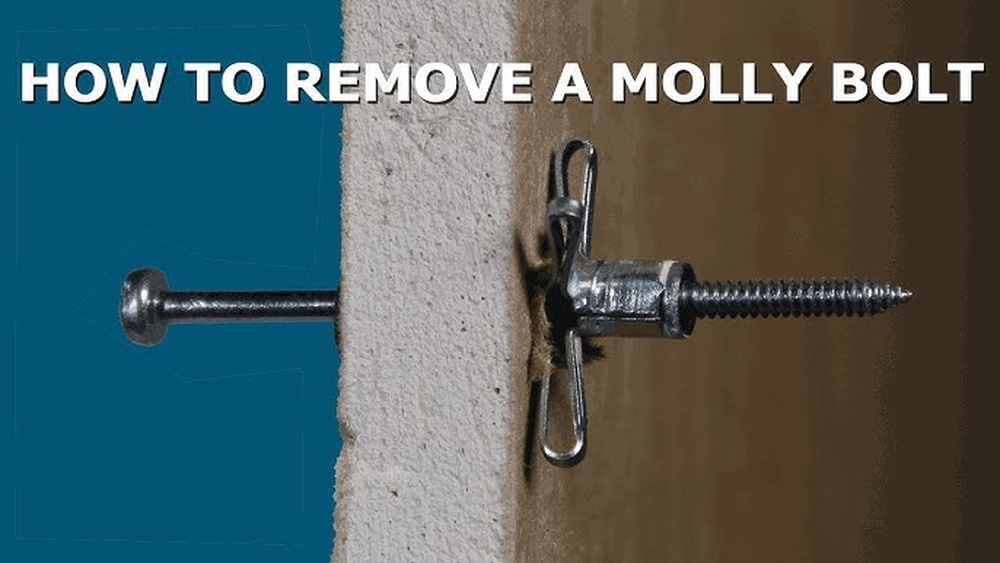
Removing Molly Bolts
Removing molly bolts from sheetrock can be tricky but not impossible. These anchors expand behind the wall for a strong hold. That makes pulling them out harder than regular screws.
Patience and the right steps help remove molly bolts cleanly. Avoid damaging your wall during the process. Two main steps help: unscrewing the bolt and collapsing the anchor.
Unscrewing The Bolt
Start by turning the screw counterclockwise. Use a screwdriver that fits well. Turn slowly to loosen the bolt.
The bolt may feel tight at first. Keep turning gently until it moves freely. Pull the bolt out once loose.
Sometimes the bolt may come out with the anchor still inside. That is normal. Next, focus on removing the anchor itself.
Collapsing The Anchor
Use needle-nose pliers to grip the anchor’s collar. Pull the anchor slightly outwards. This action helps collapse the anchor wings behind the wall.
Push the anchor back into the wall cavity once collapsed. This prevents damage and leaves a small hole. Patch the hole with spackle or wall filler.
Try not to force the anchor out. Collapsing it avoids ripping the drywall. Take your time for a clean removal.
Fixing Wall Damage
Removing wall anchors from sheetrock often leaves small holes or damage. Fixing this damage is important for a smooth and clean wall surface. Repairing the wall prepares it for painting and restores its original look. Simple tools and materials can help make the wall look like new.
Filling Holes
Start by cleaning the hole from dust and loose debris. Use a putty knife to apply spackling paste or wall filler. Press the filler into the hole until it is slightly overfilled. Let the filler dry completely, usually for a few hours. For bigger holes, apply the filler in layers, letting each dry.
Sanding And Painting
After the filler dries, sand the area smooth with fine-grit sandpaper. Sand gently until the wall surface feels even and flat. Wipe away dust with a dry cloth before painting. Use primer first if the patch is large or very visible. Then paint over the repaired spot with matching wall paint. Multiple coats may be needed for full coverage.

Credit: theturquoisehome.com
Preventing Future Damage
Preventing damage to sheetrock is important when using wall anchors. Careful choices and correct steps help keep walls strong. This avoids extra repairs and saves time.
Choosing The Right Anchor
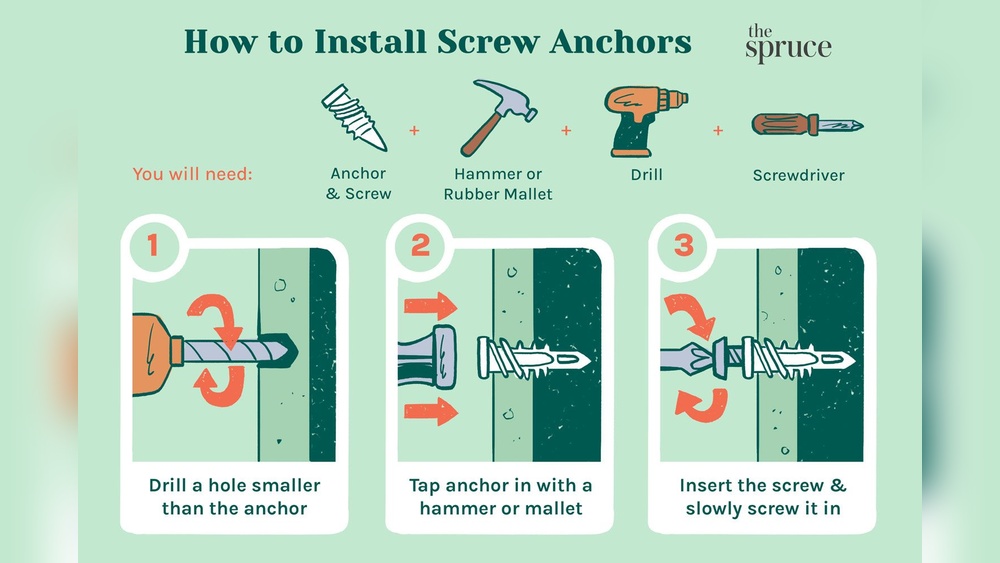
Select anchors that fit the weight of the object. Lightweight items need small anchors. Heavy items need strong, large anchors made for weight. Match anchor type to wall material. Some anchors work better with drywall, others with plaster or concrete. Using the right anchor stops holes from getting bigger or walls cracking.
Proper Installation Tips
Start by marking the exact spot for the anchor. Use a drill bit size that matches the anchor. Drill slowly to avoid making the hole too big. Insert the anchor straight into the hole. Tighten screws without forcing them. Over-tightening can break the anchor or damage the wall. Check the anchor holds firm before hanging anything. Proper steps keep your sheetrock safe and strong.
Frequently Asked Questions
How Do I Safely Remove Wall Anchors From Sheetrock?
To safely remove wall anchors, first unscrew any visible screws. Then, gently pull the anchor out using pliers or push it through the drywall. Avoid damaging the sheetrock to maintain wall integrity. Repair any holes with spackle afterward for a smooth finish.
What Tools Do I Need To Remove Wall Anchors?
You need basic tools like a screwdriver, needle-nose pliers, and a putty knife. A utility knife can help cut around the anchor. These tools allow you to remove anchors carefully and repair the wall efficiently without causing extra damage.
Can I Reuse Wall Anchors After Removal?
Generally, wall anchors are designed for one-time use. Removing them often damages their structure, making reuse unreliable. For safety and stability, it’s best to use new anchors when rehanging items on sheetrock walls.
How To Fix Holes After Removing Wall Anchors?
Fill holes with spackle or joint compound using a putty knife. Let it dry, then sand smooth. Finally, repaint the area to match your wall. This process restores the sheetrock’s appearance and prevents further damage.
Conclusion
Removing wall anchors from sheetrock is simple with the right steps. Start by choosing the best method for your anchor type. Work carefully to avoid damaging the wall surface. Take your time and be patient during the process. Small holes can be fixed easily with spackle and paint.
This helps your wall look clean and smooth again. Now, you can hang items or decorate without worry. Practice makes the task easier each time you do it. Keep these tips handy for future home projects.