Have you ever struggled with taking your floor jack off after a tough job? Removing a floor jack might seem simple, but doing it the right way can save you time, prevent damage, and keep you safe.
In this guide, you’ll discover easy steps to remove your floor jack quickly and without hassle. Whether you’re a DIY enthusiast or just want to handle your tools better, learning these tips will make your next project smoother. Keep reading, and you’ll never have to worry about tricky floor jack removal again.
Credit: www.redlinestands.com
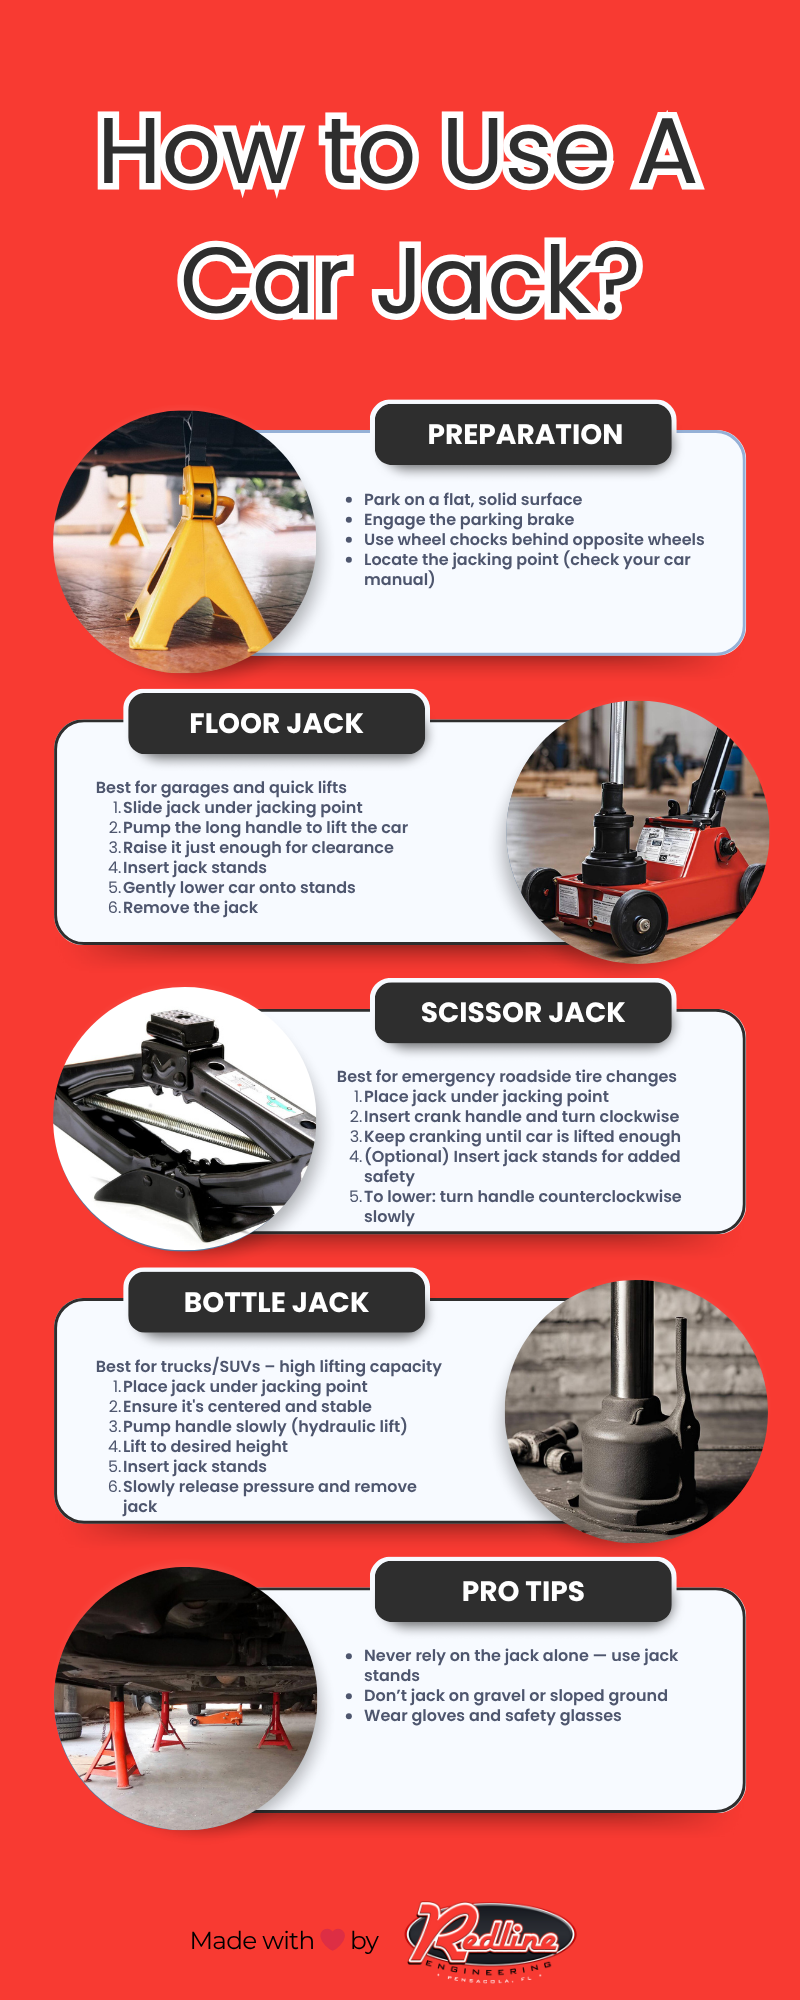
Preparing For Removal
Preparing to remove floor jacks is a crucial step. It ensures safety and makes the process smooth. Taking time to prepare helps avoid accidents and damage. Here is how to get ready for floor jack removal.
Clear The Area
Remove any tools, debris, or objects near the floor jack. A clean area prevents tripping and makes movement easier. Clear space gives you room to work safely and comfortably.
Gather Necessary Tools
Collect all tools needed for removal before starting. Common tools include wrenches, gloves, and wheel chocks. Having tools ready saves time and reduces stress.
Check Vehicle Stability
Make sure the vehicle is stable and secure on the jack. Use wheel chocks to prevent rolling. Test stability by gently shaking the vehicle before removing the jack.
Credit: www.reddit.com
Lowering The Floor Jack
Lowering a floor jack safely is key to avoiding damage and injury. This step requires careful handling and patience. Follow simple actions to control the jack’s descent smoothly. Focus on each part of the process to keep everything stable and secure.
Release The Pressure Valve
Find the pressure release valve on the jack. Turn it slowly to open. This lets the hydraulic pressure out. Do not open it quickly. A fast release can cause the jack to drop suddenly. Turn gently until the jack begins to lower.
Control The Descent
Hold the handle firmly during lowering. Control the speed by adjusting the valve opening. Keep your hands clear of moving parts. Watch the jack’s movement closely. Stop if it moves too fast or unevenly. Slow and steady is safest.
Ensure Even Lowering
Check that the vehicle or object lowers evenly. Uneven lowering can cause slipping or damage. Make small adjustments to the valve as needed. Make sure all supports stay in place. Take your time to lower the jack fully and safely.
Removing The Jack Safely
Removing a floor jack safely is very important. This prevents accidents and damage. Follow clear steps to take the jack away without trouble. Stay careful and focused during the process.
Slide The Jack Away
Lower the jack slowly until it no longer supports the object. Make sure the load is stable before moving the jack. Slide the jack back gently on a flat surface. Avoid sudden movements to keep control and balance.
Inspect The Jack For Damage
Look over the jack carefully after use. Check for cracks, leaks, or bent parts. Any damage can make the jack unsafe to use again. Clean dirt and grease from the jack’s surface. Early checks help avoid future problems.
Store The Jack Properly
Keep the jack in a dry, clean place. Store it away from heavy objects and moisture. Lower the jack fully before putting it away. Cover it to stop dust from settling. Proper storage keeps the jack ready for next time.

Credit: www.youtube.com
Safety Tips To Remember
Removing floor jacks needs care and attention. Safety must be the top priority. Small mistakes can cause injuries or damage. Follow these simple safety tips to protect yourself and others.
Avoid Sudden Movements
Move the jack slowly and steadily. Sudden jerks can make the load shift. This can cause accidents or equipment damage. Take your time and stay focused. Smooth actions keep you safe.
Wear Protective Gear
Always wear gloves and safety glasses. Gloves protect your hands from sharp edges. Glasses shield your eyes from debris. Steel-toed boots add extra foot protection. Proper gear reduces injury risks.
Work On A Stable Surface
Ensure the ground is flat and firm. A stable surface prevents the jack from slipping. Avoid soft or uneven areas. This helps keep the load steady. Stability is key for safe removal.
Frequently Asked Questions
How Do You Safely Remove Floor Jacks?
To safely remove floor jacks, first lower the jack completely. Ensure the vehicle or object is stable. Then, carefully slide the jack out from underneath, avoiding sudden movements to prevent damage or injury.
When Should Floor Jacks Be Removed During Repair?
Remove floor jacks only after the repair or maintenance is fully complete. Lower the vehicle securely onto the ground before removing the jack to ensure safety and stability.
Can I Remove Floor Jacks Without Assistance?
Yes, you can remove floor jacks alone if you follow safety steps. Lower the jack slowly and ensure the load is stable before removing the jack completely.
What Tools Help In Removing Floor Jacks Efficiently?
Typically, no extra tools are needed to remove floor jacks. However, having gloves and a clean work area can help ensure safe and efficient removal.
Conclusion
Removing floor jacks is simple with the right steps. Always lower the jack slowly and carefully. Keep safety in mind to avoid accidents. Check the area for any tools or obstacles. Store the jack in a dry, safe place after use.
With patience and care, the job finishes smoothly. Now, you can handle floor jacks with confidence.