Have you ever struggled with stubborn wall anchors that just won’t come out? Whether you’re fixing a mistake or removing old fixtures, pulling wall anchors out can be tricky and frustrating.
But don’t worry—this guide will show you simple, effective ways to remove them without damaging your walls. Keep reading, and you’ll learn easy tricks that save your time and keep your space looking clean and neat. Ready to tackle those anchors with confidence?
Let’s get started!
Credit: www.familyhandyman.com
Types Of Wall Anchors
Wall anchors come in different types. Each type works best for certain walls and weights. Knowing their features helps you remove them safely. Here are the common types of wall anchors you may find.
Plastic Expansion Anchors
Plastic expansion anchors are simple and common. They fit into small holes drilled in drywall. When a screw goes in, the anchor expands. This holds the anchor tightly in the wall. They are easy to remove but can break if pulled hard.
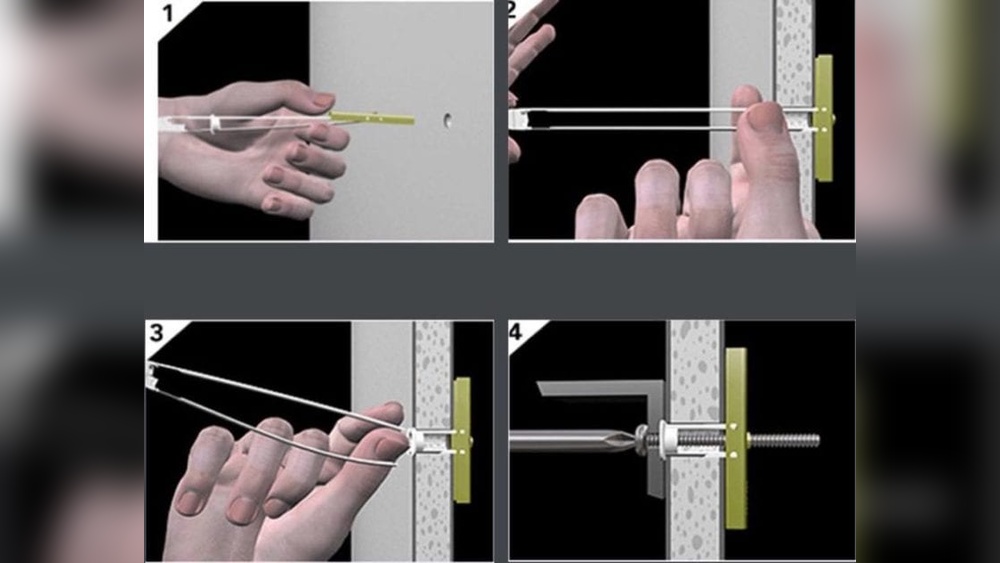
Toggle Bolts
Toggle bolts have metal wings that open inside the wall. These wings spread the load over a larger area. They work well in hollow walls and ceilings. Removing toggle bolts needs care to avoid wall damage. The wings must be folded to pull out.
Molly Bolts
Molly bolts are metal anchors that expand behind the wall. They provide strong support for medium-heavy objects. After inserting, the bolt tightens and flares the anchor. Pulling them out can leave a larger hole. Sometimes, you must unscrew them first.
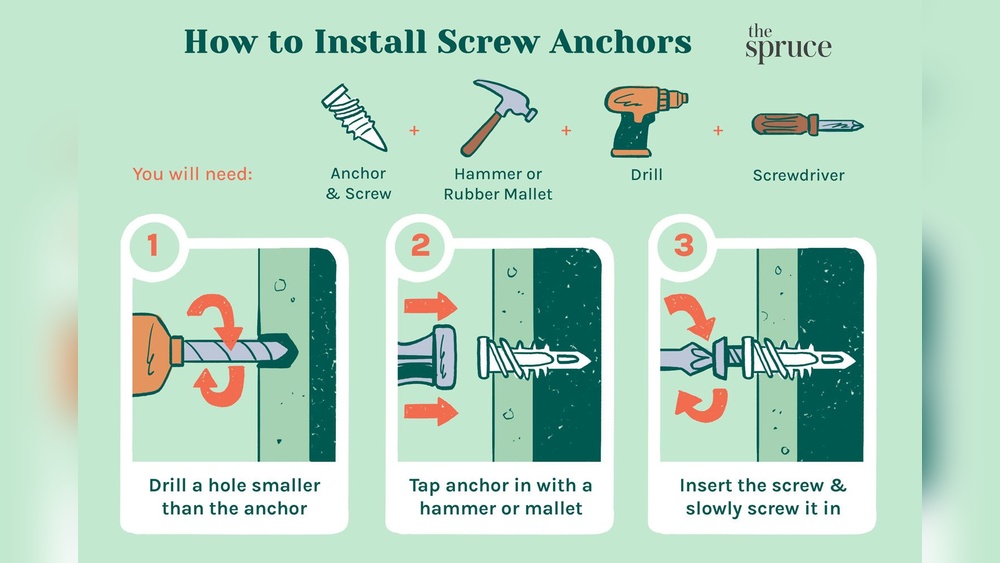
Self-drilling Anchors
Self-drilling anchors screw directly into drywall without pre-drilling. They have sharp threads for easy installation. These anchors hold light to medium loads. To remove, unscrew them slowly to avoid wall damage. They are reusable in some cases.
Tools Needed For Removal
Removing wall anchors needs the right tools. Using proper tools makes the job easier and prevents wall damage. Below are essential tools needed to pull wall anchors out safely.
Pliers And Screwdrivers
Pliers help grip the wall anchor tightly. Use needle-nose pliers for better control. Screwdrivers assist in loosening anchors stuck inside the wall. A flathead screwdriver can pry the anchor slightly before pulling.
Drill And Drill Bits
A drill with small bits helps remove stubborn anchors. Use the drill to create a hole around the anchor. This loosens the anchor from the wall. Choose drill bits that fit the anchor size for safe removal.
Putty Knife And Hammer
A putty knife slides between the wall and anchor. Tap gently with a hammer to lift the anchor. This method works well for plastic anchors. It also reduces wall damage during removal.
Preparation Steps
Before you start pulling wall anchors out, preparation is key. Taking a few simple steps helps protect your wall and makes the process easier. Proper preparation reduces damage and saves time. Follow these steps to get ready.
Clearing The Area
Remove any furniture or items near the wall. This creates space to work safely and freely. Clear small objects and decorations from the wall too. A clean area prevents accidents and keeps your tools within reach.
Protecting The Wall Surface
Cover the wall around the anchor with painter’s tape. This protects the paint and drywall from scratches. Use a soft cloth or small piece of cardboard to shield the area further. Taking this step keeps your wall looking good after removal.
Removing Plastic Expansion Anchors
Plastic expansion anchors are common in walls. They help hold screws tightly in drywall or plaster. Removing these anchors can be tricky. The goal is to take them out without damaging the wall. Two simple methods work well: backing out with pliers or pushing through with a screwdriver. Both ways are easy and need only a few tools.
Backing Out With Pliers
Start by gripping the anchor’s lip with needle-nose pliers. Pull gently while twisting back and forth. The anchor should start to come out slowly. Keep steady pressure to avoid breaking it inside the wall. If the anchor resists, try wiggling it slightly. This loosens the grip. Pull until the whole anchor is free. Clean the hole afterward to prepare for patching or new anchors.
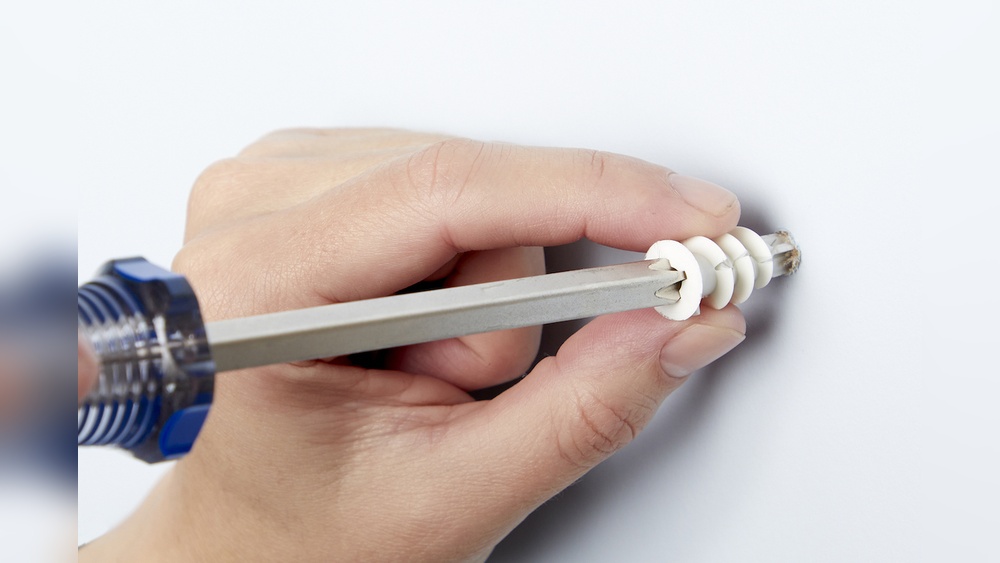
Pushing Through With A Screwdriver
Choose a screwdriver slightly smaller than the anchor. Place the tip against the anchor’s center. Push the anchor gently into the wall cavity. It will collapse inside the wall. This method works well if the anchor is flush or sunk. After pushing it in, fill the hole with spackle. Smooth it out for a clean finish. This way avoids pulling and reduces wall damage.
Extracting Toggle Bolts
Extracting toggle bolts from a wall can be tricky. These anchors hold tightly behind the wall, making removal a challenge. Knowing the right steps helps avoid damage to your wall. Follow simple instructions to pull out toggle bolts with ease.
Unscrewing The Bolt
Start by turning the bolt counterclockwise. Use a screwdriver that fits the bolt head well. Keep turning until the bolt is completely loose. Do not force it or strip the head. If the bolt spins but does not come out, try tightening it slightly first, then unscrew.
Removing The Toggle
Once the bolt is out, the toggle will still be inside the wall. Push the toggle into the wall cavity carefully. Use a thin tool or hook to pull it out if possible. Sometimes, the toggle falls inside the wall and cannot be retrieved. This is normal and will not harm the wall structure.

Credit: www.wikihow.com
Taking Out Molly Bolts
Taking out molly bolts can seem tricky at first. These wall anchors are designed to hold tight and stay put. Removing them carefully avoids damage to your wall. Follow simple steps to get them out smoothly. Understanding the structure of molly bolts helps during removal.
Unscrewing The Bolt
Start by turning the screw counterclockwise. Use a screwdriver that fits the bolt well. Turn slowly to avoid stripping the head. Unscrewing the bolt frees it from the wall. Sometimes the bolt stays stuck inside the anchor. If so, keep turning until it loosens or backs out.
Collapsing The Anchor
Once the bolt is out, the anchor remains inside the wall. The molly bolt’s metal wings expand behind the drywall. These wings hold the anchor tight. To remove the anchor, push it inward gently. Use pliers to grip the collar if needed. Squeeze the wings together to collapse them. This lets you pull the anchor out easily. Be careful not to damage the wall surface.
Handling Self-drilling Anchors
Self-drilling anchors are common for hanging items on walls. These anchors have a unique design that allows them to drill into drywall without pre-drilling a hole. Removing them requires a careful approach to avoid wall damage. The key is to handle them gently but firmly.
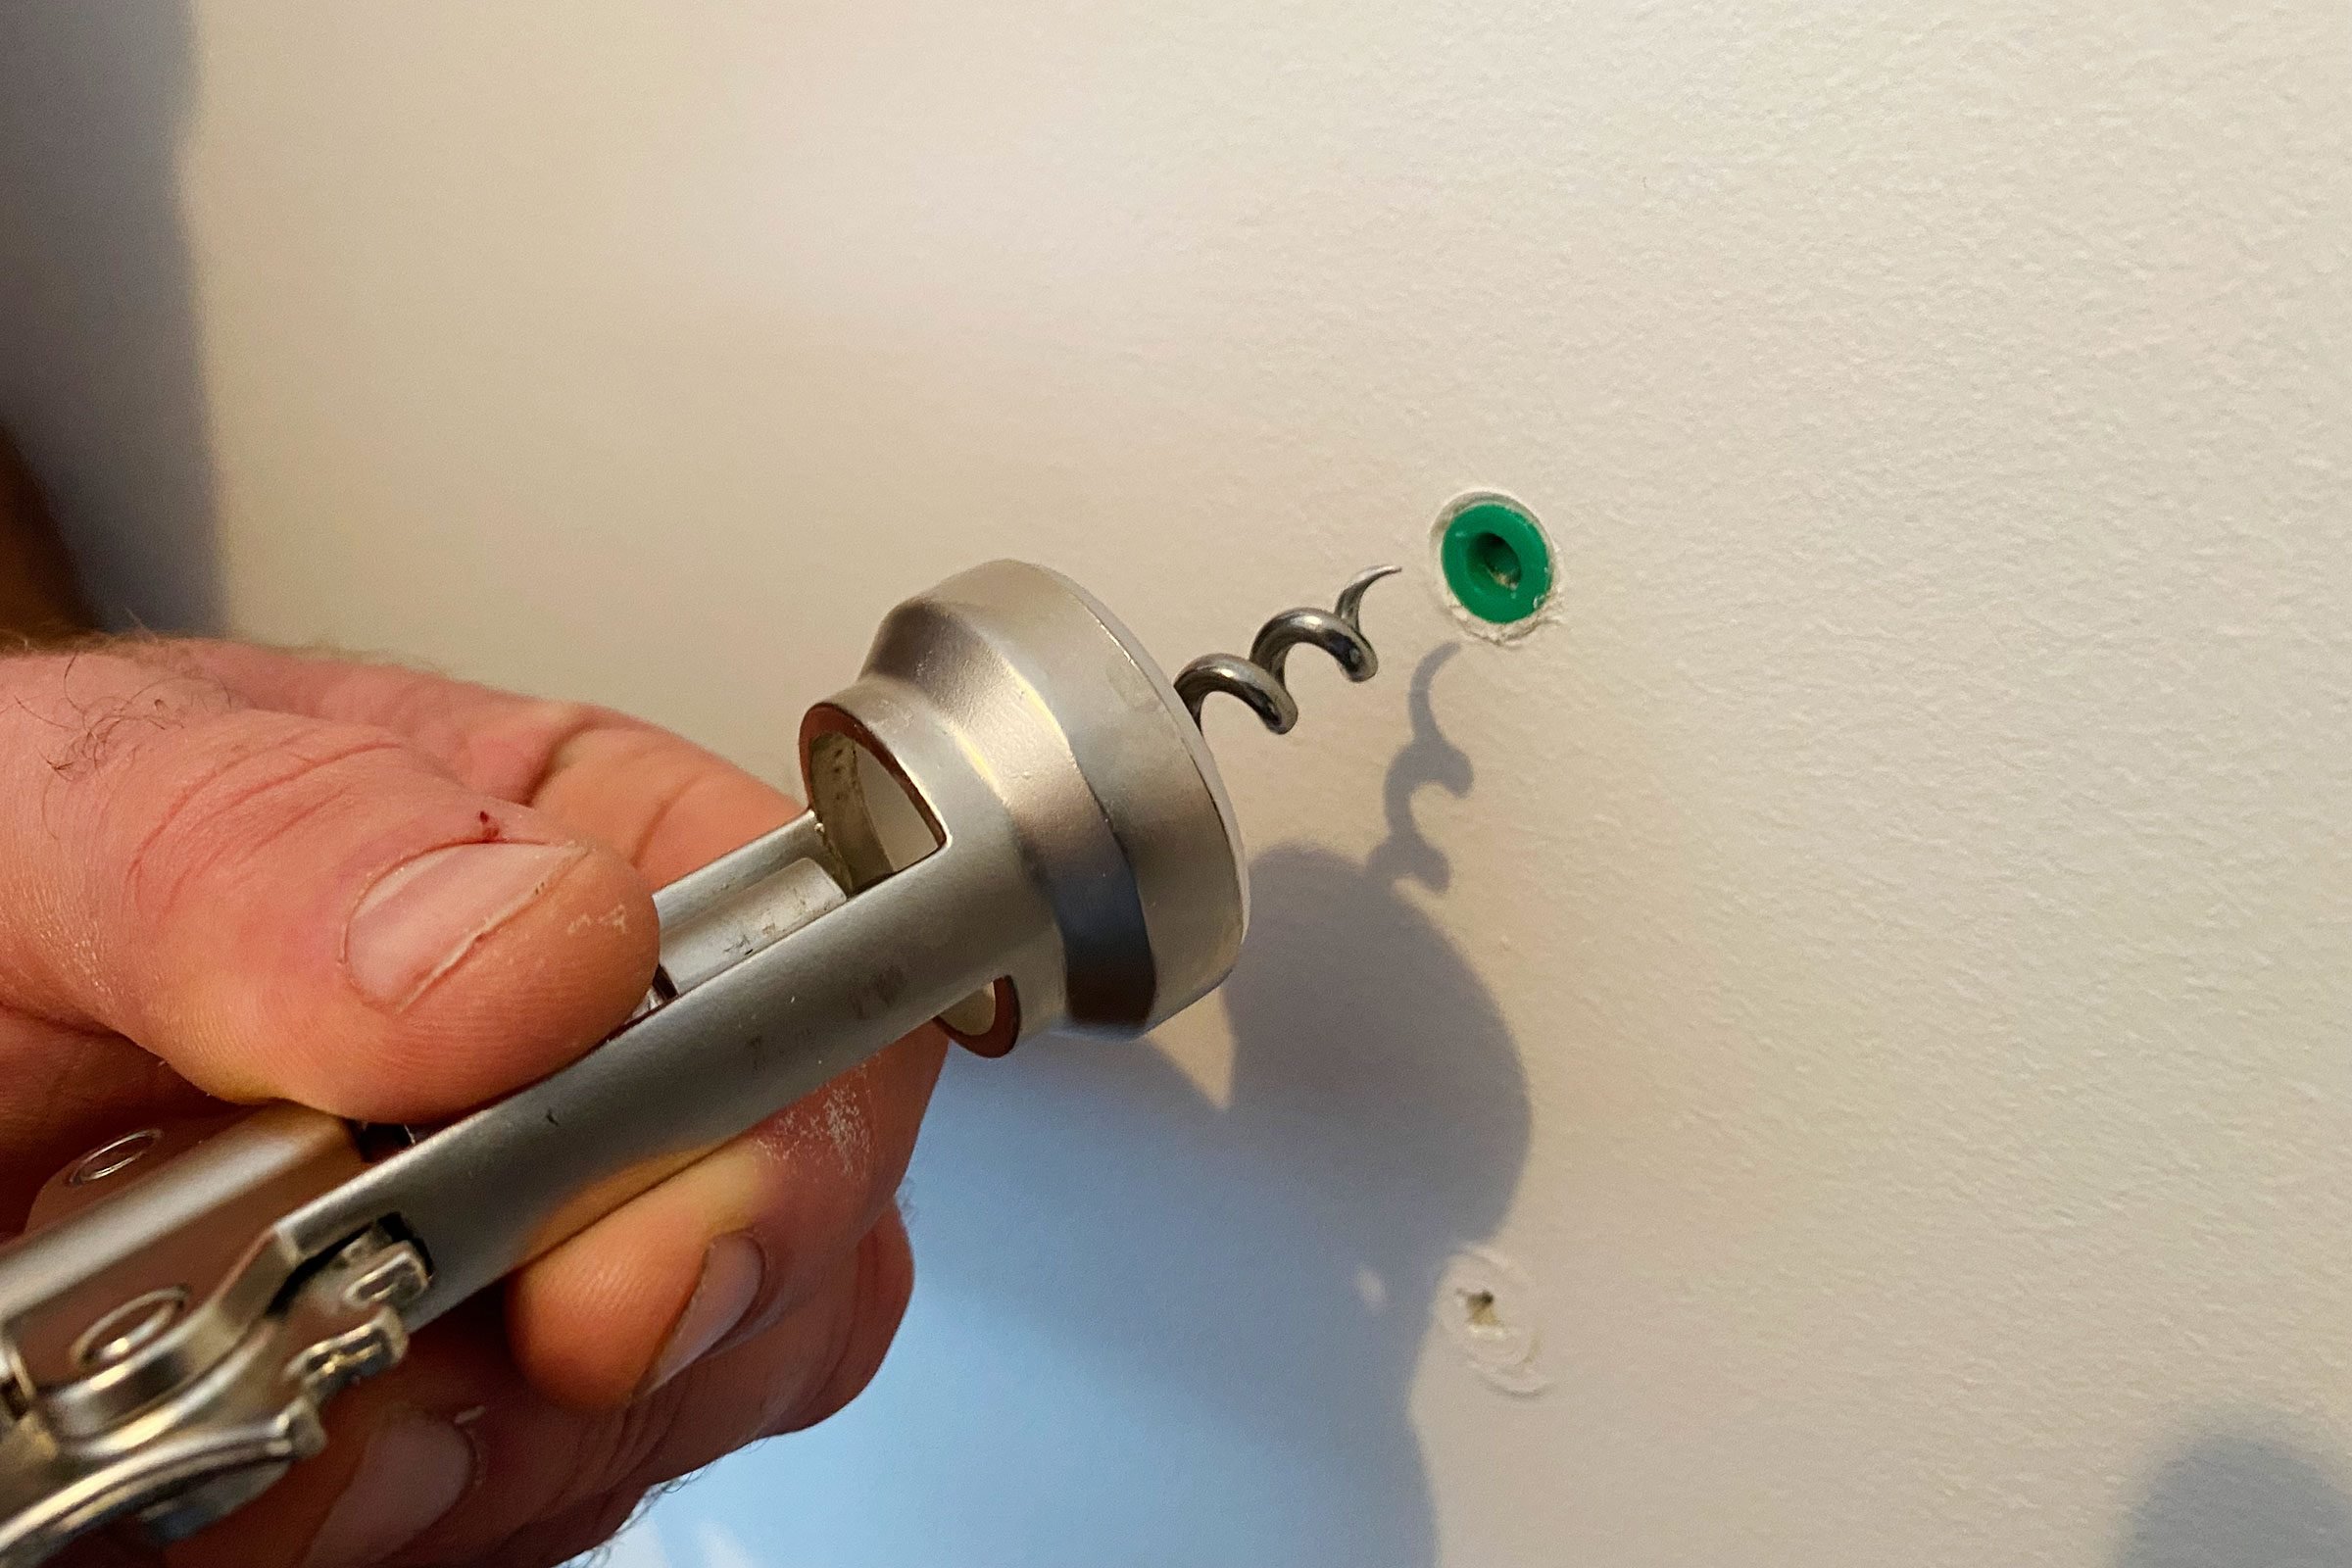
Unscrewing By Hand
Start by trying to unscrew the anchor with your fingers. Grip the anchor’s head and turn it counterclockwise. This works best if the anchor is loose or not deeply set. If it turns easily, keep unscrewing until it comes out. Use pliers for a better grip if your fingers slip. Avoid pulling straight out to prevent wall damage.
Using A Drill For Stubborn Anchors
Stubborn anchors may not unscrew by hand. Use a drill with a screwdriver bit for extra power. Set the drill to low speed and turn counterclockwise. Apply steady pressure to avoid stripping the anchor head. If the anchor spins but does not come out, try pushing it gently into the wall cavity. This prevents wall surface damage and allows easier patching later.
Repairing The Wall After Removal
Removing wall anchors often leaves holes and rough patches on your wall. Repairing these areas makes your wall look smooth and clean again. Proper repair helps paint stick better and hides any damage clearly.
This section covers simple steps to fix the wall after pulling out anchors. Follow these tips to restore your wall’s surface quickly and easily.
Filling Holes
Start by cleaning the holes to remove dust and debris. Use a putty knife to apply spackle or wall filler. Press the filler firmly into the hole. Overfill slightly to allow for shrinkage as it dries. Let the filler dry completely before moving on.
Sanding And Smoothing
Use fine-grit sandpaper to smooth the dried filler. Sand gently until the surface is even with the wall. Wipe away dust with a dry cloth. Check for any bumps or uneven spots and sand again if needed. This step ensures a flat, clean surface for painting.
Repainting Tips
Choose paint that matches your wall color. Apply a primer first if the patch is large or very visible. Use a small brush or roller to blend the paint smoothly. Paint in thin layers for even coverage. Allow each layer to dry before adding another. This process hides repairs and refreshes your wall’s look.
Preventing Wall Damage
Removing wall anchors without harming your wall takes care and the right method. Walls can crack, chip, or leave holes if anchors are pulled out roughly. Protecting the wall surface keeps it clean and ready for new fixtures or paint. Simple steps and the right tools help prevent damage and save time on repairs.
Gentle Removal Techniques
Start by loosening the anchor gently. Use pliers or a screwdriver to wiggle it slowly. Pull straight out with steady pressure. Avoid twisting or yanking hard. For plastic anchors, push them inside the wall if they resist. This stops large holes from forming. If the anchor breaks, remove pieces carefully. Take time. Quick pulls cause wall damage.
Choosing The Right Anchor
Select anchors that fit your wall type. Drywall anchors work best in drywall, not plaster or brick. Use anchors made from strong materials like metal for heavy items. Plastic anchors suit light loads. Right anchors reduce the chance of wall cracks. Match the anchor size to the screw and load. This keeps the wall safe and stable.

Credit: theturquoisehome.com
Frequently Asked Questions
How Do You Safely Remove Wall Anchors?
To safely remove wall anchors, first unscrew any attached screws. Then, gently pull the anchor using pliers or a flathead screwdriver. Avoid forcing it to prevent wall damage. Patch any holes afterward for a clean finish.
What Tools Are Best For Pulling Wall Anchors?
Pliers, flathead screwdrivers, and needle-nose pliers work best. They provide a good grip and control for pulling anchors out. Using the right tools reduces wall damage and makes removal easier.
Can I Reuse Wall Anchors After Removal?
Reusing wall anchors is not recommended. Removal often deforms them, reducing their holding power. It’s better to use new anchors for secure, stable wall mounting.
Why Are Wall Anchors Difficult To Remove?
Wall anchors can be hard to remove due to tight fitting and wall material. Plastic anchors may expand inside the wall, gripping firmly. Using proper tools and techniques helps ease removal.
Conclusion
Pulling wall anchors out can be simple with the right tools. Take your time and work carefully to avoid damage. Use pliers, screws, or special tools to loosen anchors. Small holes left behind can be fixed easily. Practice makes the process quicker and less stressful.
Knowing how to remove anchors helps with home repairs. Keep these tips in mind for your next project. You’ll feel more confident handling wall anchors yourself.