Changing the keys to your Kwikset electronic deadbolt might sound complicated, but it doesn’t have to be. Imagine having full control over who can access your home, without calling a locksmith or buying a new lock.
In this guide, you’ll discover simple steps to rekey your Kwikset electronic deadbolt quickly and safely. Whether you just moved in, lost a key, or want extra security, this article will give you the confidence to take charge of your door’s safety.
Keep reading to unlock the secrets to protecting your home easily.
Tools Needed
Before starting to rekey your Kwikset electronic deadbolt, gather the right tools. Having the proper tools makes the process easier and faster. It helps avoid mistakes and damage to your lock. Below are the essential tools needed for rekeying.
Phillips Head Screwdriver
This screwdriver removes the screws holding the lock. Most Kwikset locks use Phillips screws. It is important to have the correct size to avoid stripping screws.
Flathead Screwdriver
A flathead screwdriver helps pry off the lock cover gently. It can also assist in removing small parts. Use it carefully to prevent damage.
Kwikset Rekey Tool
The Kwikset rekey tool is designed specifically for this lock type. It helps reset the lock pins to match a new key. This tool is essential for a proper rekey.
New Keys
Have your new keys ready before starting. The lock will be set to match these keys. Without new keys, the rekeying process cannot finish.
Small Container
Use a small container to hold screws and small parts. This prevents losing them during the process. Keeping parts organized saves time and effort.
Prepare The Lock
Preparing the lock is the first step to rekey your Kwikset electronic deadbolt. This step ensures you can access the parts inside the lock. Proper preparation helps make the rekeying process smooth and safe.
Take your time to follow each step carefully. This will protect the lock and your door from damage.
Remove The Deadbolt
Start by unlocking the door and opening it fully. Use a screwdriver to remove the screws from the interior side of the deadbolt. Keep the screws in a safe place to avoid losing them.
Gently pull off the interior cover of the deadbolt. This exposes the inside parts of the lock. If the cover feels stuck, do not force it. Check for hidden screws or clips holding it in place.
Access The Interior Components
Once the cover is off, locate the battery pack and the cylinder inside the lock. Remove the battery pack carefully to avoid damaging wires. This step disconnects power from the lock for safety.
Find the small retaining clip or screw holding the lock cylinder. Remove it to free the cylinder. Pull the cylinder out slowly. Keep all parts organized for reassembly.
Remove Old Keys
Removing old keys is the first step to rekey your Kwikset electronic deadbolt. This step prepares the lock for new keys and ensures it works correctly. Without removing old keys, the lock may not function as expected after rekeying.
It is important to carefully take out all old keys. This helps avoid confusion and keeps your lock secure. Follow the steps below to remove old keys safely and easily.
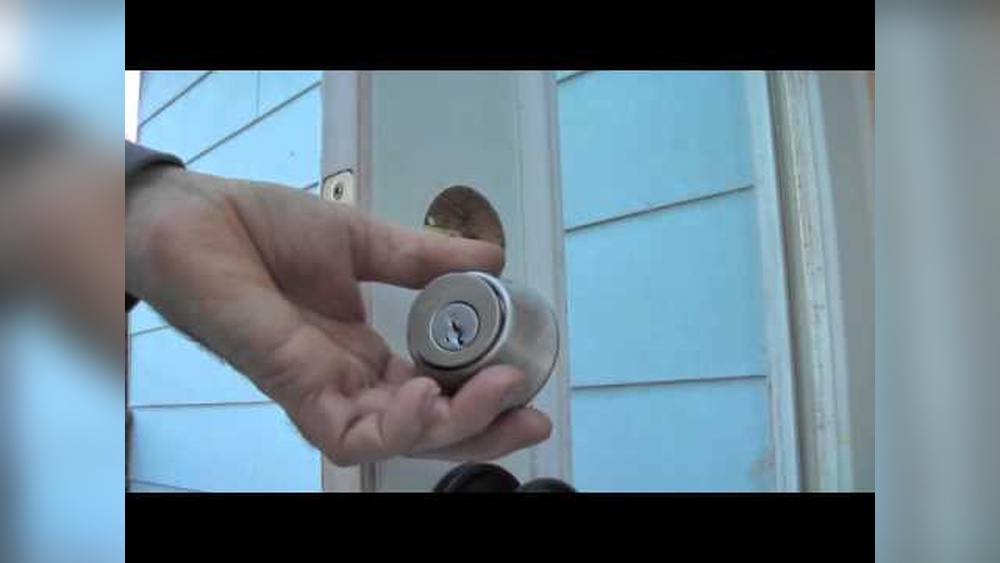
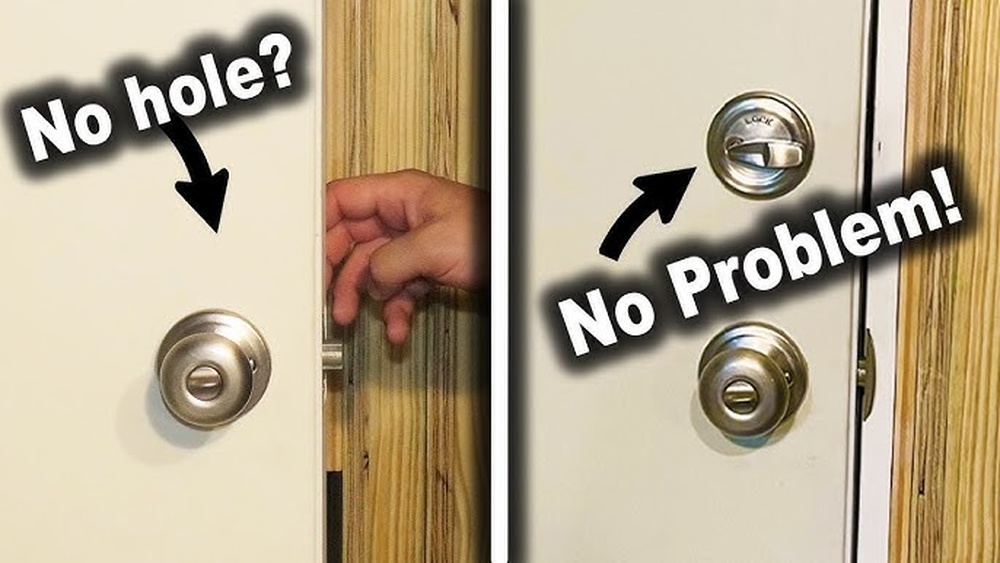
Locate The Key Slot
Find the key slot on your Kwikset electronic deadbolt. It is usually on the outside of the door. This is where you insert and remove keys. Make sure the lock is in the unlocked position before starting.
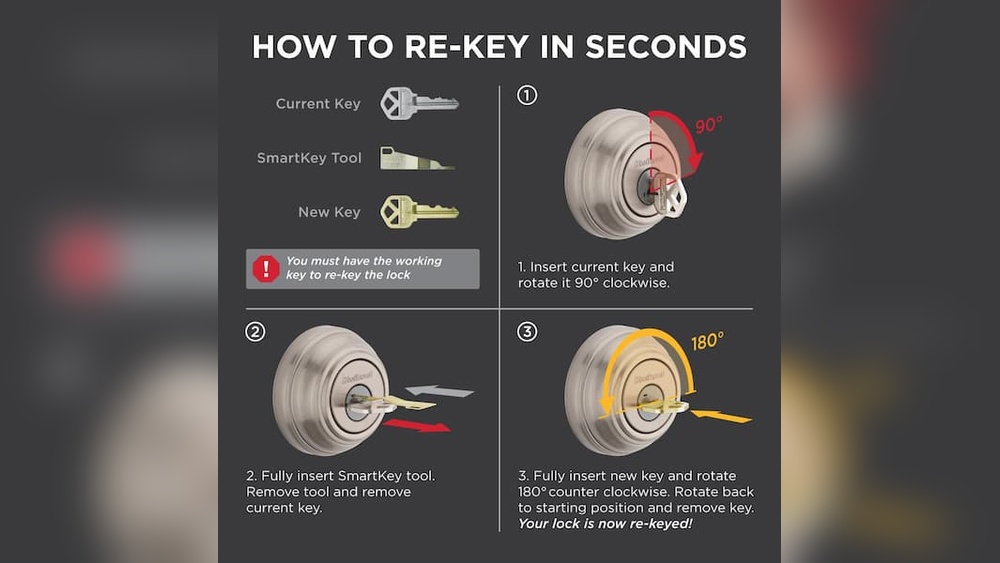
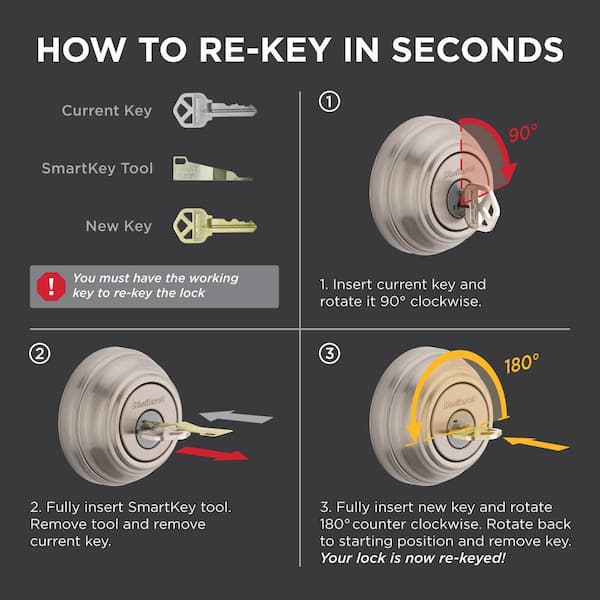
Insert The Current Key
Put the current key fully into the key slot. Turn it gently to unlock the deadbolt if needed. Keeping the key turned helps release the lock cylinder for removal.
Remove The Key And Lock Cylinder
With the key turned, pull the key and lock cylinder out together. Do this slowly to avoid damage. The lock cylinder holds the pins and springs inside the lock.
Take Out All Old Keys
Check the lock cylinder and remove any old keys found inside. Keep them separate from new keys. This prevents accidentally using old keys after rekeying.
Credit: www.homedepot.com
Insert New Keys
Inserting new keys into your Kwikset electronic deadbolt is a simple task. This step ensures the lock works only with your new keys. It keeps your home secure and prevents old keys from working.
Follow the instructions carefully to insert the keys properly. This will help your deadbolt function smoothly and reliably every time.
Prepare The New Keys
Start by selecting the correct new keys for your deadbolt. Make sure they are cut to match your lock’s pin configuration. Avoid using worn or damaged keys as they might jam the lock.
Align The Key Correctly
Hold the key so the grooves line up with the lock pins. Insert the key gently into the keyway. Do not force it, as this can damage the pins inside the lock.
Test The Key Operation
Turn the key slowly to check if it moves the deadbolt. The lock should operate smoothly without sticking. If the key does not turn easily, remove it and try again.
Remove The Old Keys
After confirming the new key works, remove all old keys from the lock. This step disables the old keys and increases security. Keep only the new keys with you or trusted family members.
Reassemble The Lock
After rekeying the Kwikset electronic deadbolt, reassembling the lock is the next key step. This process puts all parts back together so the lock works smoothly. Careful reassembly ensures the lock stays secure and functions properly.
Follow each step carefully. Avoid forcing parts. Proper alignment is important for the lock to work correctly. Keep tools and small parts close by to avoid losing them.
Attach The Interior Assembly
Start by placing the interior assembly back onto the door. Align it with the screws and the deadbolt mechanism. Make sure the wiring connects properly if your model has electronic components. Gently press the interior assembly flush against the door surface.
Insert and tighten the screws to hold the interior assembly firmly. Do not overtighten to prevent damage. Check that all parts fit well and the keypad or buttons are accessible.
Secure The Deadbolt
Next, secure the deadbolt by tightening the mounting plate screws. The deadbolt should slide smoothly when you operate the lock. Test the bolt by turning the thumb turn inside. It must move without sticking or wobbling.
Double-check the lock’s operation from both sides of the door. Confirm that the lock engages and disengages properly. Properly securing the deadbolt keeps your door safe and your lock reliable.
Test The New Keys
Testing the new keys is an important step after rekeying your Kwikset electronic deadbolt. This ensures the lock works properly and keeps your home secure. Take your time to check each key carefully. This helps avoid future problems.
Insert The Key Smoothly
Gently insert the new key into the lock. It should slide in without force. If it feels stuck, do not push hard. Check the key and lock for any issues. A smooth fit means the rekeying was done right.
Turn The Key To Lock And Unlock
Turn the key to lock and unlock the door. It should move easily and stop at the correct points. If the key feels tight or hard to turn, the lock may need adjustment. The key must work smoothly both ways.
Test All New Keys
Try every new key you made. Each key should open the lock without trouble. This confirms the lock matches all new keys. Testing all keys avoids surprises later on.
Check The Electronic Functions
Use the keypad or electronic part of the deadbolt. Enter your code and see if the lock opens. The electronic features must work with the new key settings. This keeps your deadbolt fully functional.
Troubleshooting Tips
Troubleshooting your Kwikset electronic deadbolt can save time and frustration. Problems may arise during or after rekeying. Knowing common issues and fixes helps keep your lock working smoothly.
This section covers simple tips to solve typical problems. Follow these steps carefully for the best results.
Check Battery Power
Low battery often causes the lock to stop working. Replace old batteries with fresh ones. Use the correct battery type recommended by Kwikset. Test the lock after changing batteries.
Reset The Lock
Resetting the lock can clear errors. Find the reset button inside the lock. Hold it for the time specified in the manual. This resets settings to factory defaults. Reprogram your codes after reset.
Inspect The Keypad
Dirty or damaged keypads may not respond well. Clean the keypad with a soft, dry cloth. Avoid liquids or harsh cleaners. Check for stuck or broken buttons. Replace the keypad if damaged.
Align The Deadbolt
Misaligned deadbolts cause jamming. Make sure the bolt fits smoothly into the strike plate. Adjust the strike plate position if needed. Tighten any loose screws on the lock and door frame.
Verify Programming Codes
Incorrect codes prevent the lock from unlocking. Double-check your programming steps. Enter the master code before adding new user codes. Remove old codes that are no longer used.
Consult The Manual
The user manual has detailed troubleshooting advice. Follow the instructions exactly. Manuals also list error codes and their meanings. Keep the manual handy for future reference.
Credit: www.kwikset.com
Credit: www.kwikset.com
Frequently Asked Questions
How Do I Rekey A Kwikset Electronic Deadbolt?
To rekey a Kwikset electronic deadbolt, remove the lock from the door. Use the included tool to change the cylinder pins. Follow the manufacturer’s instructions carefully to ensure proper function.
Can I Rekey Kwikset Electronic Deadbolt Myself?
Yes, rekeying a Kwikset electronic deadbolt is DIY-friendly with the right tools. Follow the step-by-step guide provided with your lock for safe results.
What Tools Are Needed To Rekey Kwikset Deadbolt?
You need a key gauge, a plug follower, a screwdriver, and new pins. These tools help safely remove and replace the cylinder pins inside the lock.
How Long Does Rekeying A Kwikset Electronic Lock Take?
Rekeying usually takes about 15 to 30 minutes. Time depends on your experience and the specific lock model.
Conclusion
Rekeying your Kwikset electronic deadbolt is simpler than it seems. Follow the steps carefully and take your time. This small task can improve your home’s security quickly. You don’t need special tools or skills. Just patience and attention to detail.
Keep your keys organized and test the lock after rekeying. This way, you know it works well. Protect your home with confidence and ease. A little effort goes a long way.