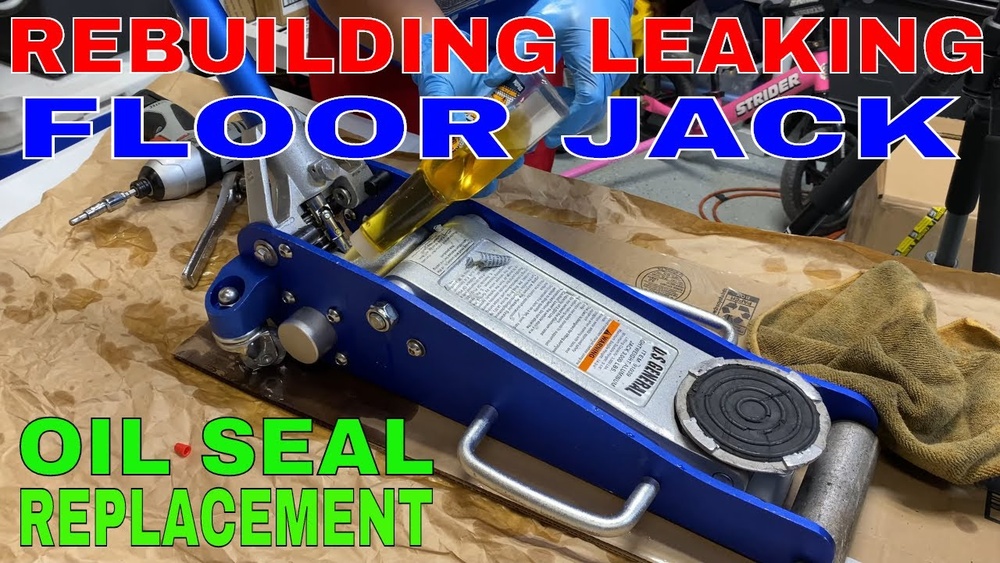
If you use a floor jack regularly, keeping it in top shape is essential for your safety and efficiency. One key part of maintenance is replacing the oil fill plug.
You might wonder why this small piece matters or how to do it without making a mess. In this guide, you’ll learn simple, clear steps to replace your floor jack oil fill plug quickly and correctly. By the end, you’ll feel confident handling this task yourself, saving time and money.
Ready to keep your floor jack working like new? Let’s dive in.

Credit: www.reddit.com
Tools And Materials Needed
Replacing the floor jack oil fill plug needs certain tools and materials. Having these ready makes the job easier and faster. It also helps avoid damage to your floor jack.
Each tool has a specific purpose in the process. Using the right materials ensures a proper seal and smooth operation. Below are the essential items you should have before starting.
Wrench Or Socket Set
A wrench or socket set fits the oil fill plug size. It helps remove and tighten the plug without slipping. Choose one that matches your floor jack’s plug.
Replacement Oil Fill Plug
The new plug replaces the old one after draining the oil. It must fit perfectly to prevent leaks. Pick a plug designed for your floor jack model.
Hydraulic Oil
Use the correct hydraulic oil for your floor jack. The oil keeps the jack working smoothly. Check your manual for the recommended type and quantity.
Clean Cloth Or Rag
A clean cloth wipes dirt and oil spills. It helps keep the work area tidy. Use it to clean the plug and jack surface before and after the job.
Drain Pan Or Container
A drain pan collects old oil safely. It prevents spills on the floor. Choose a container large enough to hold all the oil.

Credit: yourpghlawyer.com
Safety Precautions
Always wear gloves and eye protection before starting the oil fill plug replacement. Ensure the floor jack is on a flat, stable surface to prevent accidents. Check for oil spills and clean them immediately to avoid slips.
Wear Protective Gear
Always wear gloves to protect your hands from oil and dirt. Use safety goggles to shield your eyes from splashes. These simple steps prevent injuries and keep you safe.
Work On A Stable Surface
Place the floor jack on a flat, solid floor. Avoid working on slopes or uneven ground. A steady base stops the jack from tipping over during the oil change.
Release Pressure Carefully
Lower the jack fully before removing the oil fill plug. This releases pressure inside the jack. Removing the plug under pressure can cause oil to spray out.
Dispose Of Oil Properly
Collect old oil in a sealed container. Do not pour oil on the ground or down drains. Take used oil to a recycling center to protect the environment.
Keep Children And Pets Away
Ensure kids and pets stay out of the work area. Oil and tools can be harmful. A clear workspace prevents accidents and distractions.
Locating The Oil Fill Plug
Start by cleaning the floor jack to see all parts clearly. The oil fill plug is usually on the side or top. Look for a small, round cap that can be unscrewed easily.
Understanding The Oil Fill Plug
The oil fill plug is a small part on your floor jack. It allows you to add or replace hydraulic oil. Finding this plug is the first step in maintaining your jack. Knowing its location helps you work safely and efficiently.
Checking The Jack Body
Look closely at the main body of the floor jack. The oil fill plug is usually near the base or side. It may be a round, flat piece with a slot for a screwdriver or a hex shape. Clean any dirt or grease to see it clearly.
Consulting The User Manual
The user manual gives exact details about your jack model. It shows where the oil fill plug is located. Follow the guide to avoid mistakes. Manuals often include pictures for easy spotting.
Using Visual Clues
Look for a small cap or bolt that looks different from others. The oil fill plug often has a rubber or metal seal. It might sit near the hydraulic cylinder or pump area. Spotting these clues helps identify the plug quickly.
Draining Old Oil
Draining old oil from a floor jack is a crucial step before replacing the oil fill plug. Removing used oil helps maintain the jack’s performance and prevents damage. Old oil can contain dirt and debris that affect the jack’s hydraulic system.
Proper draining ensures fresh oil fills the system cleanly. The process is simple but requires care to avoid spills and mess. Follow the steps carefully for safe and efficient oil removal.
Prepare Your Workspace
Place the floor jack on a flat surface. Use old newspapers or a plastic sheet to catch oil drips. Wear gloves to protect your hands from dirty oil. Have a container ready to collect the old oil safely.
Locate The Oil Fill Plug
Find the oil fill plug on the jack’s body. It is usually a small bolt or screw. Use a wrench or screwdriver to loosen the plug gently. Keep the plug nearby for later use.
Drain The Old Oil
Tip the jack slightly to help the oil flow out easily. Let the oil drain completely into your container. Avoid rushing to prevent spills. Check the jack’s reservoir to ensure all old oil is removed.
Clean The Area
Wipe the oil fill opening with a clean cloth. Remove any dirt or debris around the plug area. This step prevents contamination of the new oil. Dispose of the old oil properly at a recycling center.
Removing The Old Oil Fill Plug
Start by locating the old oil fill plug on the floor jack. Use a wrench to turn it counterclockwise and remove it carefully. Keep the plug safe for reinstallation after filling new oil.
Gather Necessary Tools And Prepare The Area
Start by collecting the right tools. You will need a wrench or socket set that fits the oil fill plug.
Wear gloves to protect your hands from oil and dirt. Place the floor jack on a flat surface to keep it steady.
Clean The Area Around The Plug
Use a clean cloth to wipe dirt and grime from the plug area. This prevents debris from falling inside the jack.
Cleaning helps avoid contamination in the oil, which can harm the jack’s performance.
Loosen The Old Oil Fill Plug
Use the wrench or socket to turn the plug counterclockwise. Apply steady pressure to avoid stripping the plug.
Loosen it slowly. If it is stuck, a little penetrating oil can help loosen rust or dirt.
Remove The Plug Carefully
Once loose, unscrew the plug by hand. Be ready to catch any oil that may leak out.
Place the old plug in a safe spot to avoid losing it. Check the plug for damage or wear.

Credit: yourpghlawyer.com
Choosing The Right Replacement Plug
Choosing the right replacement plug for your floor jack oil fill is crucial. The plug seals the oil reservoir. It stops leaks and keeps dirt out. A wrong plug can cause oil spills or damage the jack.
There are many types of plugs. Each fits different jacks. Picking the correct size and material ensures a proper fit. This helps your jack work safely and last longer.
Check The Size And Thread Type
Measure the old plug’s diameter and thread pitch. Most plugs have standard sizes, but some are unique. Match the thread type exactly to avoid leaks.
Choose Durable Materials
Replacement plugs come in metal or plastic. Metal plugs resist wear and heat better. Plastic plugs are lighter and cheaper. Pick a material that suits your jack’s use.
Consider Sealing Features
Look for plugs with built-in seals or washers. These parts improve the seal and prevent oil leaks. A tight seal keeps the oil clean and your jack working well.
Buy From Trusted Brands
Use plugs from known manufacturers or the jack’s brand. Quality plugs fit better and last longer. Avoid cheap, generic plugs that may fail quickly.
Installing The New Oil Fill Plug
Installing the new oil fill plug is a key step in maintaining your floor jack. It keeps the oil sealed inside, preventing leaks and damage. The process is simple and can be done with basic tools. Follow these steps carefully to ensure a secure fit and proper function.
Prepare The Area For Installation
Start by cleaning the area around the oil fill hole. Remove any dirt or old oil residue. This helps the new plug seal tightly. Use a clean cloth or paper towel for wiping. Make sure the surface is dry before proceeding.
Check The New Oil Fill Plug
Inspect the new plug for any defects or damage. The threads should be clean and smooth. If the plug has a rubber gasket or O-ring, check it for cracks. A good seal depends on these parts being intact.
Insert The New Oil Fill Plug
Place the plug into the oil fill hole carefully. Turn it clockwise by hand to start threading. Avoid cross-threading by aligning the plug properly. Hand-tighten until snug. This reduces the risk of stripping the threads.
Tighten The Plug Securely
Use a wrench to tighten the plug firmly. Do not over-tighten as it may damage the threads or gasket. Tighten just enough to stop any leaks. Check for proper fit and alignment before finishing.
Refilling The Jack With Oil
Refilling the floor jack with oil is a key step to keep it working smoothly. The right oil level helps the jack lift heavy loads safely and efficiently. Using the correct oil type is important for the jack’s performance and longevity.
Before starting, prepare the tools and oil. Clean the area around the fill plug to avoid dirt entering the jack. Proper refilling prevents damage and ensures smooth operation.
Remove The Oil Fill Plug
Locate the oil fill plug on the jack’s body. Use a wrench or screwdriver to loosen and remove it carefully. Keep the plug in a safe place to avoid losing it. Removing the plug allows old oil to drain and new oil to enter.
Drain Old Oil Completely
Place a container under the jack to catch the used oil. Tilt the jack slightly to let the oil flow out. Wait until the oil stops dripping. This step removes dirt and contaminants from inside the jack.
Pour New Oil Into The Jack
Use the recommended hydraulic oil type for your floor jack. Slowly pour the oil into the fill hole using a funnel. Fill until the oil reaches the correct level, usually just below the fill hole. Avoid overfilling to prevent leaks and damage.
Reinstall The Oil Fill Plug
Clean the plug before putting it back. Screw the plug tightly but do not overtighten. A secure plug keeps the oil inside and prevents dirt from entering. Check for leaks after refilling to ensure a good seal.
Testing The Floor Jack
Testing the floor jack after replacing the oil fill plug is essential. It ensures the jack works safely and smoothly. This step helps catch any leaks or pressure issues early. Follow each test carefully for best results.
Check For Oil Leaks
Look closely around the new oil fill plug. Make sure there is no oil dripping or wet spots. A tight plug should stop all leaks. If you see oil, tighten the plug again. Wipe any spilled oil before testing further.
Pump The Handle Slowly
Move the jack handle up and down slowly. Feel how the jack lifts the arm. It should rise smoothly without jerks or stops. If the jack feels weak, it might need more oil or air bleeding.
Test Lifting Capacity
Place the jack under a heavy object, like a car tire. Pump the handle to lift the object a few inches. The jack must hold the weight steadily. If it lowers quickly, check the oil level or plug seal again.
Release Pressure And Lower Jack
Turn the release valve slowly to lower the jack. The arm should descend smoothly without sudden drops. A safe jack lowers steadily under control. Stop if you notice any strange noises or fast drops.
Maintenance Tips For Longevity
Proper maintenance extends the life of your floor jack. Small steps keep it working smoothly. Regular checks prevent costly repairs and safety risks. Follow simple tips to keep your jack in top shape.
Check Oil Levels Regularly
Keep the oil at the right level. Low oil causes poor lifting and damage. Use the correct type of oil for your jack. Check oil every few months or after heavy use.
Clean The Oil Fill Plug Area
Remove dirt and debris around the plug before opening. Clean areas stop contaminants from entering the jack. Use a clean cloth to wipe around the fill plug carefully. This prevents internal damage.
Tighten The Oil Fill Plug Securely
Always tighten the oil fill plug after refilling. Loose plugs cause oil leaks and air entry. Use proper tools to avoid stripping the plug. A secure plug keeps the jack sealed and safe.
Inspect For Oil Leaks
Look under the jack for oil spots. Leaks reduce oil levels and harm jack parts. Fix leaks early to avoid serious problems. Replace worn seals or damaged plugs immediately.
Store The Jack Properly
Keep the jack in a dry, clean place. Avoid exposure to dust and moisture. Proper storage stops rust and oil contamination. Lower the jack fully before storing to relieve pressure.
Frequently Asked Questions
What Tools Are Needed To Replace A Floor Jack Oil Fill Plug?
You need a wrench or socket set, clean cloth, new oil fill plug, and hydraulic jack oil. Always check your jack’s manual for specific tool recommendations.
How Do I Safely Remove The Old Oil Fill Plug?
First, ensure the jack is lowered and on a flat surface. Use a wrench to turn the plug counterclockwise gently. Avoid forcing it to prevent damage.
What Type Of Oil Should I Use After Replacing The Plug?
Use the hydraulic jack oil specified in your jack’s manual. Avoid using motor oil or other fluids as they can damage the jack’s internal components.
How Often Should I Replace The Floor Jack Oil Fill Plug?
Replace the plug if it’s damaged, leaking, or during oil changes. Regular inspection every 6 months helps maintain jack performance and safety.
Conclusion
Replacing the floor jack oil fill plug keeps your jack working well. It stops oil leaks and protects the jack’s parts. Always check the plug for damage before installing it. Tighten the plug carefully to avoid stripping the threads. Regular maintenance helps your floor jack last longer and work safely.
Now, you can handle this simple task with confidence. Keep your tools in good shape for better performance every time. Simple steps make a big difference in the jack’s life.