If you’ve ever tried to hang something heavy on your wall and worried it might fall, learning how to screw anchors into your wall is a game changer. You might think it’s tricky, but with the right steps, you can do it confidently and securely.
This simple skill will save you from damage and keep your belongings safe. Ready to make your walls stronger and your hangings safer? Keep reading, and you’ll discover easy tips that anyone can follow.
Choosing The Right Anchor
Choosing the right anchor makes screwing into walls easier and safer. The right anchor holds your item firmly and prevents damage. Knowing types and matching them to your wall type saves time and effort. Let’s explore how to pick the right anchor for your needs.
Types Of Wall Anchors
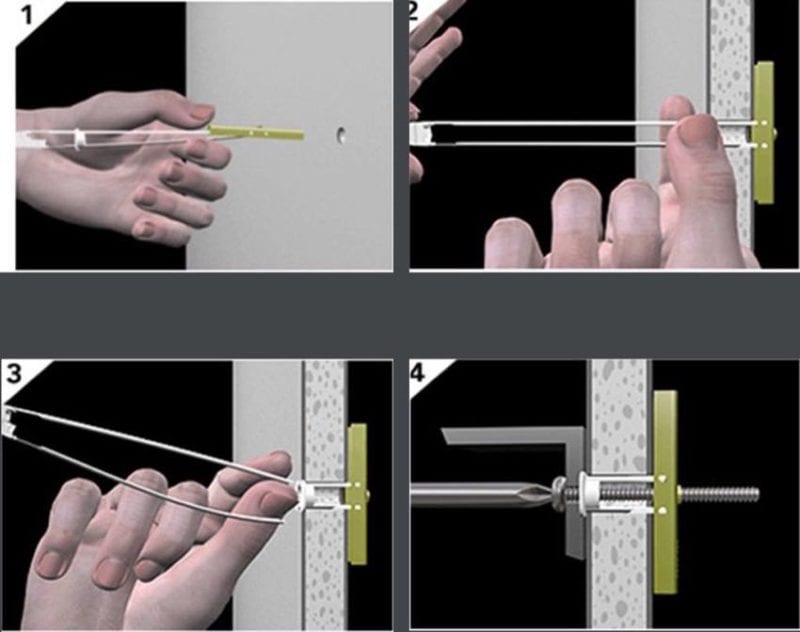
Plastic anchors are common for light loads. They expand inside the wall to hold screws tight. Metal anchors are stronger and good for medium loads. They can support heavier items without bending or breaking. Toggle bolts have wings that open inside hollow walls. They offer strong support for heavy objects on drywall. Self-drilling anchors do not need pre-drilling. They screw directly into drywall or plaster easily.
Matching Anchors To Wall Material
Drywall needs anchors that expand or toggle inside the hollow space. Plastic anchors work for small frames or light shelves. Use metal or toggle bolts for heavier items on drywall. Masonry walls require anchors that can grip concrete or brick. Use sleeve or wedge anchors for stone or brick surfaces. Plaster walls are fragile, so choose anchors that spread load. Hollow wall anchors suit plaster walls well. Matching the anchor to the wall type ensures strong and safe support.
Gathering Tools And Materials
Gathering the right tools and materials is the first step to screw anchors into a wall effectively. Having everything prepared makes the job easier and safer. It also saves time and helps avoid mistakes.
Knowing what tools and screws to use is important. The right choice depends on the wall type and the weight of the item you want to hang. This section explains what you need to get started.
Essential Tools Needed
You need a drill to make holes for the anchors. A screwdriver or drill with a screwdriver bit helps to insert screws. A hammer can help tap anchors into the wall. A tape measure ensures correct placement. A pencil helps mark the spots to drill.
Use a level to keep your items straight. Safety glasses protect your eyes from dust. A stud finder is useful to avoid drilling into studs or wires. These basic tools make the process smooth and safe.
Selecting Proper Screws
Choose screws that fit your anchors well. Too short screws will not hold firmly. Too long screws can damage the wall or anchor. Match the screw size to the weight of the object you hang.
Different wall types need different screws. Drywall anchors use specific screws. Masonry walls need screws that work with concrete anchors. Check the anchor package for recommended screw types and sizes.
Preparing The Wall
Preparing the wall is an important first step before screwing anchors. It makes sure the anchors hold well and stay safe. Taking time here helps avoid damage and makes your project last longer.
Start by finding the best spots on the wall. Then, create small holes that guide the anchor in straight. These steps protect the wall and make the anchors fit perfectly.
Locating Studs And Marking Spots
Studs are wooden beams inside walls. Anchors hold better near studs. Use a stud finder tool to locate them. Move the tool slowly across the wall. When it beeps or lights up, a stud is there.
Mark the spot with a pencil. If no stud is found, choose a solid area. Avoid places with wires or pipes. Mark all spots where you want anchors.
Drilling Pilot Holes
Use a drill bit smaller than the anchor. Drill gently into the marked spots. Pilot holes guide the anchor and stop the wall from cracking. Keep the drill straight for best results.
Drill only as deep as the anchor length. Clear dust from holes with a brush or air blower. Now, the wall is ready for the anchor to go in smoothly.
:max_bytes(150000):strip_icc()/how-to-use-and-discard-anchor-screws-1822671-002-04-4963da18c2674e6bbf07e5fc07d5b4f0.jpg)
Credit: www.thespruce.com
Inserting The Anchor
Inserting the anchor into the wall is a key step for a strong hold. The anchor must fit tightly and sit properly inside the hole. This step ensures your screws stay secure and support the weight you plan to hang.
Choosing the right method to insert the anchor affects the ease and success of this task. Pay attention to how the anchor sits in the wall to avoid future damage or loose fittings.
Manual Vs. Power Tools
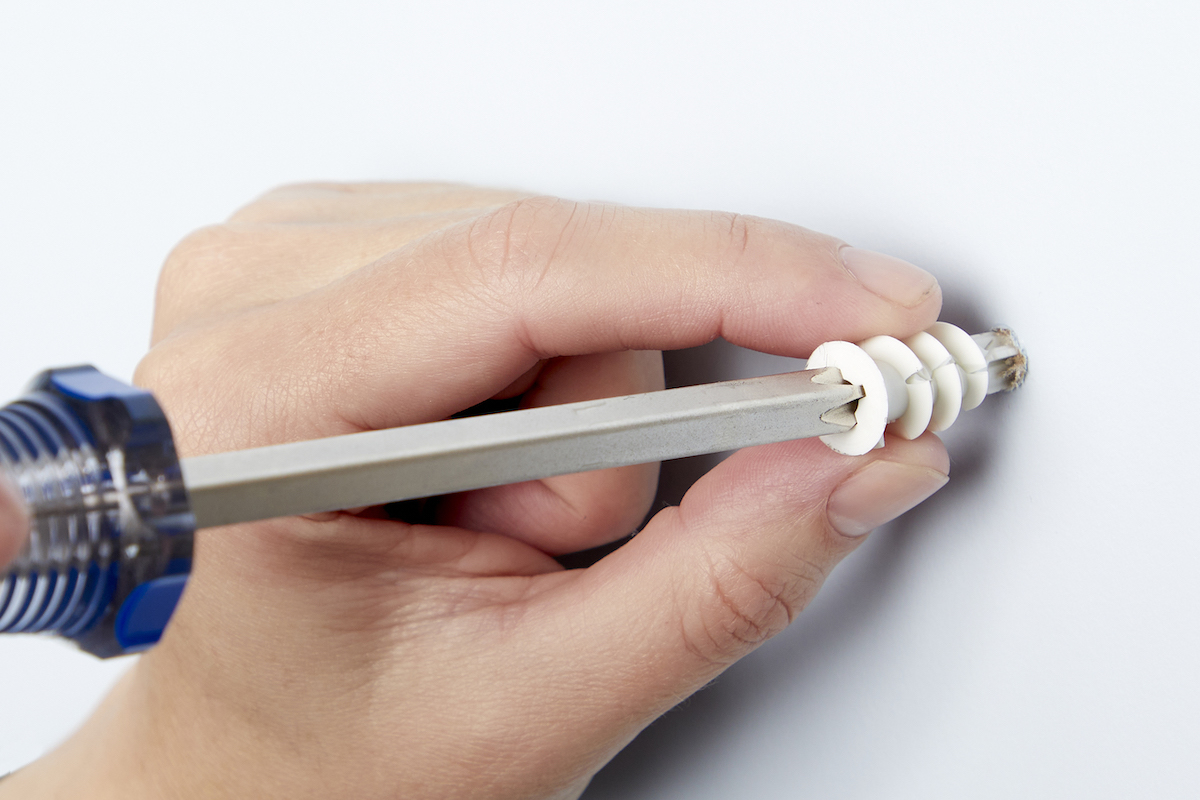
Use a screwdriver for manual insertion. This gives you more control and reduces the risk of pushing too hard. Manual tools work well for small anchors or delicate walls.
Power tools speed up the process. They work best for larger anchors or harder walls. Use low speed and gentle pressure to prevent cracking the wall.
Choose the tool that matches your anchor size and wall type. Avoid forcing the anchor to prevent damage.
Ensuring Flush Placement
The anchor should sit flush with the wall surface. Too deep, and the screw won’t hold well. Too shallow, and the anchor may pop out.
Check the anchor’s edge after insertion. Use a level or your eye to see if it is even.
Adjust by gently tapping with a hammer or twisting with a screwdriver. A flush anchor ensures a strong and stable screw fit.
Screwing Into The Anchor
Screwing into the anchor is an important step in securing items to the wall. The anchor holds the screw tightly, giving strong support. Proper screwing ensures the anchor expands and grips the wall properly. This section explains how to screw into the anchor safely and effectively.
Choosing The Right Screwdriver
Select a screwdriver that fits the screw head well. A good fit prevents slipping and damage to the screw. Use a Phillips screwdriver for cross-shaped screws. For flat-head screws, pick a flat screwdriver. Using the correct tool makes screwing easier and faster.
Avoiding Over-tightening
Screw gently until you feel resistance. Stop turning once the screw is snug. Over-tightening can break the anchor or damage the wall. A tight screw holds firmly without forcing it too much. Careful screwing keeps the anchor and wall intact.
Credit: www.bobvila.com
Testing The Hold
Testing the hold of screw anchors is a crucial step. It ensures the anchor will support the weight safely. This step helps avoid accidents and damage to your wall. Taking time to test the hold makes your work reliable and long-lasting.
Applying Pressure Safely
Apply pressure gently to the screw or attached item. Start with a light push to check for movement. Use your hand to feel if the anchor shifts or wiggles. Avoid sudden or heavy force that may loosen the anchor. Gradually increase pressure to simulate real use conditions. Stop immediately if you notice any slipping or cracking sounds.
Adjusting If Necessary
If the anchor moves or feels loose, adjustments are needed. Remove the screw carefully and inspect the hole. Consider using a larger anchor or a different type for better grip. Fill loose holes with wall filler and let dry before re-drilling. Try repositioning the anchor slightly for a stronger hold. Repeat testing after adjustments to confirm stability and safety.
Common Mistakes To Avoid
Screwing anchors into a wall might seem simple, but mistakes can cause big problems. Avoiding common errors ensures your anchors hold tight and your items stay safe. Knowing what not to do saves time and frustration.
Using Incorrect Anchors
Choosing the wrong anchor weakens the hold. Drywall anchors won’t work well in brick or concrete. Heavy items need stronger anchors than light ones. Match the anchor size with the screw and weight. Using small or weak anchors can cause damage and falls.
Ignoring Wall Material
Every wall type needs a different approach. Drywall, plaster, brick, and concrete require specific anchors and tools. Drilling without knowing the wall type can cause cracks or holes. Always check your wall material before starting. This step helps pick the right anchor and drill bit.
Credit: www.protoolreviews.com
Frequently Asked Questions
What Tools Are Needed To Screw Anchors Into Wall?
You need a drill, screwdriver, wall anchors, and screws. A drill helps make a pilot hole. Screwdrivers secure the anchor into the wall. Use anchors suitable for your wall type for best results.
How Do I Choose The Right Wall Anchors?
Select anchors based on wall material and weight load. Plastic anchors work for light loads on drywall. Metal anchors suit heavier items and drywall or masonry. Always check anchor packaging for weight limits and compatibility.
Can I Install Wall Anchors Without A Drill?
Yes, but a drill makes the job easier and neater. For small plastic anchors, you can push them into soft drywall. However, drilling a pilot hole ensures proper placement and anchor grip, especially for heavier items.
How Deep Should I Drill Holes For Wall Anchors?
Drill holes slightly deeper than the anchor length. This allows the anchor to fit fully inside the wall. Check anchor packaging for exact hole depth recommendations. Proper depth ensures secure fastening and prevents damage.
Conclusion
Screwing anchors into a wall is simple with the right steps. Start by choosing the correct anchor for your wall type. Drill a hole that matches the anchor size. Push or tap the anchor in gently. Then, screw in your fastener firmly but not too tight.
This method keeps your items secure and your wall safe. Practice makes the process easier and faster. Try it yourself for a steady and strong hold every time. No need to worry about falling items again.