Have you ever tried to hang something on your wall, only to find those stubborn plastic wall anchors stuck inside the drywall? Removing them can feel tricky and frustrating, especially if you want to avoid damaging your walls.
But don’t worry—there are simple, effective ways to get those anchors out cleanly. You’ll learn step-by-step methods that anyone can use to remove plastic wall anchors quickly and safely. Keep reading, and you’ll be ready to fix your walls like a pro in no time.
Credit: www.familyhandyman.com
Tools Needed
Removing plastic wall anchors from drywall requires some basic tools. These tools help you pull out the anchors without damaging the wall. Having the right tools makes the job easier and faster.
Needle-nose Pliers
Needle-nose pliers are essential for gripping small objects. They allow you to grab the plastic anchor firmly. With steady pressure, you can pull the anchor out slowly.
Screwdriver
A screwdriver helps to loosen or twist the anchor. It can also help pry the anchor out gently. Choose a flathead or Phillips screwdriver based on the anchor type.
Utility Knife
A utility knife is useful for cutting around the anchor. You can trim any rough edges on the drywall. This tool helps prepare the area for easy anchor removal.
Putty Knife
Use a putty knife to pry the anchor from the wall. It slides under the anchor’s lip without damaging drywall. It also helps to smooth the surface after removal.
Drill With Small Bit
A drill with a small bit can widen the hole if needed. It helps loosen the anchor stuck deep inside. Use it carefully to avoid making the hole larger.
Identify The Anchor Type
Removing plastic wall anchors from drywall starts with identifying the anchor type. Different anchors require different removal methods. Knowing the type helps avoid damage to the wall. It also saves time and effort.
Plastic Expansion Anchors
These anchors expand inside the wall when a screw is inserted. They are common in light-duty applications. Check if the anchor has a wide flange and a hollow body. These features help hold it tightly in place.
Self-drilling Anchors
Also called threaded anchors, they have sharp edges to screw into drywall. They look like small plastic screws. Identify them by their pointed tip and screw-like threads. They often stay in the wall even after screw removal.
Toggle Or Molly Anchors
Toggle anchors have metal or plastic wings that open inside the wall. Molly anchors are similar but have a sleeve that expands. These anchors are bulkier than simple plastic ones. Their shape allows stronger holding power in drywall.
Look For Anchor Size And Shape
Measure the anchor’s length and diameter. Note its shape—round, ribbed, or flanged. This information narrows down the type. It also guides the correct removal method to use.
Prepare The Area
Clear the wall around the anchor to avoid damage. Gather tools like pliers and a screwdriver before starting. Ensure the area is well-lit for better visibility.
Clear The Surrounding Area
Start by removing items near the anchor. Clear shelves and countertops to avoid damage. This space makes the removal process easier and safer. It also stops dust or debris from settling on your belongings.
Gather Necessary Tools
Collect tools like a screwdriver, pliers, and a putty knife. Have a small container ready for removed anchors. Proper tools speed up the work and reduce wall damage. Keep everything within reach before starting.
Protect The Floor And Furniture
Place a drop cloth or old towel below the work area. Cover nearby furniture with plastic sheets. This protection catches falling debris and dust. It saves cleanup time after the job is done.
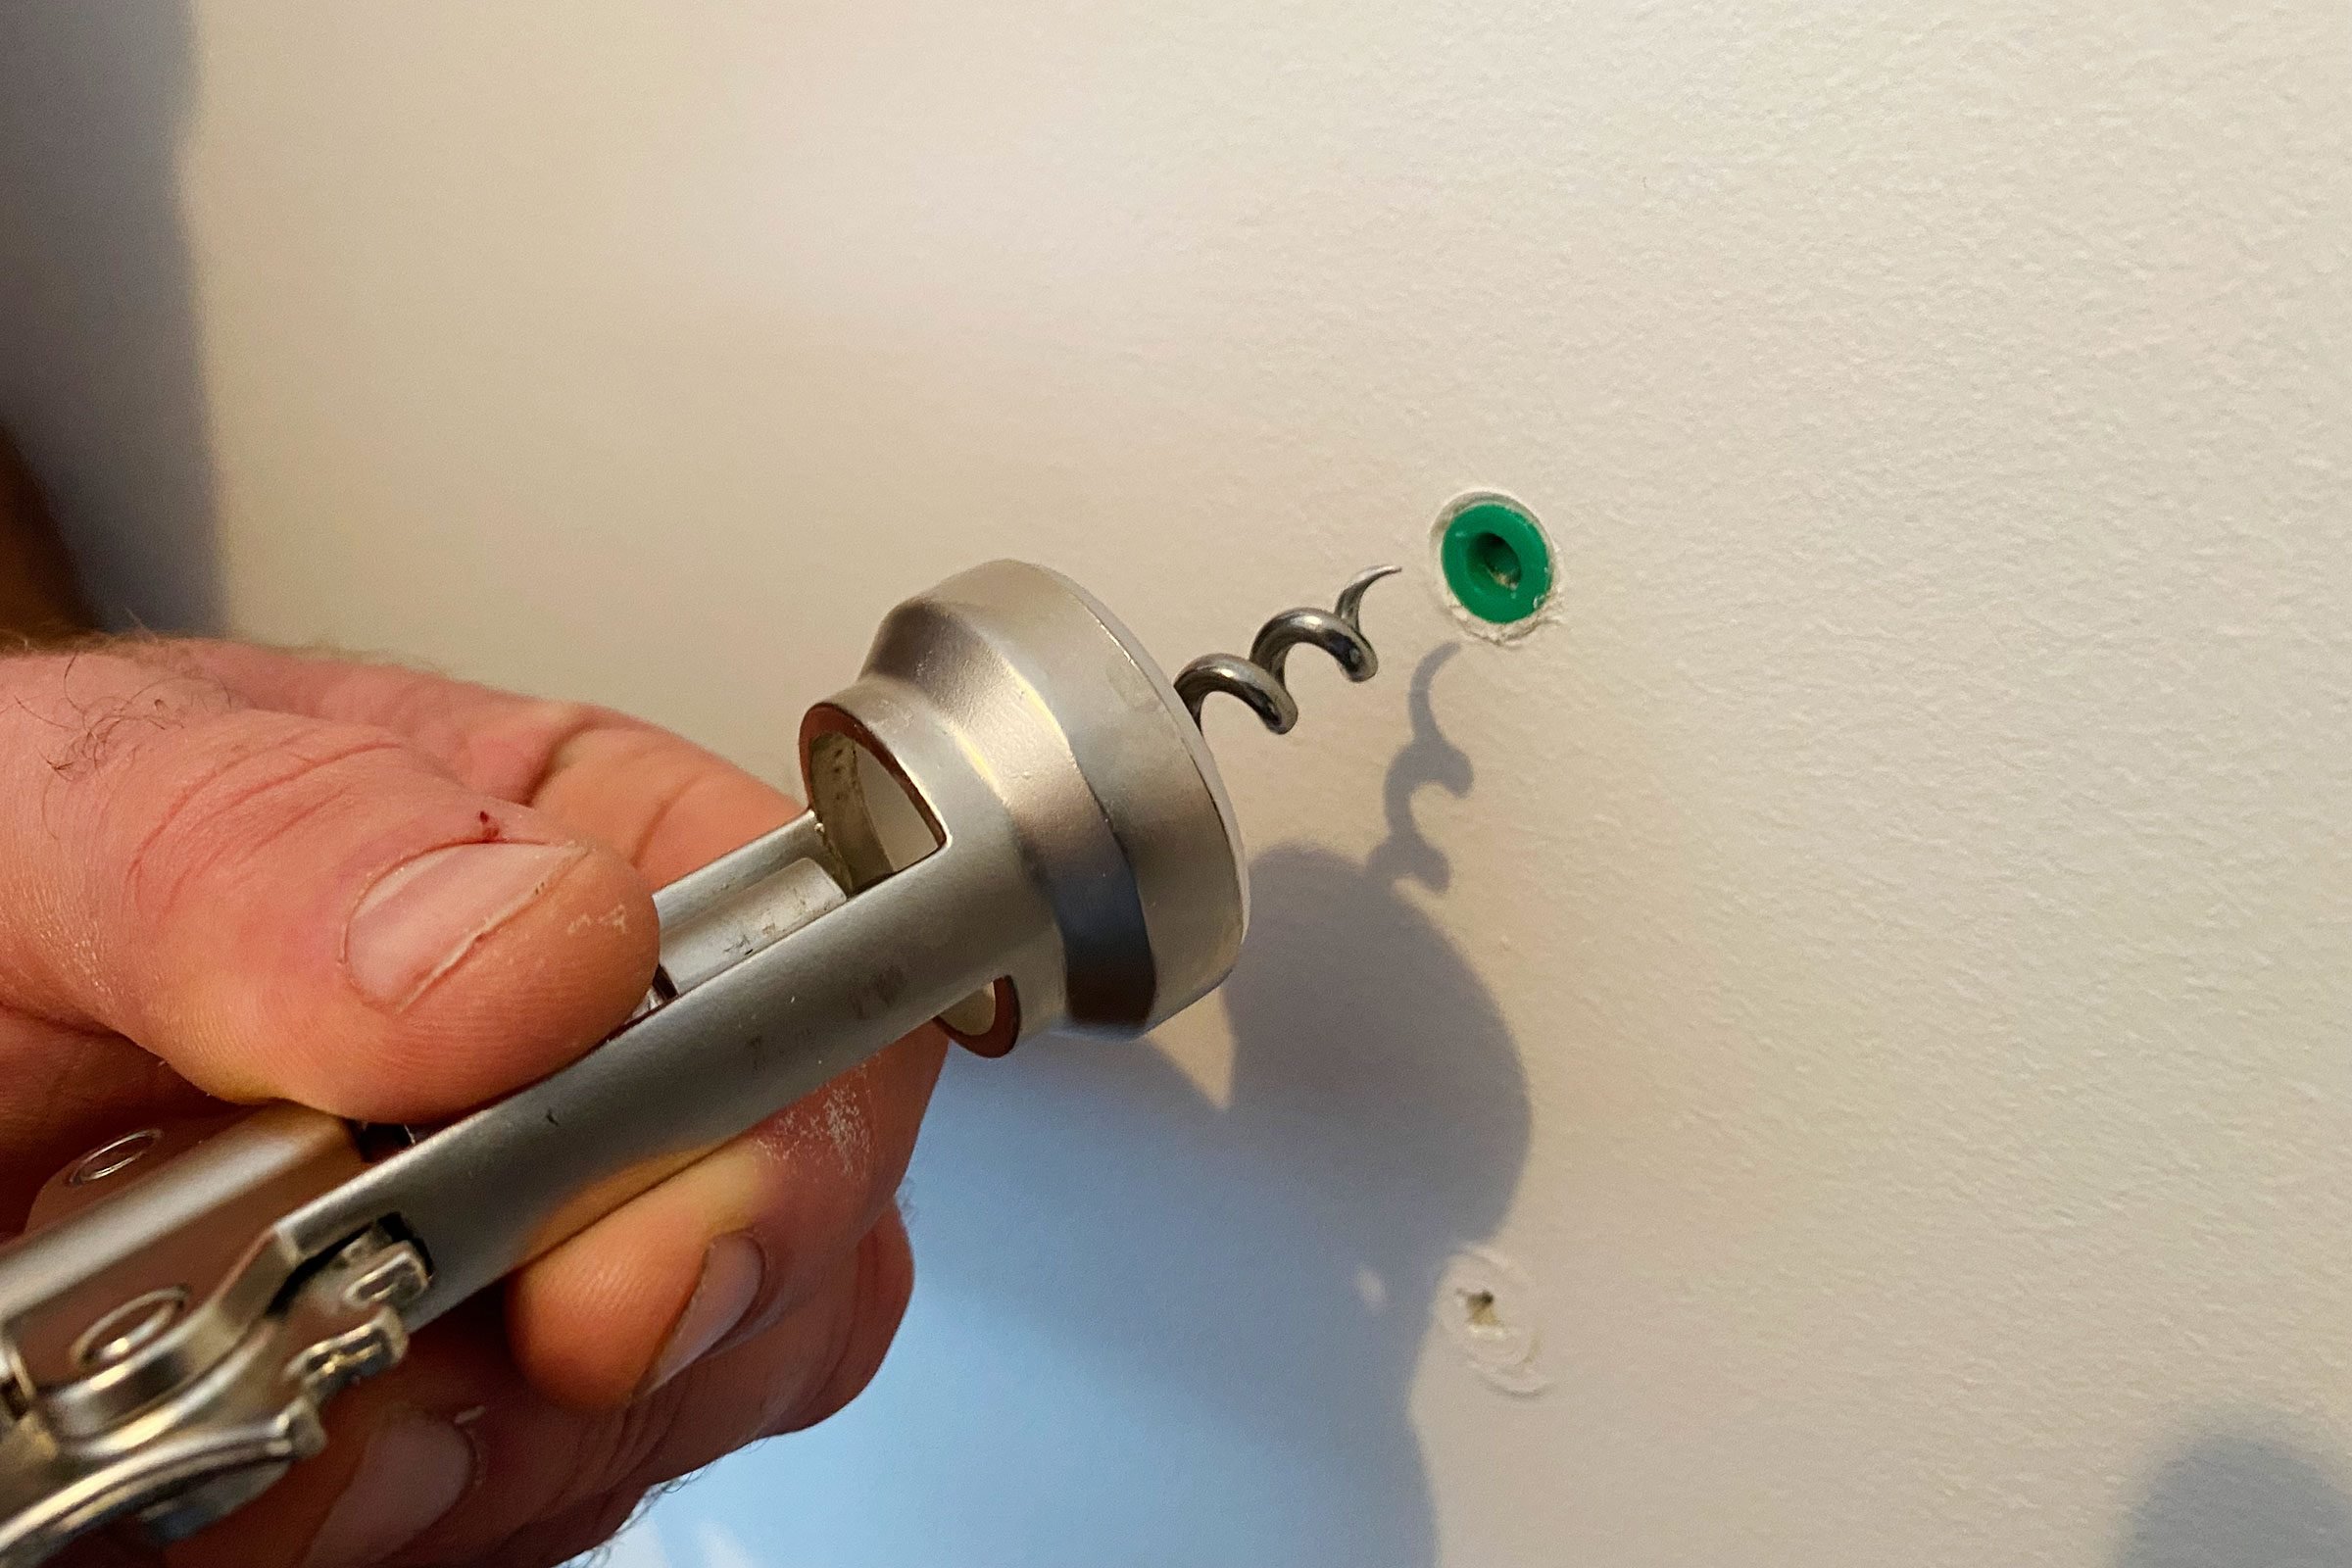
Remove With Pliers
Removing plastic wall anchors from drywall can be tricky. Pliers offer a simple way to pull them out. This method requires little skill and basic tools.
Using pliers helps avoid damage to the wall. It works best if the anchor sticks out slightly. Grab the anchor firmly and pull slowly. Steady pressure helps remove it cleanly.
Choose The Right Pliers
Select needle-nose or slip-joint pliers. These types give a good grip on small anchors. Avoid using pliers that are too big or slippery.
Grip The Anchor Firmly
Hold the anchor near the drywall surface. Squeeze the pliers tightly but gently. A firm grip prevents the anchor from breaking.
Pull The Anchor Straight Out
Pull the anchor slowly and steadily. Pulling straight out reduces wall damage. Avoid twisting or jerking movements.
Fill The Hole After Removal
Once the anchor is out, fill the hole with spackle. Smooth the surface with a putty knife. Let it dry before painting or hanging new items.
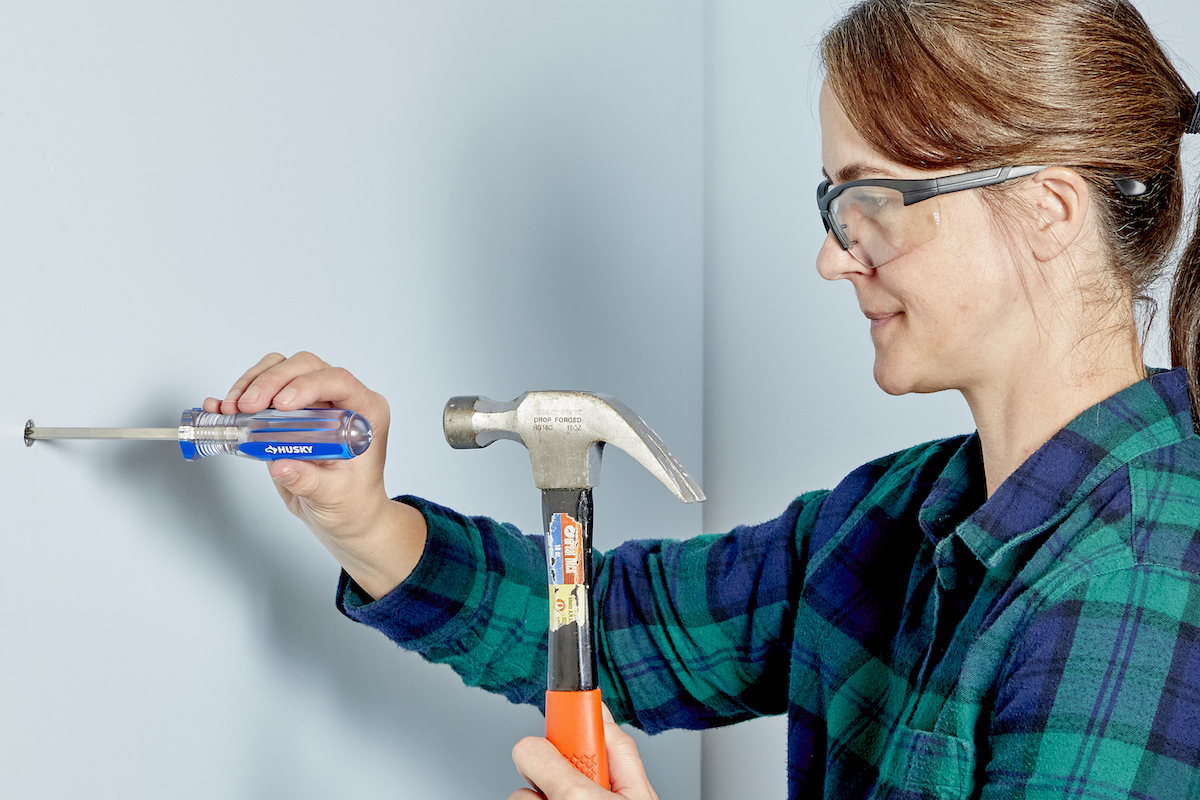
Use A Screwdriver Method
The screwdriver method is a simple way to remove plastic wall anchors from drywall. It uses common tools and basic steps anyone can follow. This method causes little damage to the wall and keeps the area clean.
Start by choosing the right screwdriver. A flathead screwdriver works best for most anchors. The goal is to pull the anchor out without breaking the drywall.
Insert The Screwdriver Into The Anchor
First, place the flathead screwdriver into the center of the plastic anchor. Push it gently so it fits snugly. This grip helps you pull the anchor out straight.
Twist And Pull The Anchor Out
Turn the screwdriver slowly to loosen the anchor from the wall. Pull the screwdriver back while twisting. The anchor should slide out with the screwdriver.
Fill The Hole After Removal
After removing the anchor, a small hole remains in the drywall. Use wall filler or spackle to fill the hole. Smooth the surface with a putty knife. Let it dry, then sand for a clean finish.
Try The Push-in Technique
The push-in technique is a simple and effective way to remove plastic wall anchors from drywall. This method works best for anchors that are flush with the wall surface. It avoids damage to the drywall and saves time.
Using the push-in technique, you apply steady pressure to push the anchor into the wall cavity. The anchor then falls inside the wall, leaving a small hole. You can fill this hole easily later. This technique is less messy than pulling or drilling out the anchor.
Tools Needed For The Push-in Technique
You need a screwdriver or a blunt object like a wooden dowel. A hammer or mallet helps to push the anchor gently. No special tools required. Just simple household items.
How To Position The Tool Correctly
Place the screwdriver or dowel tip in the center of the anchor. Hold it steady and straight to avoid wall damage. Keep your hand firm and ready to push.
Applying Pressure To Push The Anchor In
Tap the tool gently with a hammer or mallet. Push the anchor slowly and steadily into the wall. Do not use too much force to prevent drywall cracks.
Fixing The Hole Left Behind
The anchor leaves a small hole after removal. Use spackle or wall filler to cover the hole. Smooth it with a putty knife. Let it dry and sand lightly for a clean finish.
Patch And Repair Holes
After removing plastic wall anchors, small holes remain in the drywall. These holes need to be patched and repaired for a smooth finish. Repairing these holes restores the wall’s look and makes it ready for painting or decoration. The process is simple and requires just a few tools and materials.
Clean The Hole
Start by cleaning the hole carefully. Remove any dust, loose drywall, or debris. Use a small brush or a vacuum to clear the area. This step helps the spackle stick better to the wall.
Apply Spackle
Use a putty knife to apply spackle or joint compound. Press it firmly into the hole to fill it completely. Smooth the surface to make it even with the surrounding wall. Let the spackle dry fully, which usually takes a few hours.
Sand And Paint
Once dry, sand the patched area gently with fine sandpaper. Sand until the surface feels smooth and flush with the wall. Clean the dust off before painting. Use matching paint to cover the patch and blend it with the rest of the wall.
Credit: www.bobvila.com
Prevent Future Damage
Removing plastic wall anchors from drywall can sometimes cause damage. Preventing future damage starts with choosing the right anchor and installing it correctly. These steps help keep your walls strong and looking good.
Choose The Right Anchors
Select anchors that match the weight of your item. Light items need small anchors, heavy items need stronger ones. Use drywall anchors only for drywall, not for plaster or brick walls. Using the correct anchor stops the wall from cracking or breaking. Check the anchor size and type before buying.
Proper Installation Tips
Drill a hole that fits the anchor snugly. Too big or too small can weaken the wall. Push the anchor in gently without forcing it. Tighten screws slowly to avoid tearing the drywall. If the anchor feels loose, remove it and try a different size. Proper installation keeps the wall safe and secure.

Credit: www.youtube.com
Frequently Asked Questions
How Do You Safely Remove Plastic Wall Anchors?
To safely remove plastic wall anchors, first unscrew any attached screws. Then, gently pull the anchor using pliers. If it resists, push it through the drywall carefully. Avoid damaging the wall to ensure easy patching afterward.
What Tools Are Needed To Remove Drywall Anchors?
Common tools include pliers, a screwdriver, a utility knife, and a putty knife. These help in unscrewing, pulling, cutting, and smoothing the drywall for repair after anchor removal.
Can I Reuse Plastic Wall Anchors After Removal?
Plastic wall anchors usually lose grip after removal and should not be reused. It’s best to install new anchors to ensure strong, secure wall mounting for safety and durability.
How Do I Repair Drywall After Anchor Removal?
Fill the hole with spackle or joint compound using a putty knife. Let it dry, sand smooth, then repaint. This restores the wall surface and hides anchor damage effectively.
Conclusion
Removing plastic wall anchors from drywall is simple with the right steps. Use basic tools like pliers and a screwdriver. Take your time to avoid damaging the wall. Small holes left behind can be fixed with spackle. This keeps your walls looking clean and smooth.
Now you can hang new items easily or repaint the area. Practice makes the process easier each time. You’ve got this!